
Should You Be a Travel Photographer? What Travel Photography is Really Like - Don't be Fooled by Social Media
/What is Travel Photography?
Travel photography blends many different types of photography into one. You can focus on the people and the lifestyles present in a place or you can capture the landscapes and the natural world. Macro shots or wildlife photography could also be included but involve highly specialized equipment. Be it on the beaches of Bali or the ice fields of Antartica, the job of a travel photographer is to transport the viewer to that place without leaving their home.
My Experience with Travel Photography
I have been traveling the world full time for nearly 4 years. Even before my long-term travels I spent countless months traveling and taking photos. During the last several years of travel I have worked professionally taking real-estate photographs for accommodation, food photography for restaurants, and travel photography for tour companies. My wife and I work as brand ambassadors for a few companies, Six Moon Designs, being our strongest supporter. We garnered product sponsorships from dozens of companies in exchange for photography that they can use for promotional purposes.
Recent Travel Statistics (2016 onwards)
Between the services we receive in exchange for photography, product sponsorships, and royalties earned we are able to reduce our travel costs by more than half. We spend more than 25% of our time staying in boutique lodges and 3, 4, and 5-star hotels free of charge. Additionally we receive countless free meals, tours, and other travel arrangements.
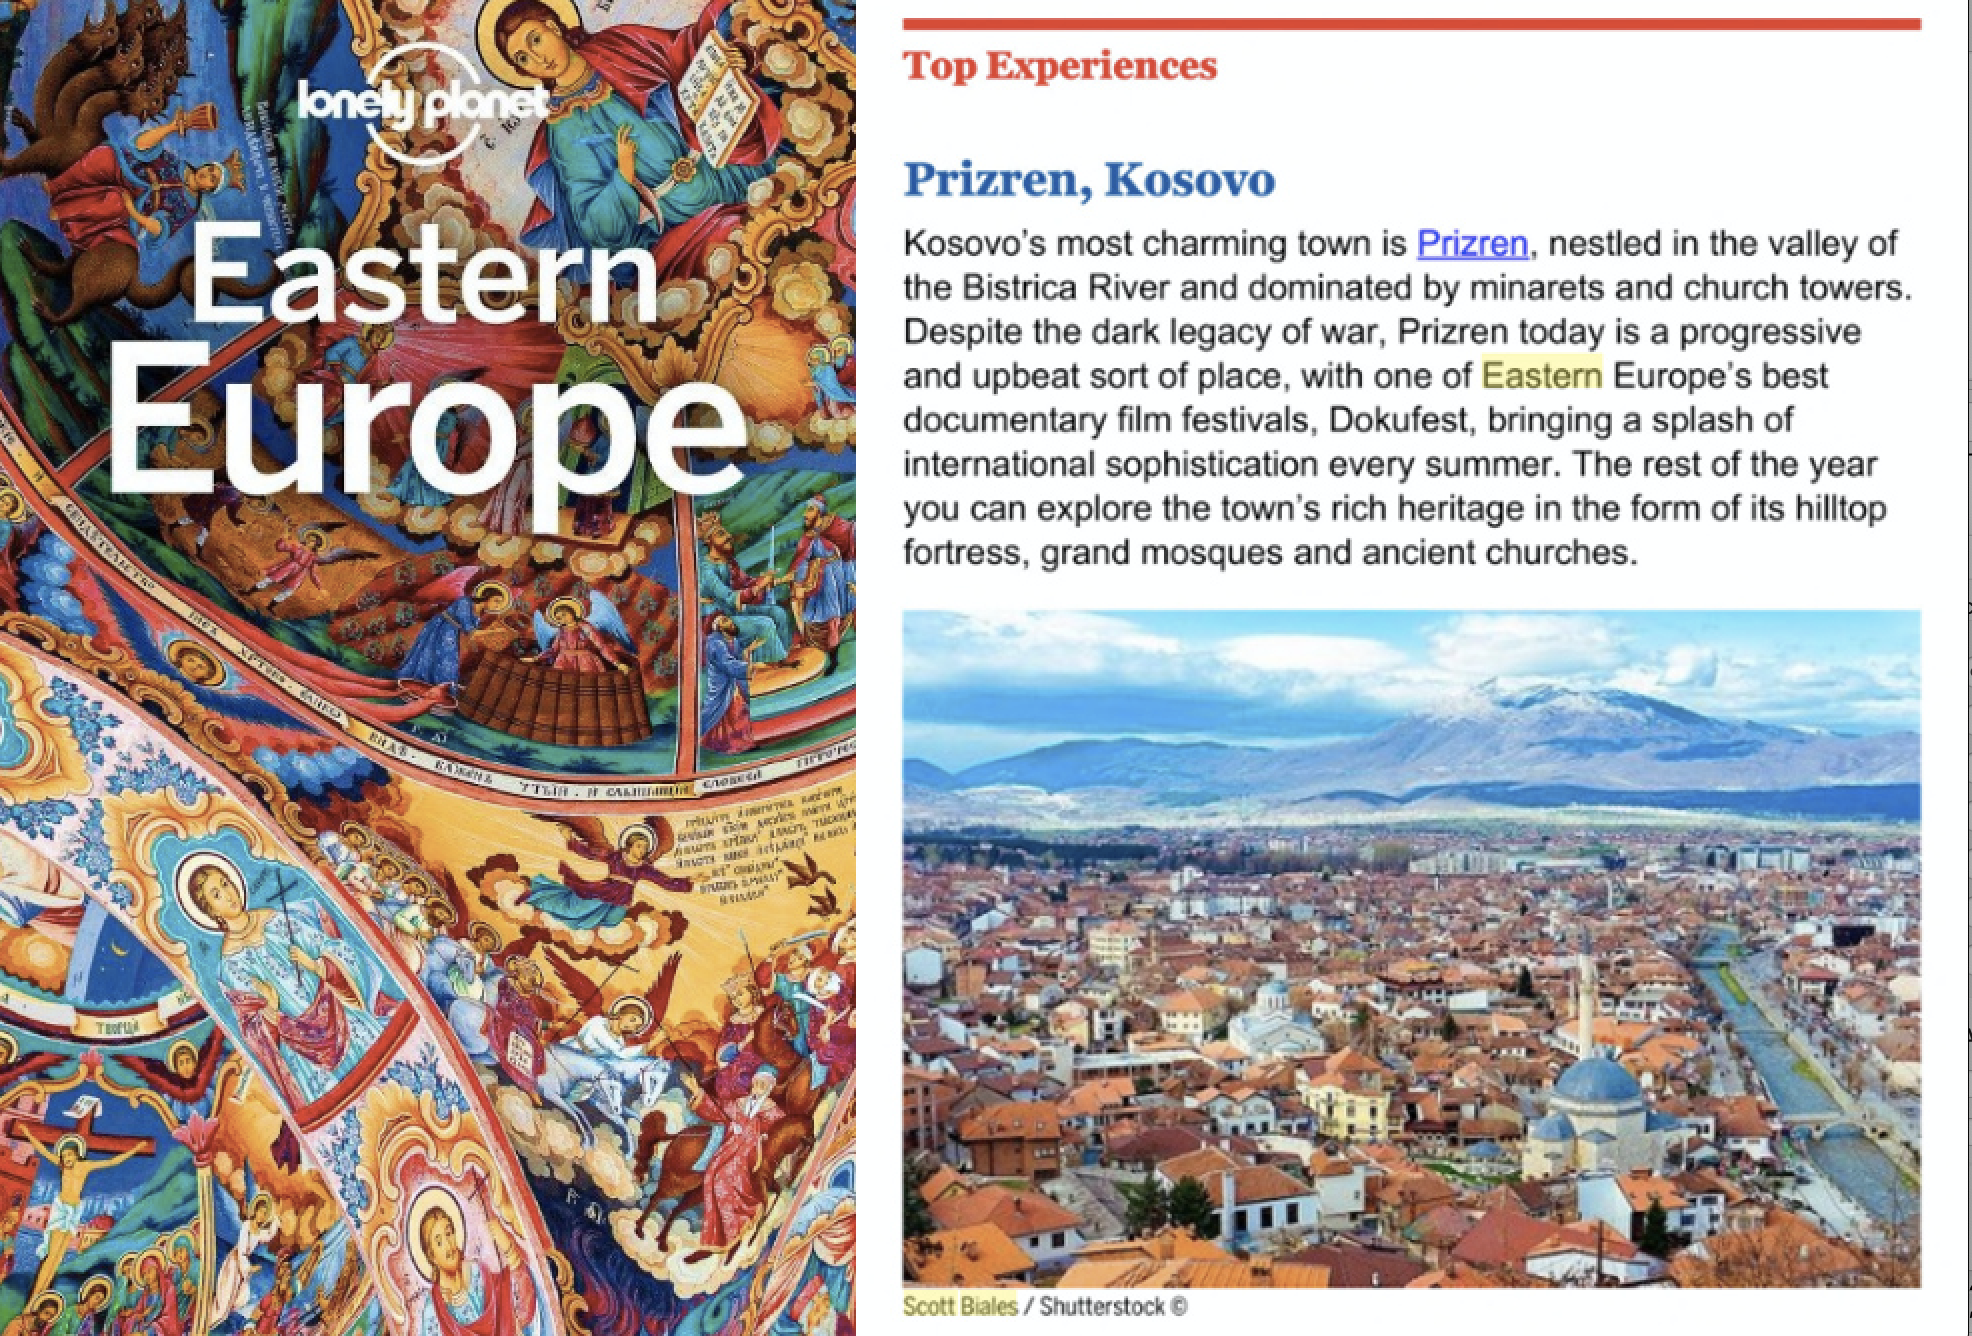
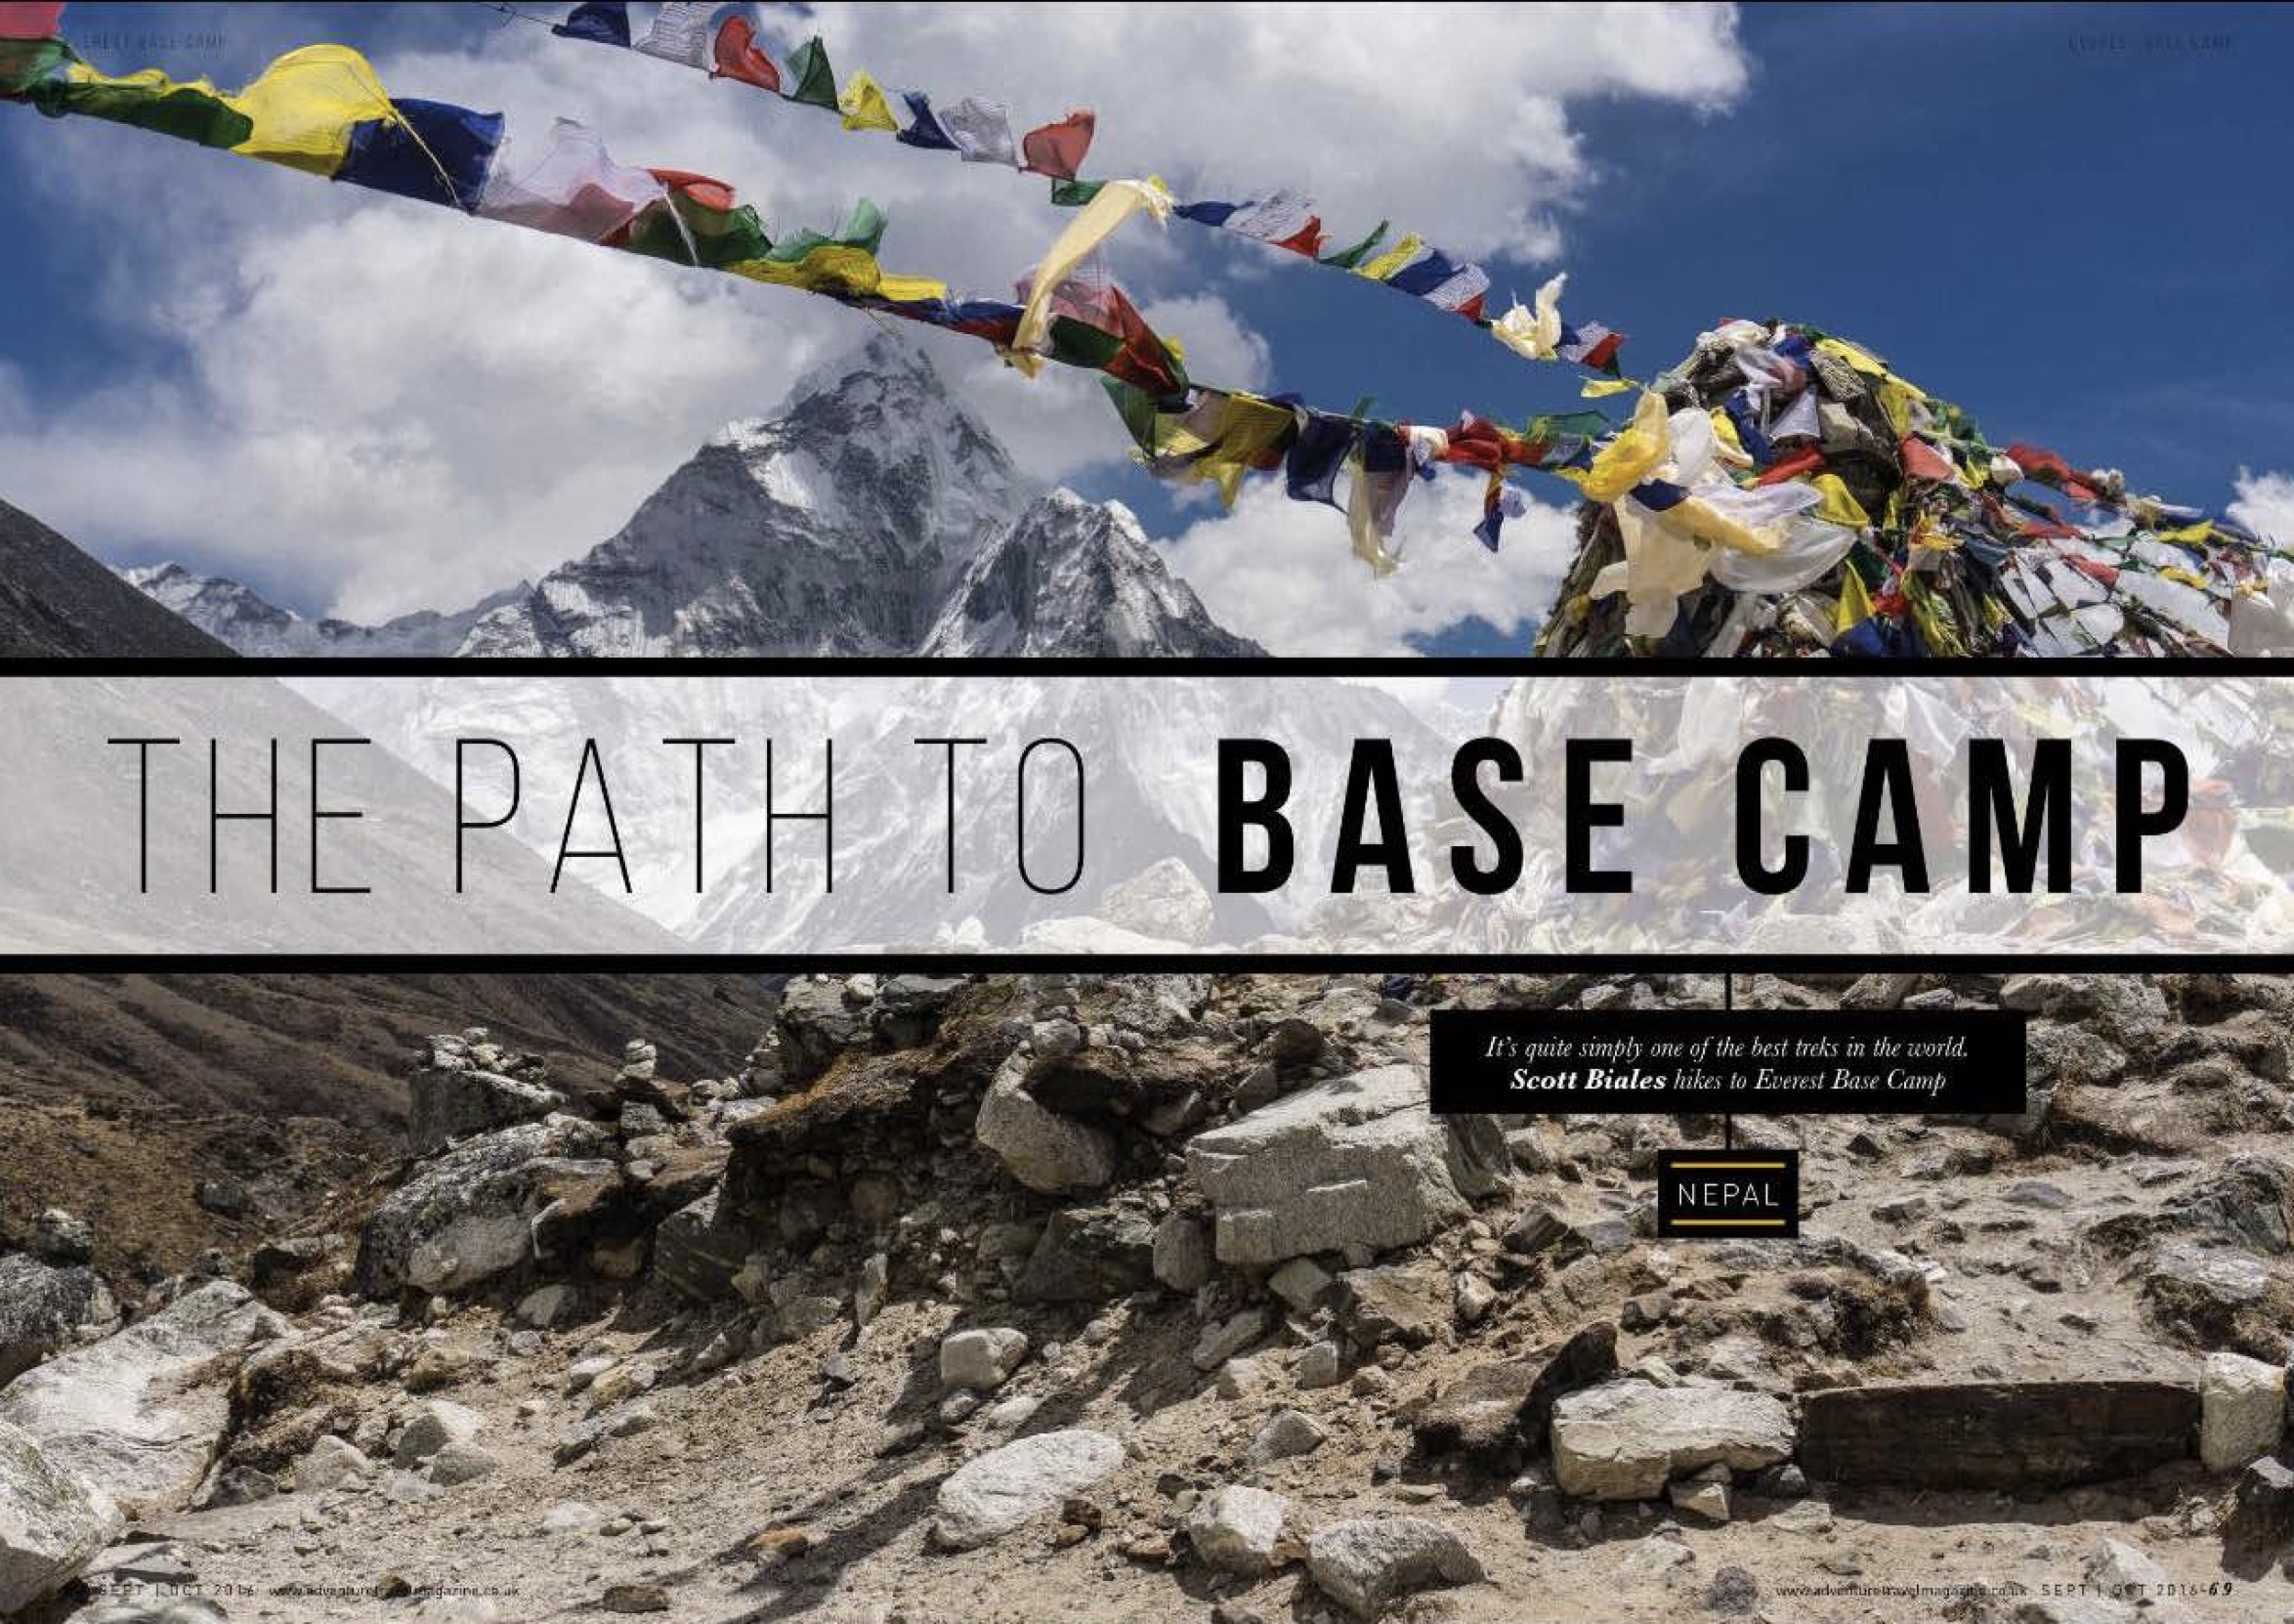
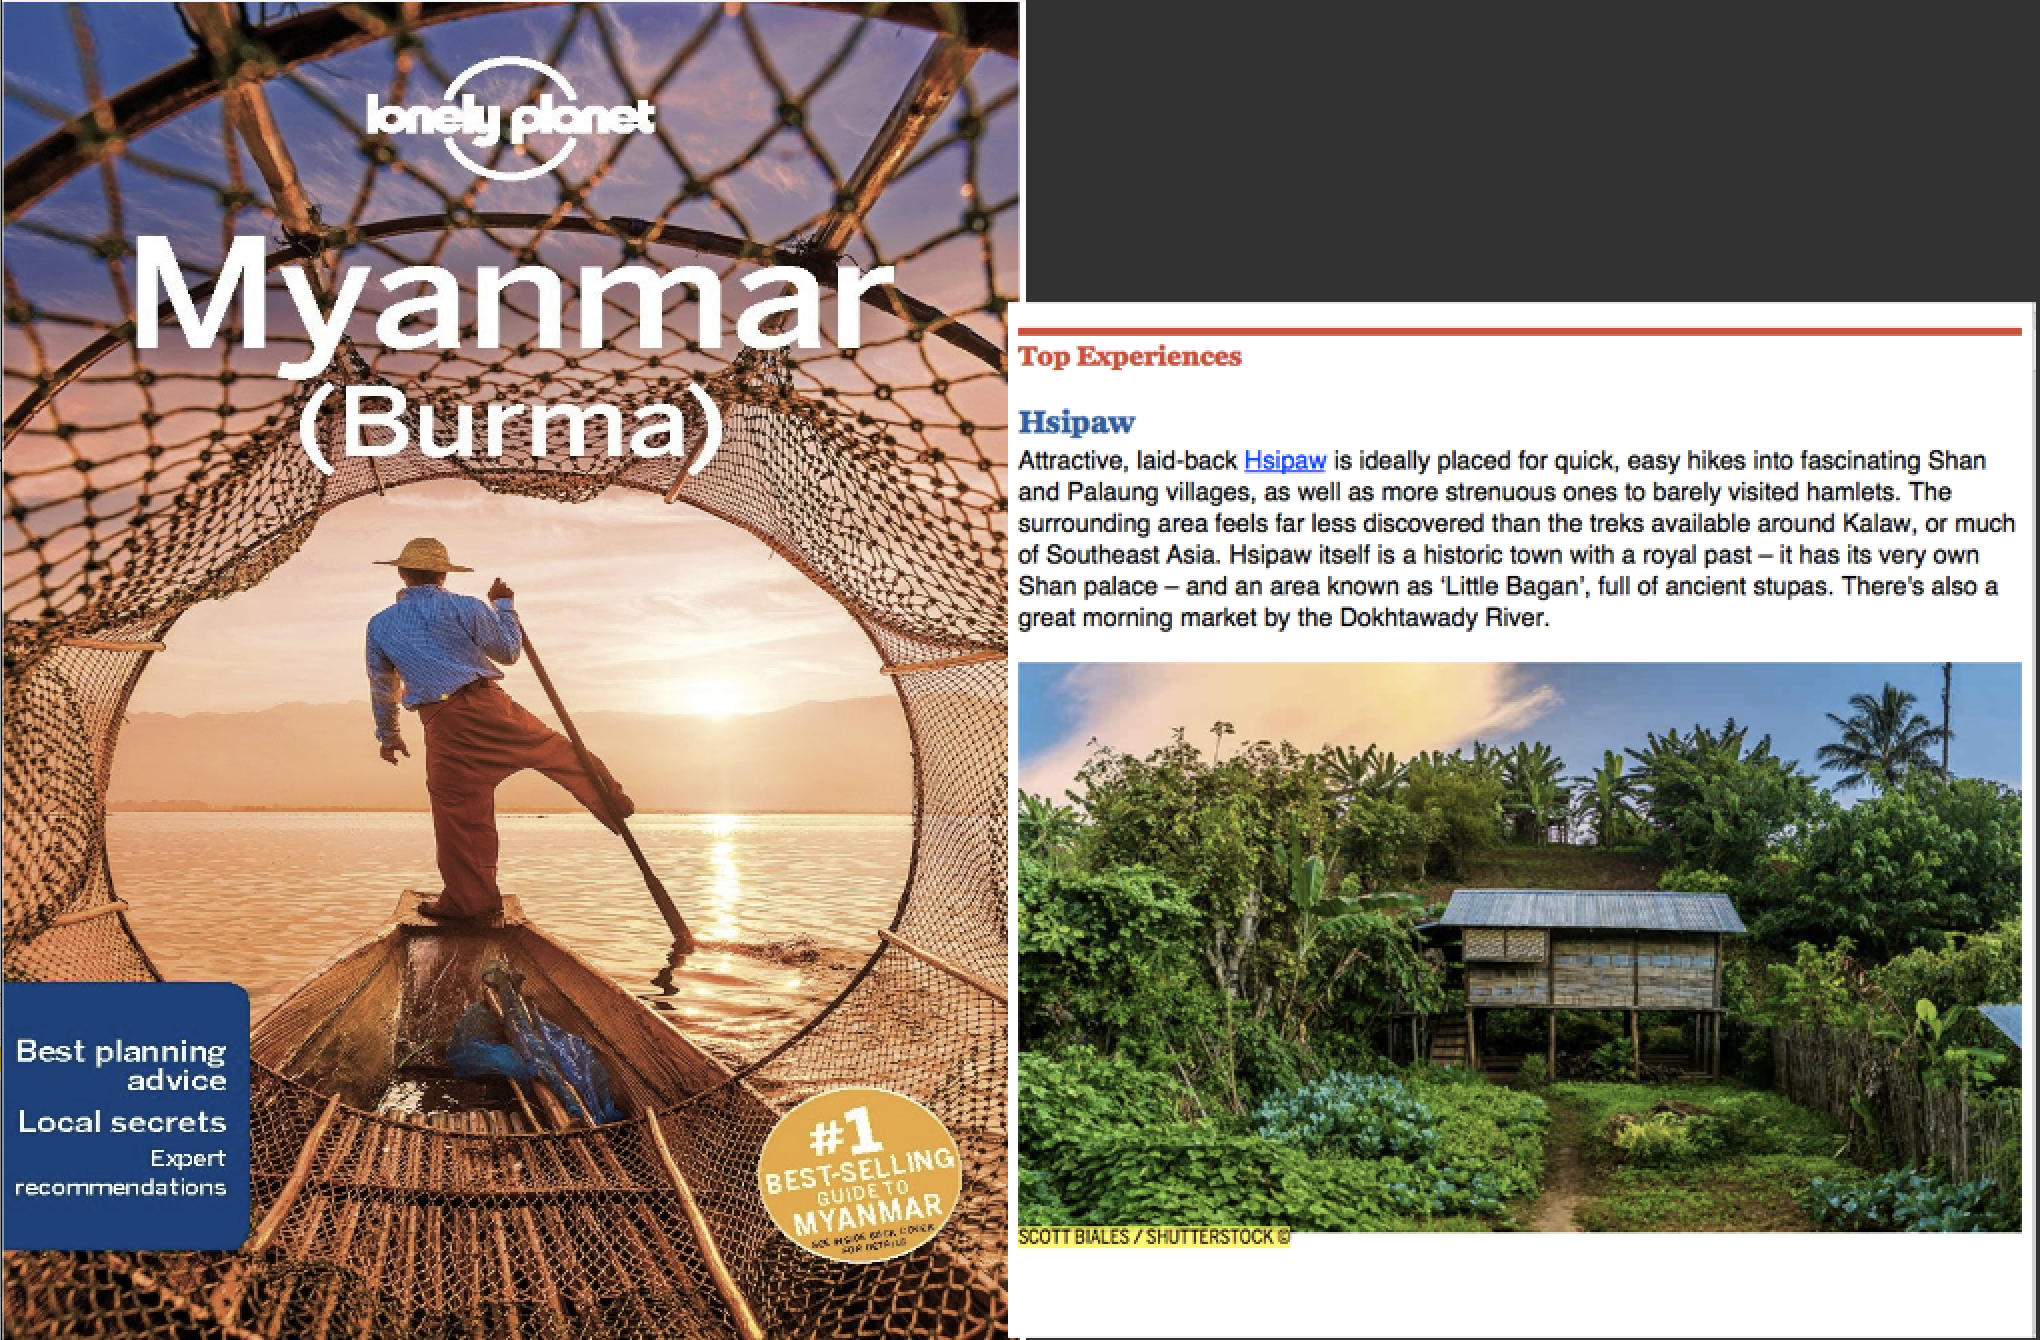
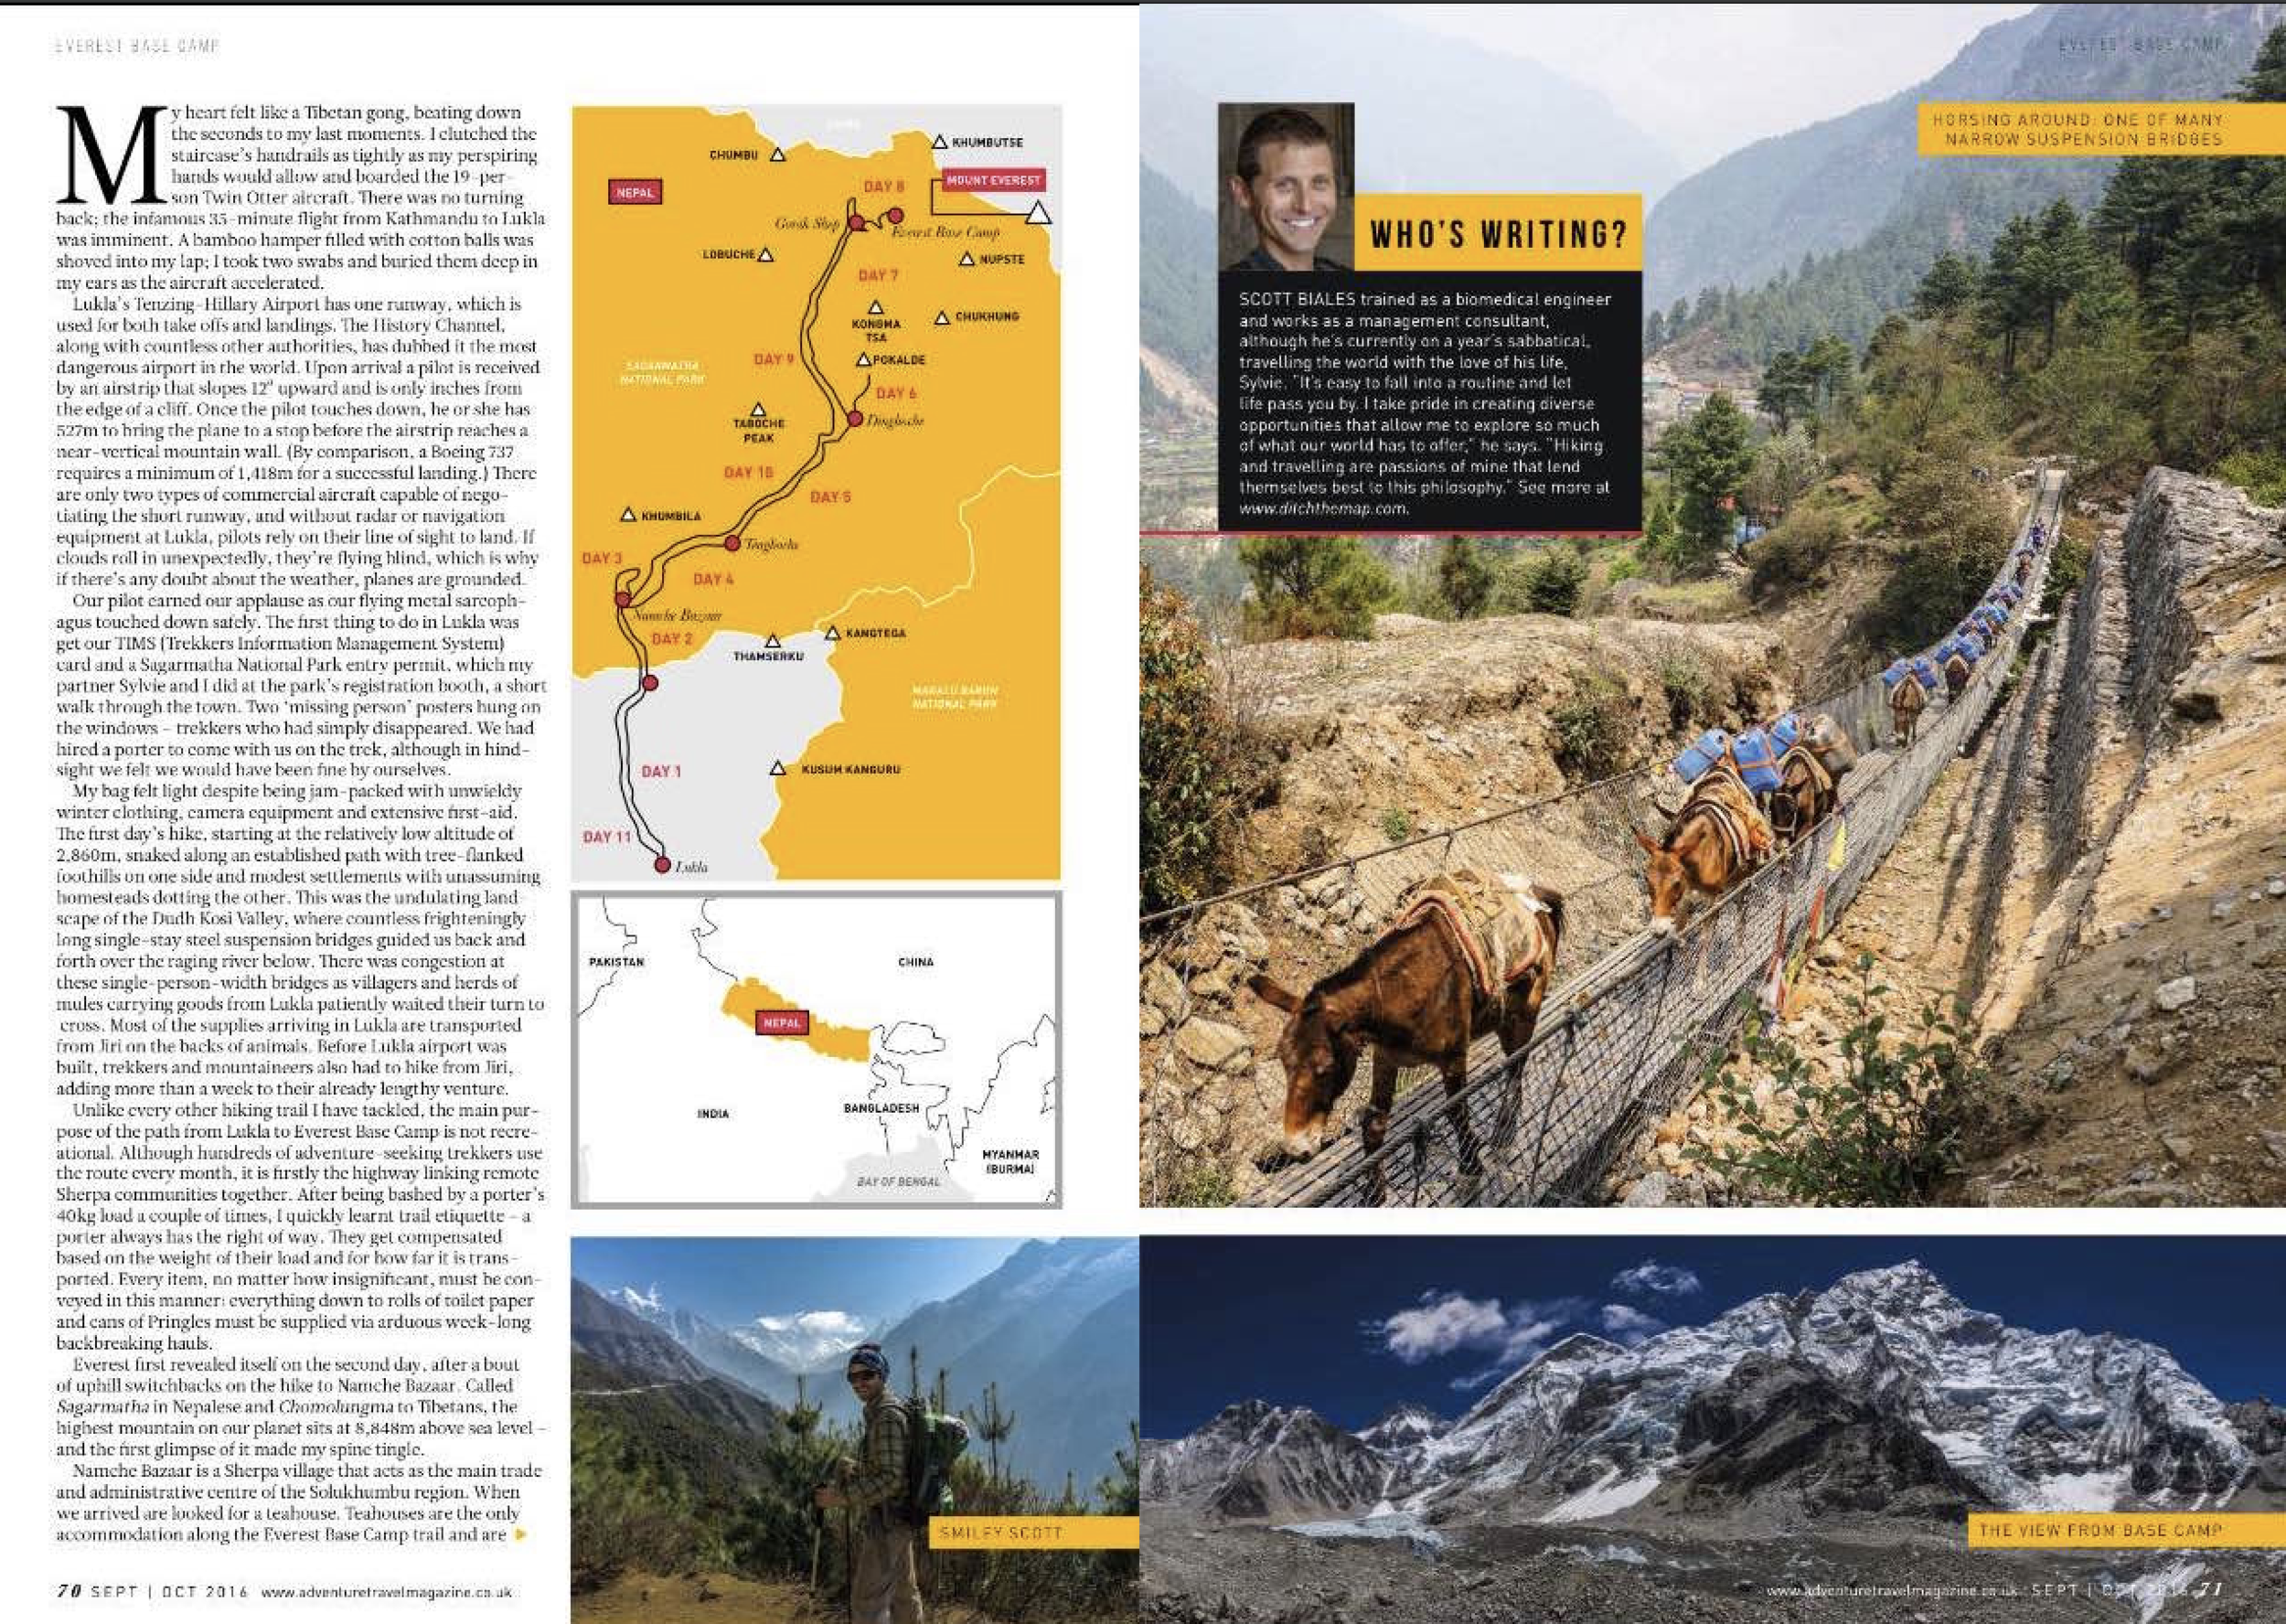
I Have Been Published in Hundreds of Books, Magazines, Newspapers, and Online Sites
My photos have been published in international and regional travel guides like Lonely Planet and Rough Guide along with magazines like Adventure Travel. My work has been used on MSN, Travel and Leisure, Reader’s Digest, along with dozens of other print and online media.
What Makes Travel Photography Unique?
Travel photography is more than just taking some iPhone shots while on vacation. The skills and gear for this type of photography differ then those needed in portrait and wedding/event photography. In portrait photography one has complete control over external light sources and in event photography using a narrow depth of field can make framing your shot much simpler since distracting or non-essential objects can simply be defocused. These are not the case for travel photography.
At a high level travel photography is unique for the various reasons:
Location/Setting: you cannot control the setting (weather, light, clouds, rain, crowds, etc.)
Limited and Inconvenient Times: light is too harsh most of the day so you will be waking up before sunrise or waiting until nighttime for sunset.
Weight Conscience: you will often be hiking to remote areas so low-weight gear is essential…pick/pack your gear very carefully.
Framing: you cannot control your environment (pile of garbage in the foreground, an advertisement on the side of an otherwise beautiful barn, the backside of a fat cow in pasture, etc.), thus you need pay extra attention to everything in your field of view—this gets increasingly harder as you shoot with wider lenses.
Wide Depth of Field (DoF): in landscape photography your goal is a sharp photograph from foreground to background. This requires you pay extra attention to distracting elements everywhere in your shot. A large DoF requires a small aperture [large f-stop] and thus long shutter speed for proper exposure so you will need to travel with a tripod (more about this below).
An Insider Tells you the Truth About Travel Photography
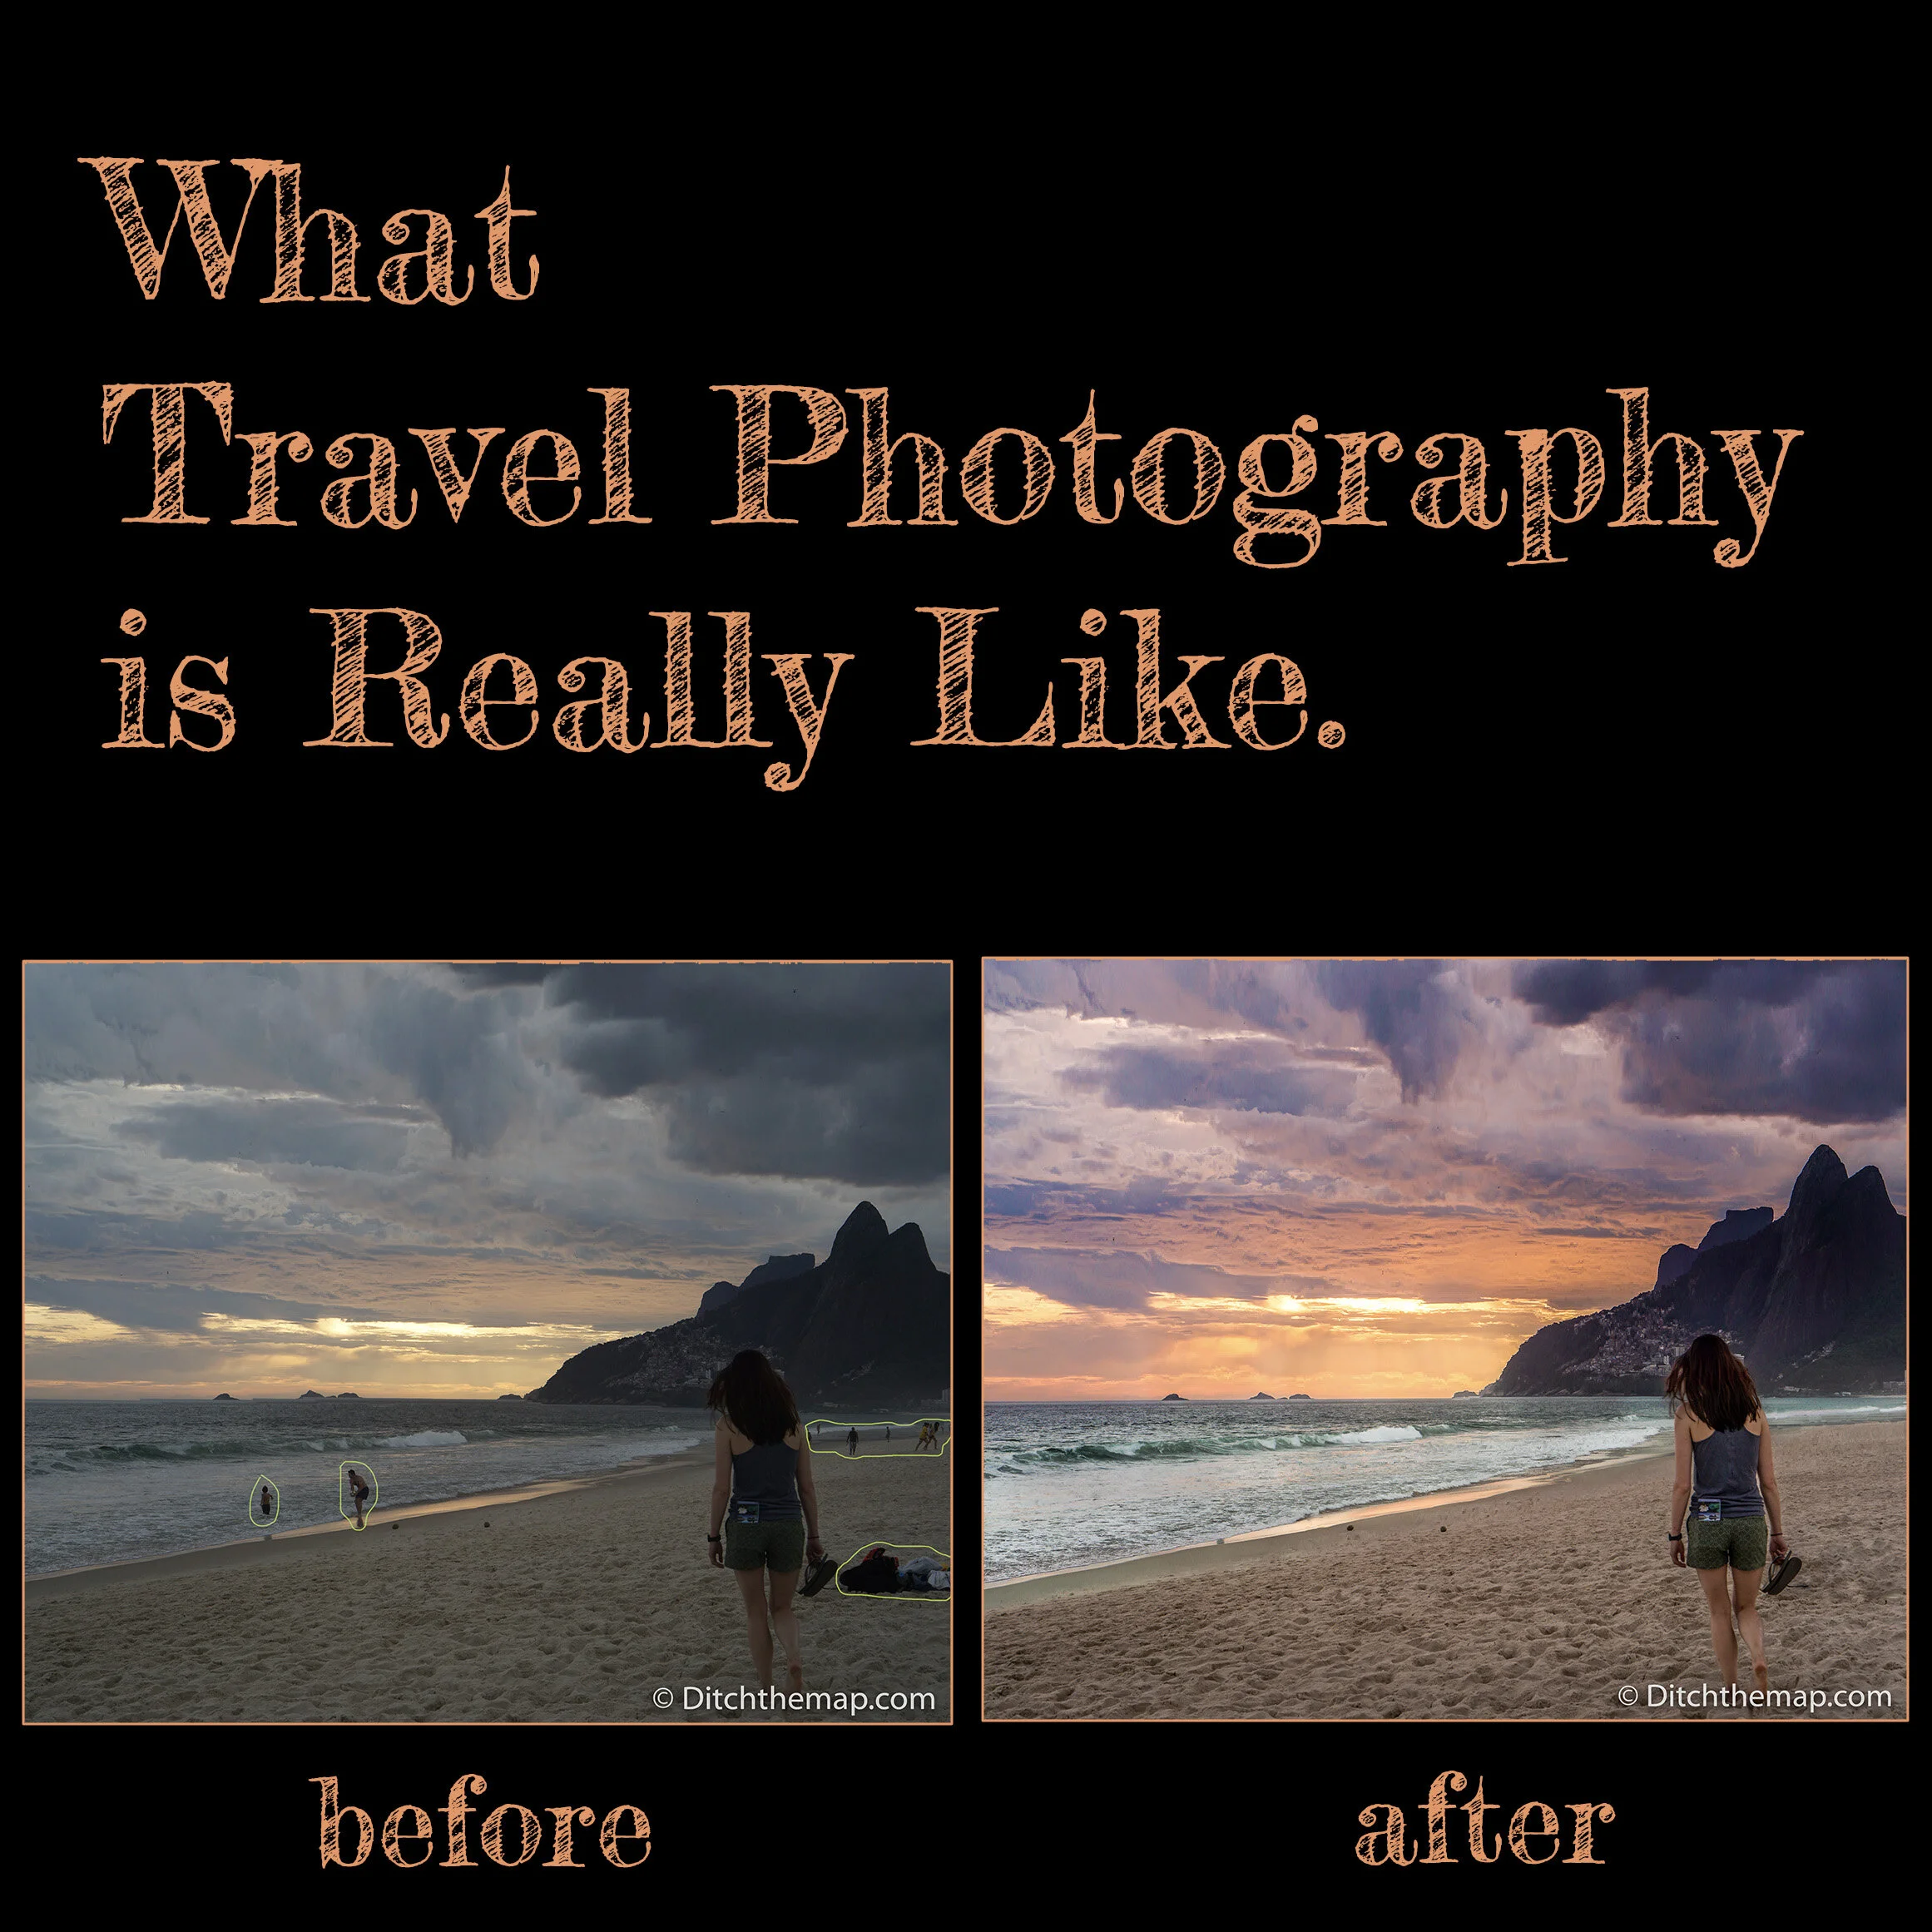
In this section you will learn the pitfalls, hurdles, and secrets used by professional travel photographers and why the photos you see on Instagram, Facebook, and other sources of media are complete fabrications of the truth. In many of these photos I will also include an unedited (or less edited) photograph so that you can see how much they are ‘pushed’ to get to their final state.
Location:
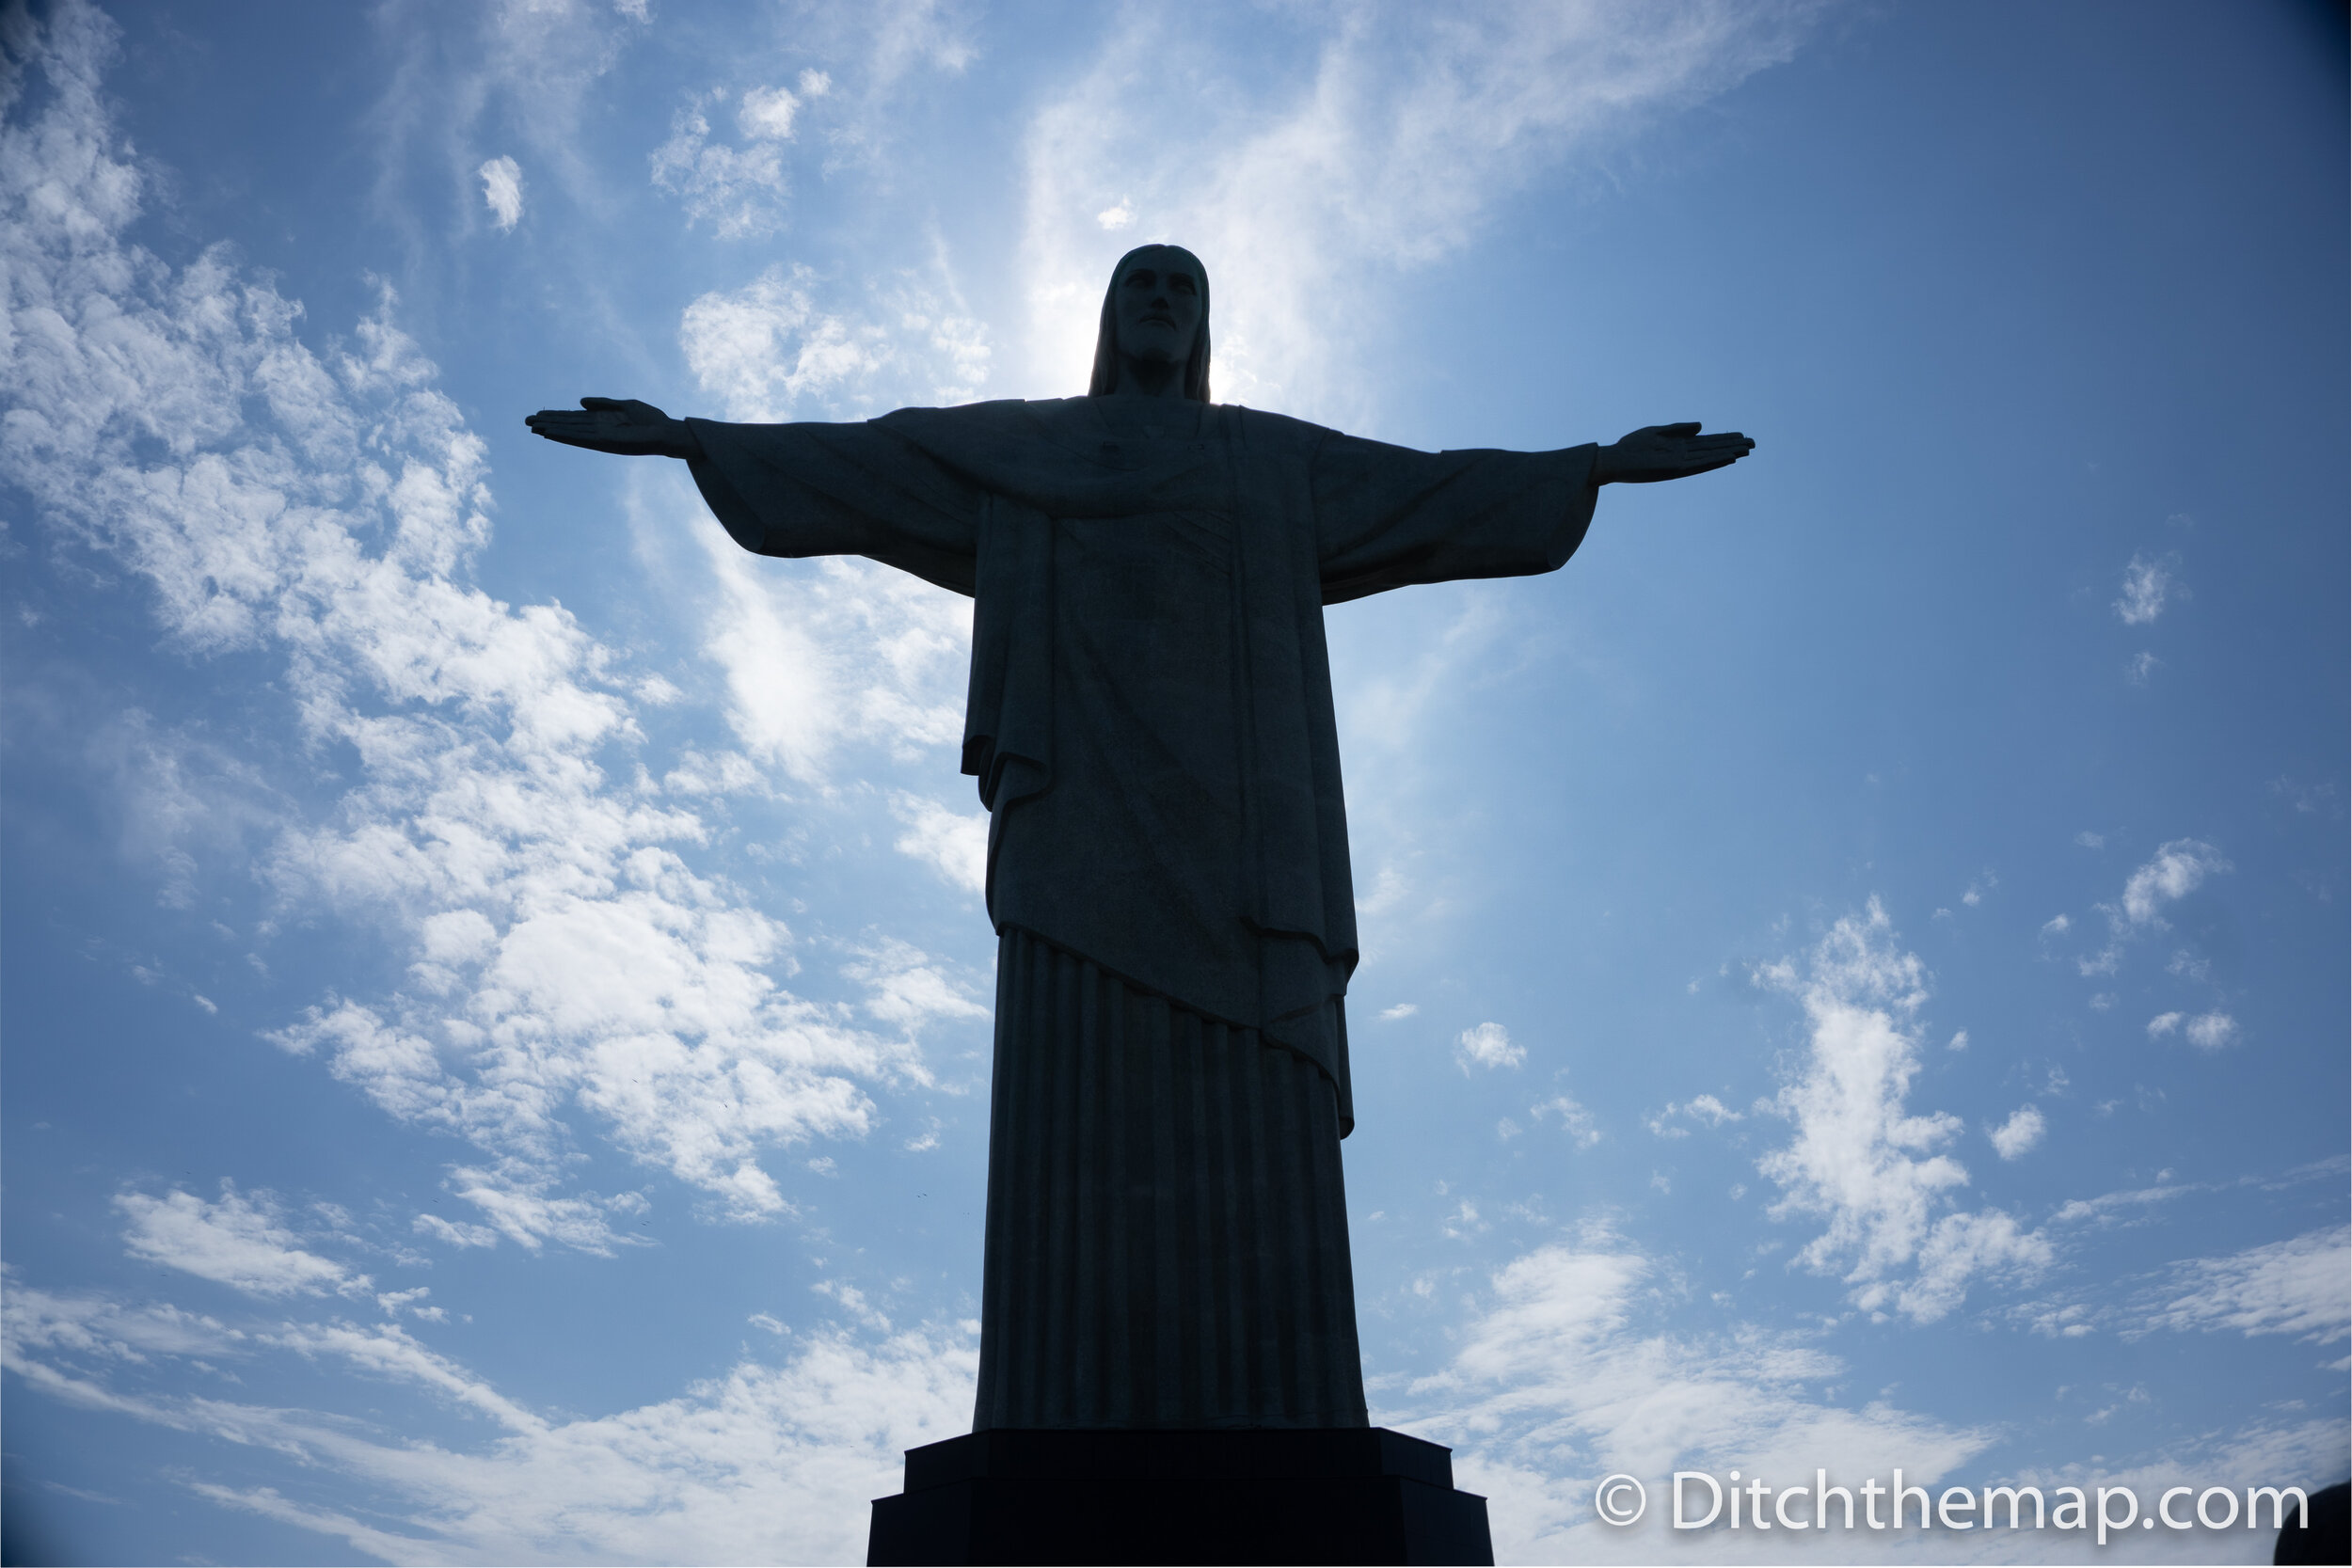
Some of the most beautiful photographs are taken in the hardest to reach places. Are you prepared to fly on a small plane through the Himalayas only to hike 9 days to take a photo of Everest Base Camp? How about Trekking to the southern most ice-field in Chilean Patagonia for a chance to see a double rainbow? Perhaps you are up for a 4 hour speed boat ride in some of the harshest waters to reach a small island just to get a chance to see some blue-footed boobies?
Everest Base Camp, Nepal
Torres del Paine, Patagonia, Chile
Blue Footed Boobies on Isla de la Plata, Ecuador
Timing:
Travel photography does not lend itself to unlimited shooting time. Most outdoor photography is limited to shooting within the Golden Hour, a period of daytime shortly after sunrise or before sunset, during which time daylight is redder and softer than when the sun is higher in the sky. Under direct sunlight where the sun is above head harsh shadows make for unappealing photos.
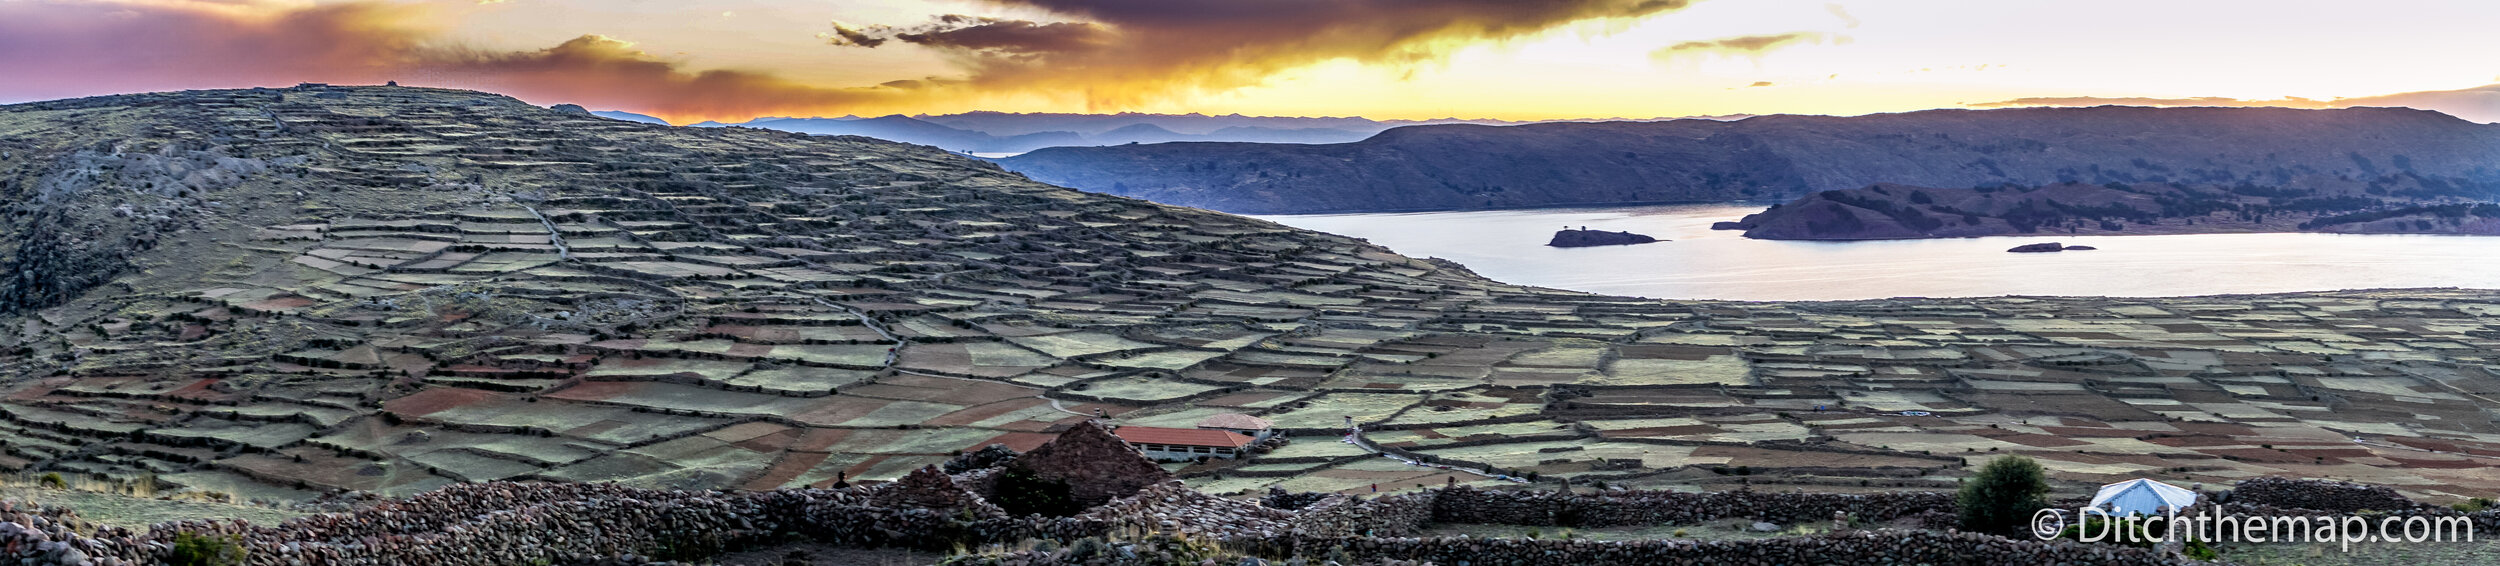
So What Can Be Done? There is a technique called High Dynamic Range (HDR)—you probably have seen this setting on your camera. This setting will cause your camera to take several photos at various exposures allowing you to capture the bright sky and dark shadows, a range that a single photograph cannot capture (note: human eyes are better at capturing these vast lighting differences than any film or printed image). You will then need to use post-processing (Photoshop, Lightroom, etc.) to stack these photos to create 1 flattened image. After stacking you will need to ‘push’ the shadows and highlights ‘adding back’ the missing colors. You can learn more about taking HRD photography here. While HDR can help improve the dynamic range your midday photos are still likely to come out unattractive and overly harsh.

Numerous photos taken at different exposures using the HDR setting on a digital camera
The following photos were taken using the HDR technique. Notice how the dark shadows are made lighter and the bright clouds are made darker.

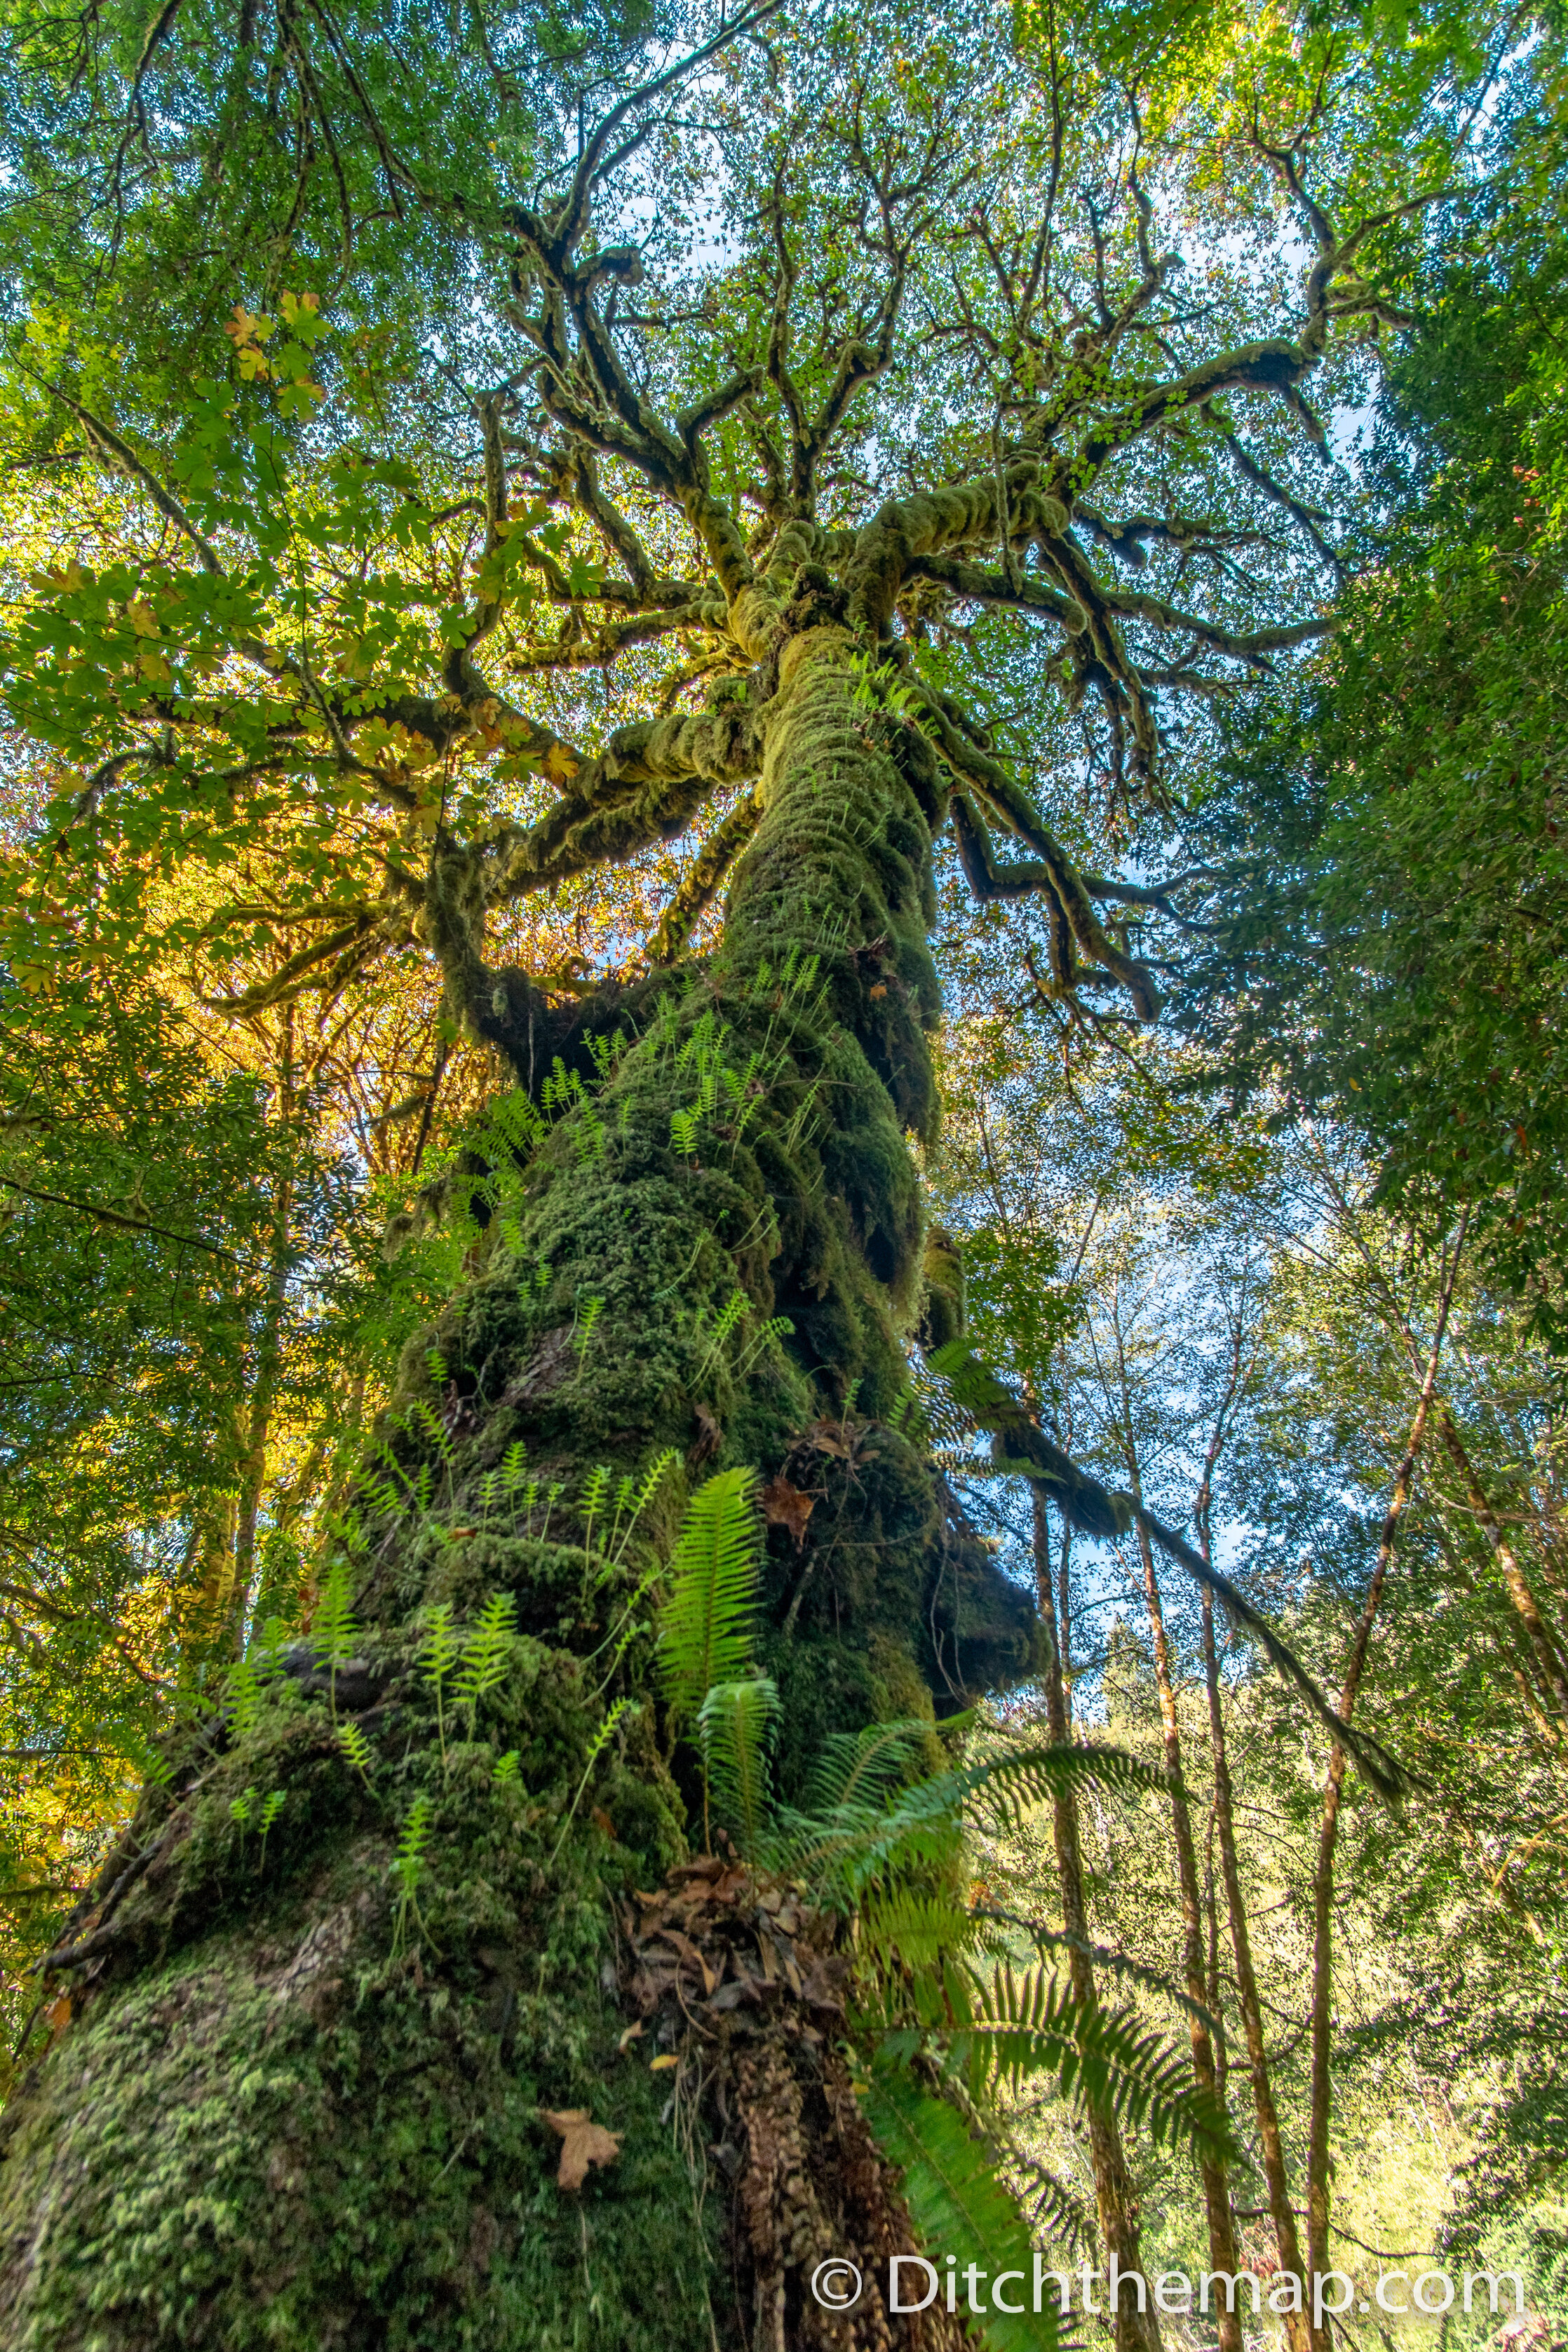
Perspective:
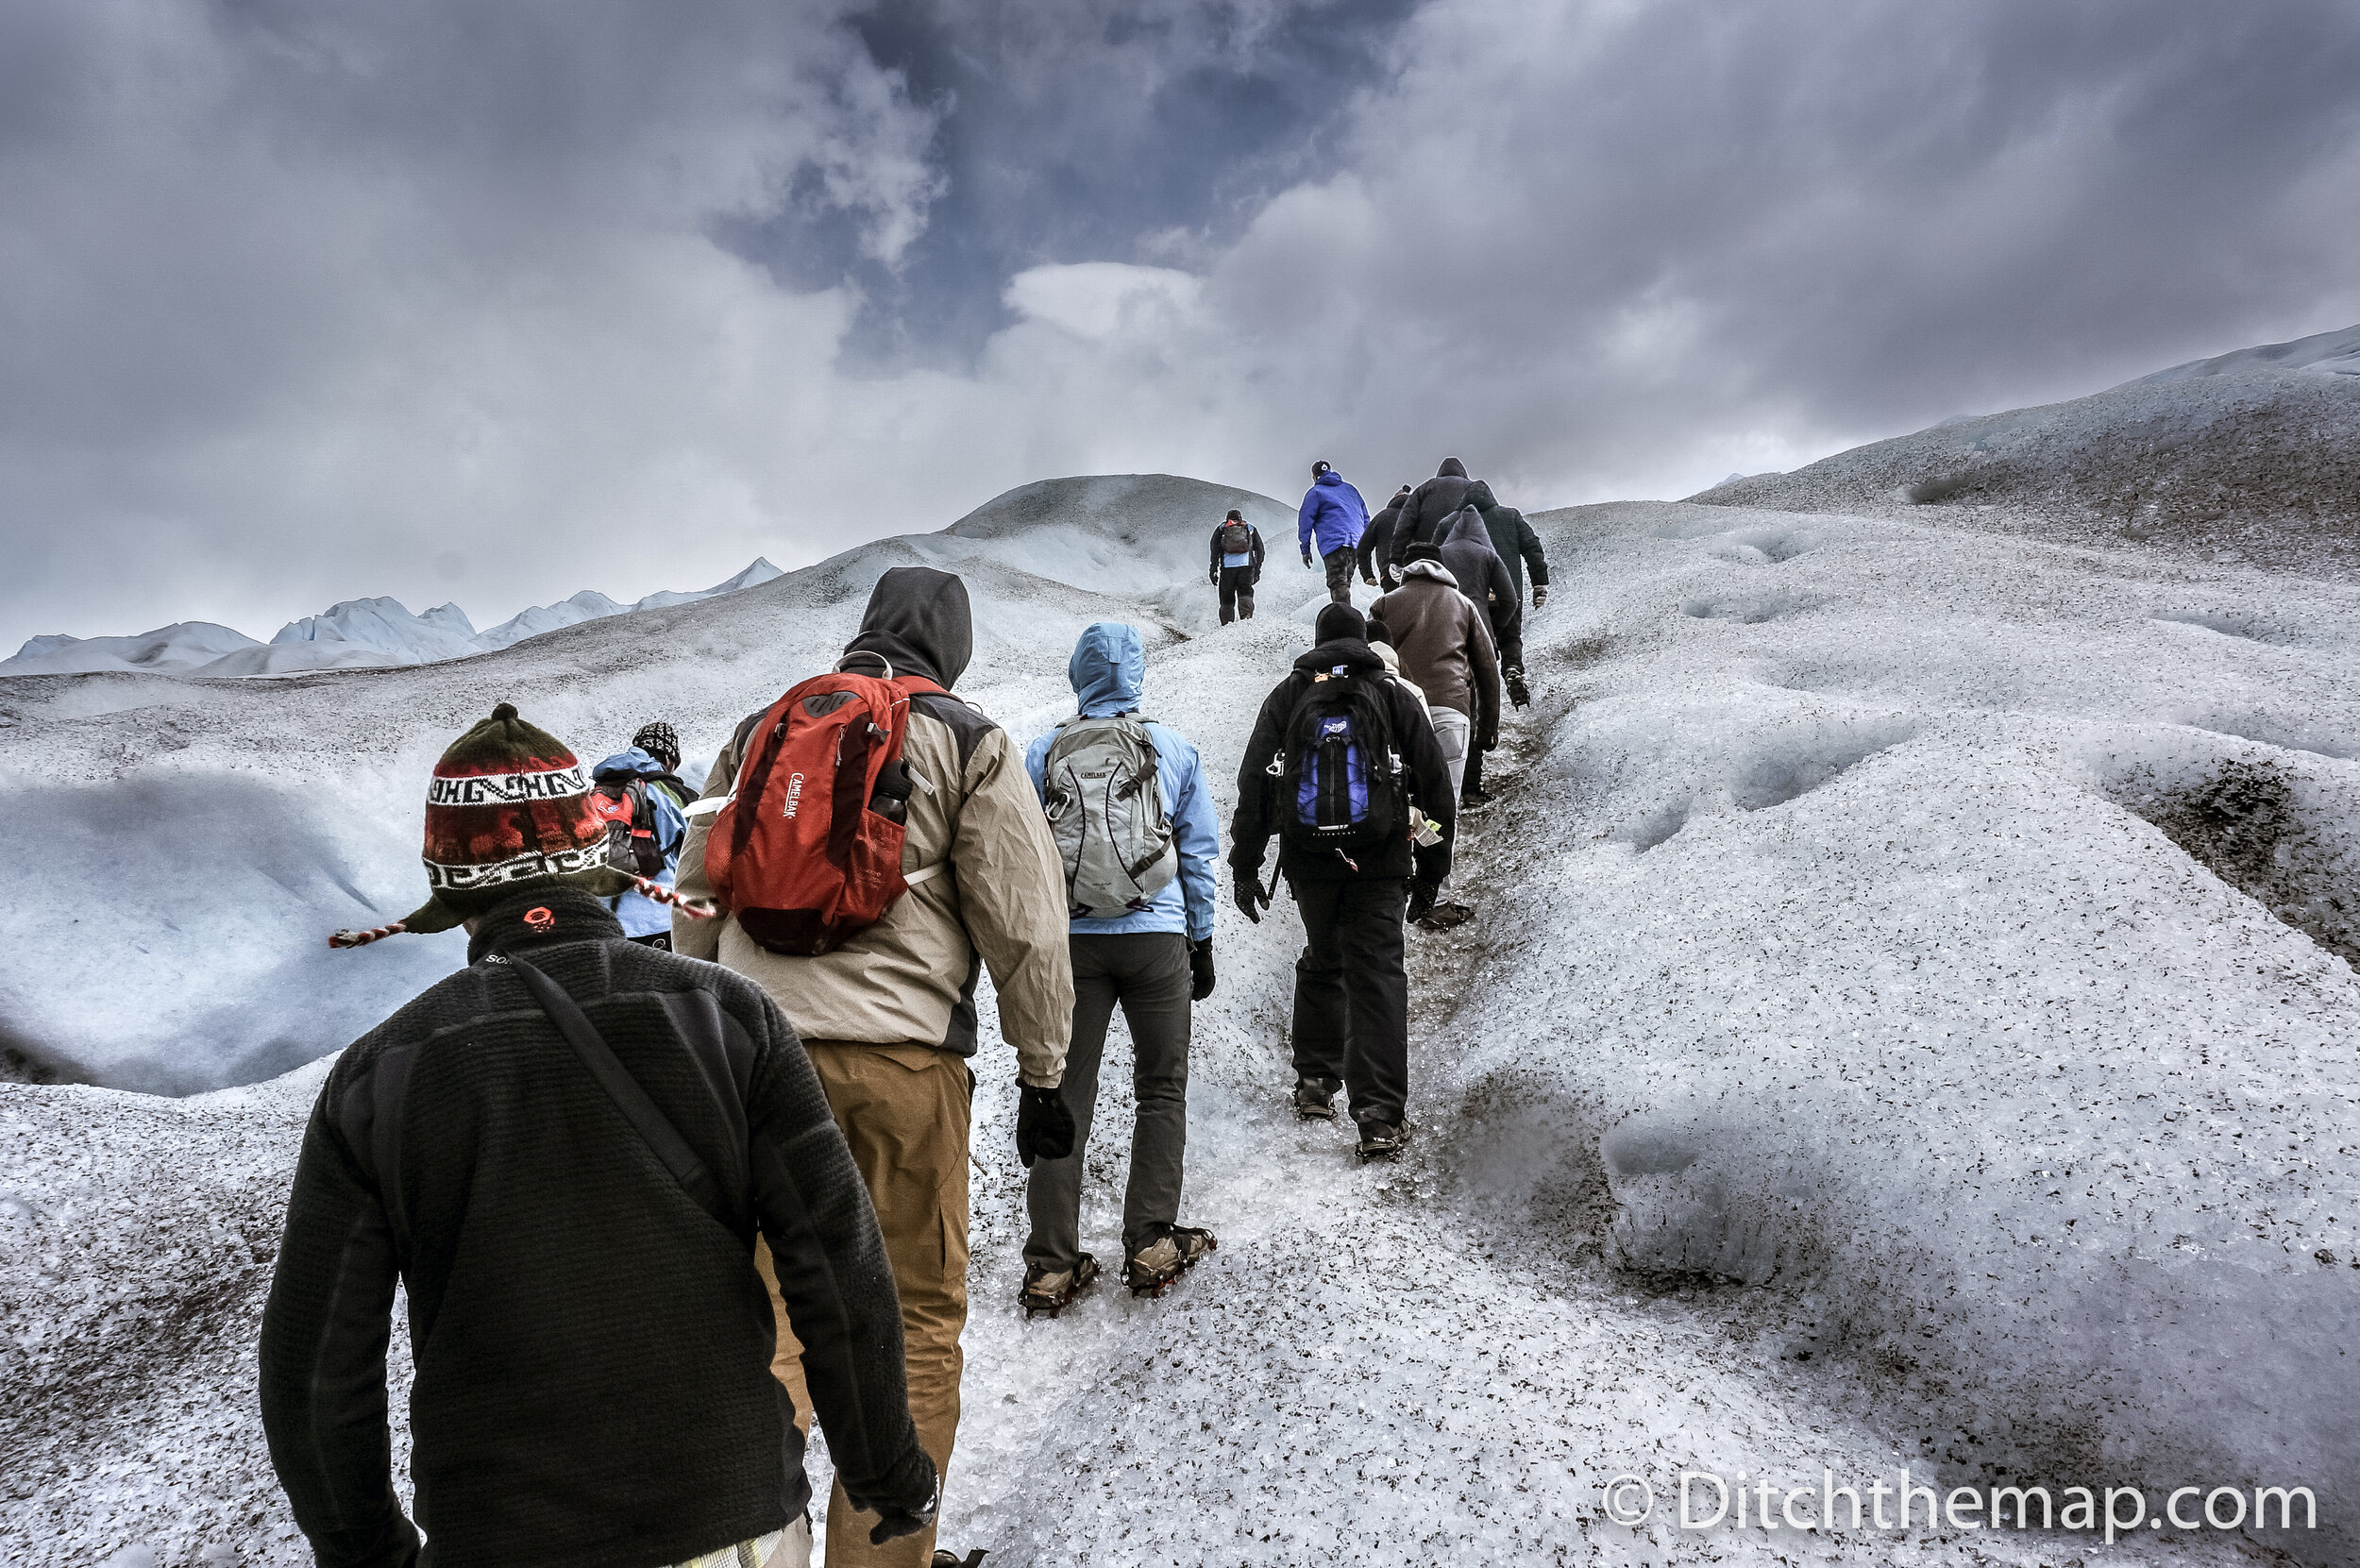
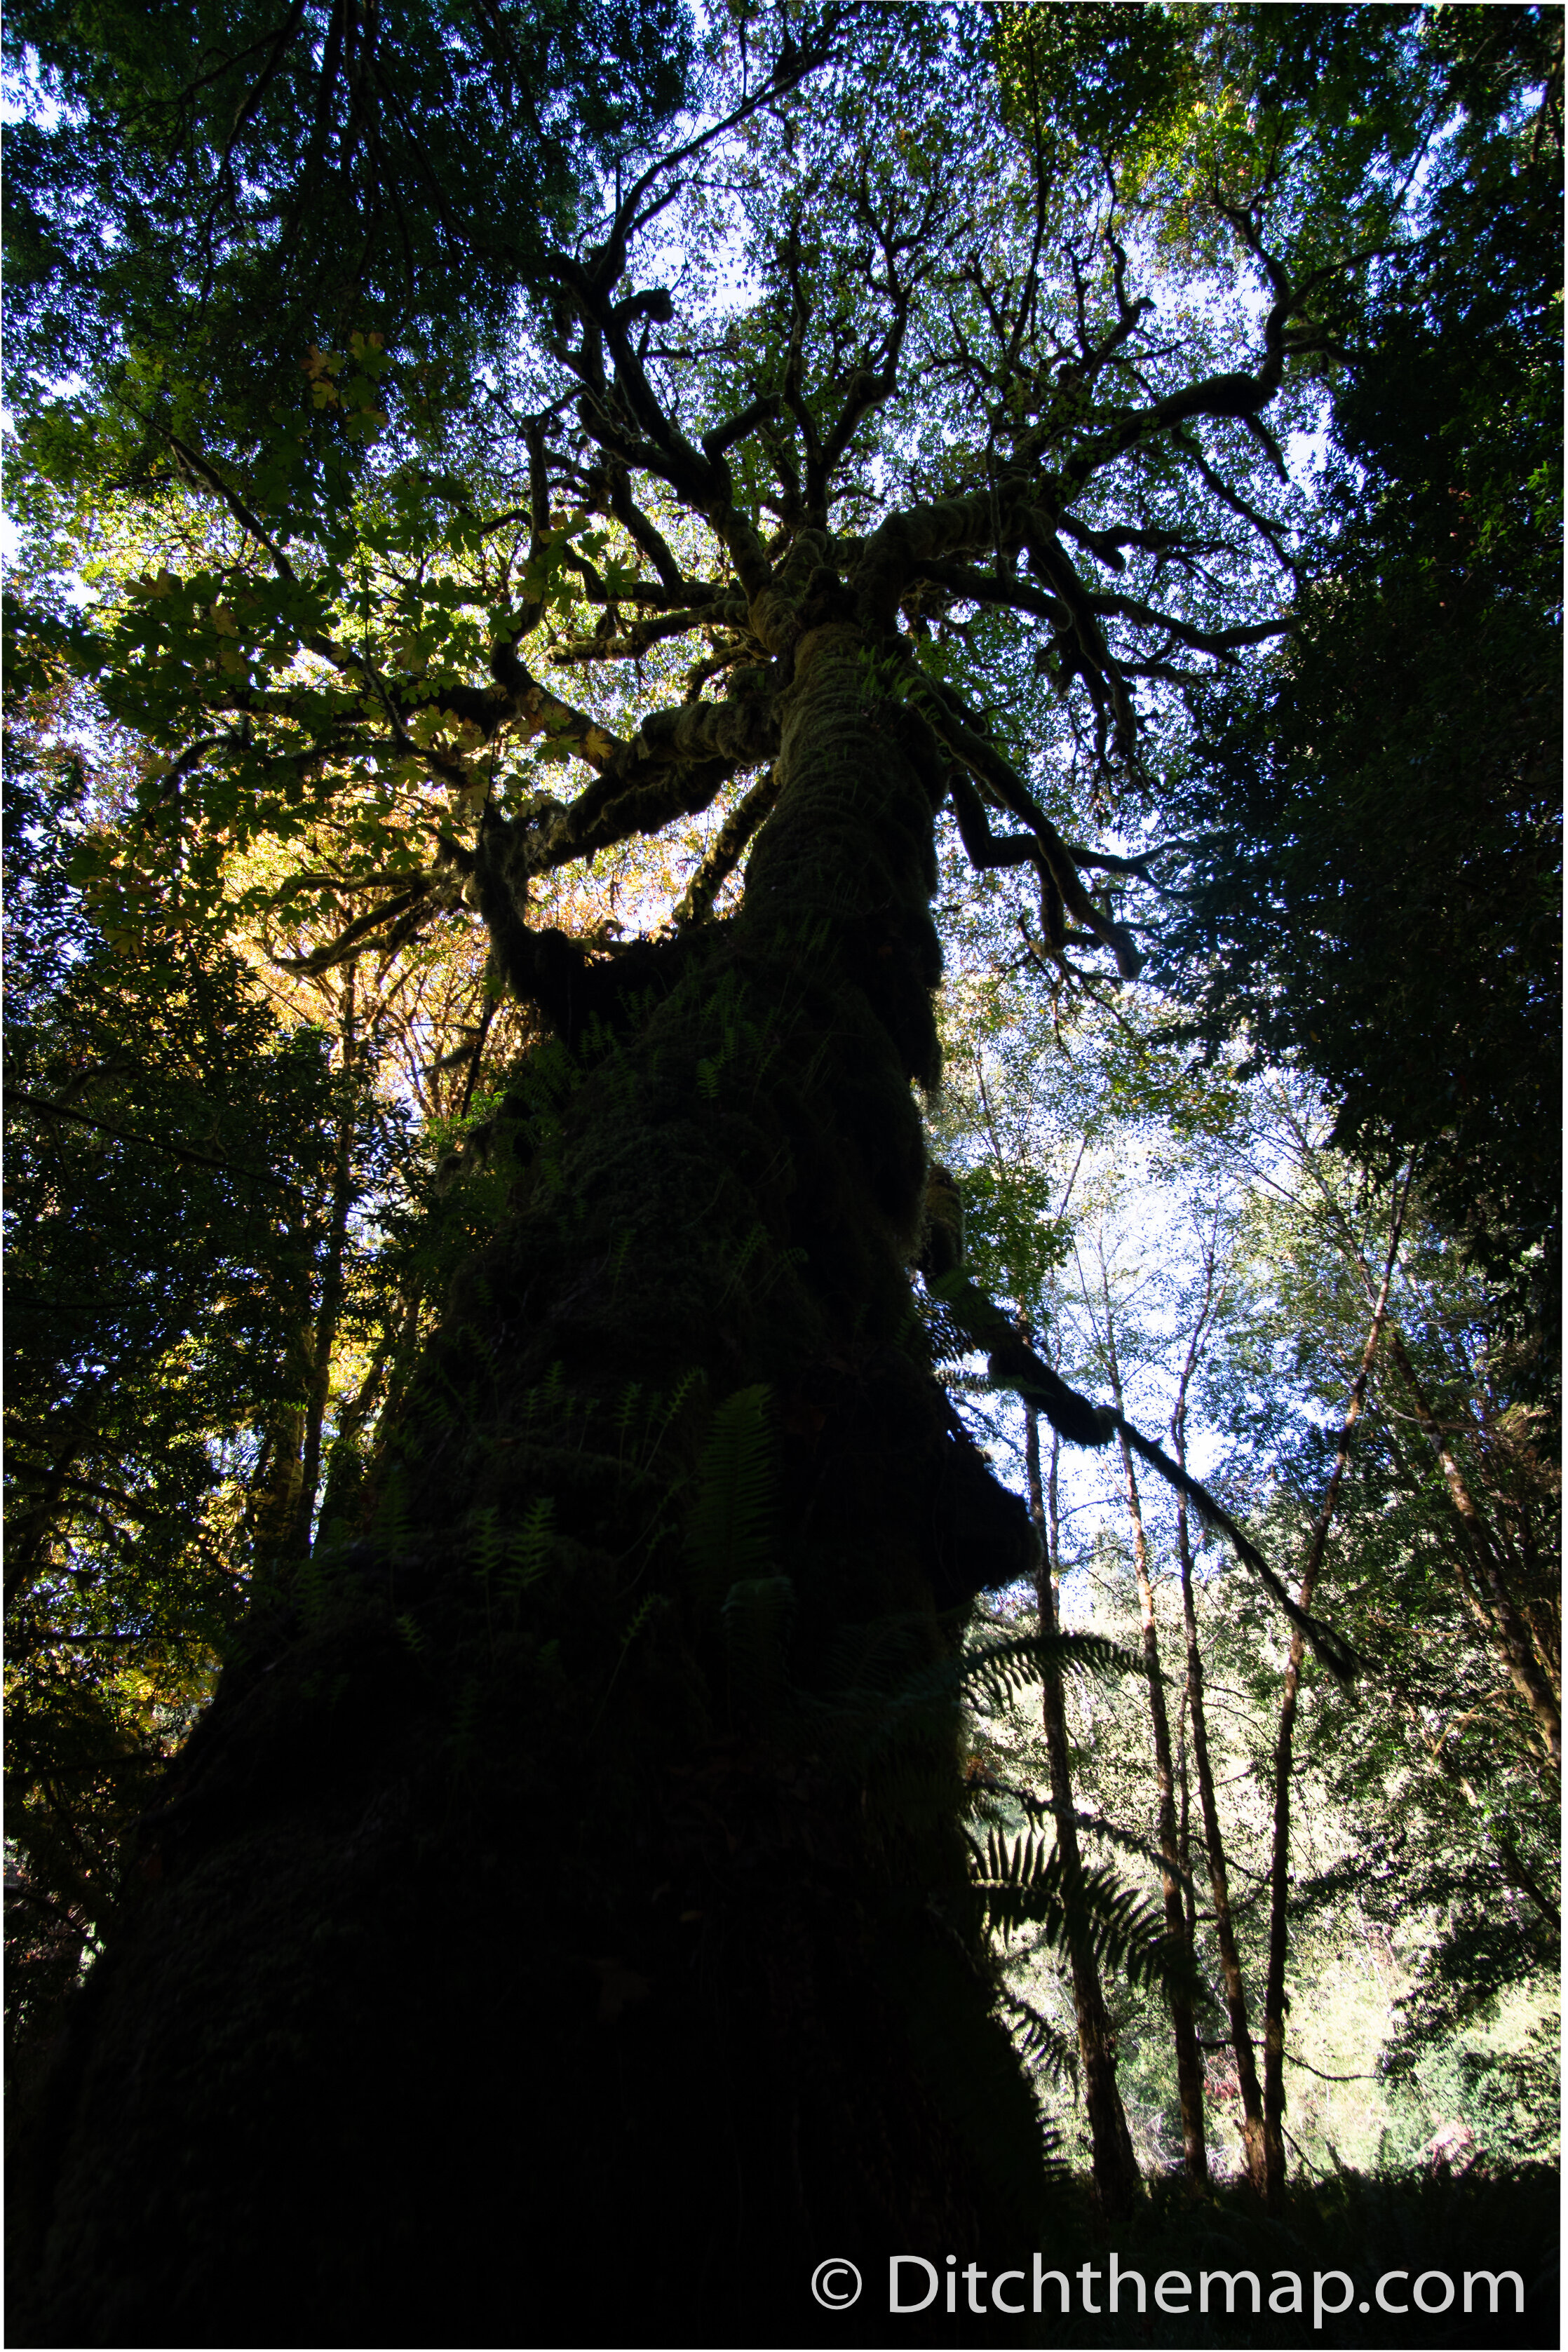
Sometimes you want to emphasize the relative the size of something or show motion/directionality. You can do this by altering your perspective. The photo below (left) shows a group of us hiking up a hill on a glacier—the camera was shot with an upward angle to emphasize the upward journey. Similarly the photo on the right was taken with a large tilt to showcase the hugeness of the tree. The HDR method was also used in these shots.

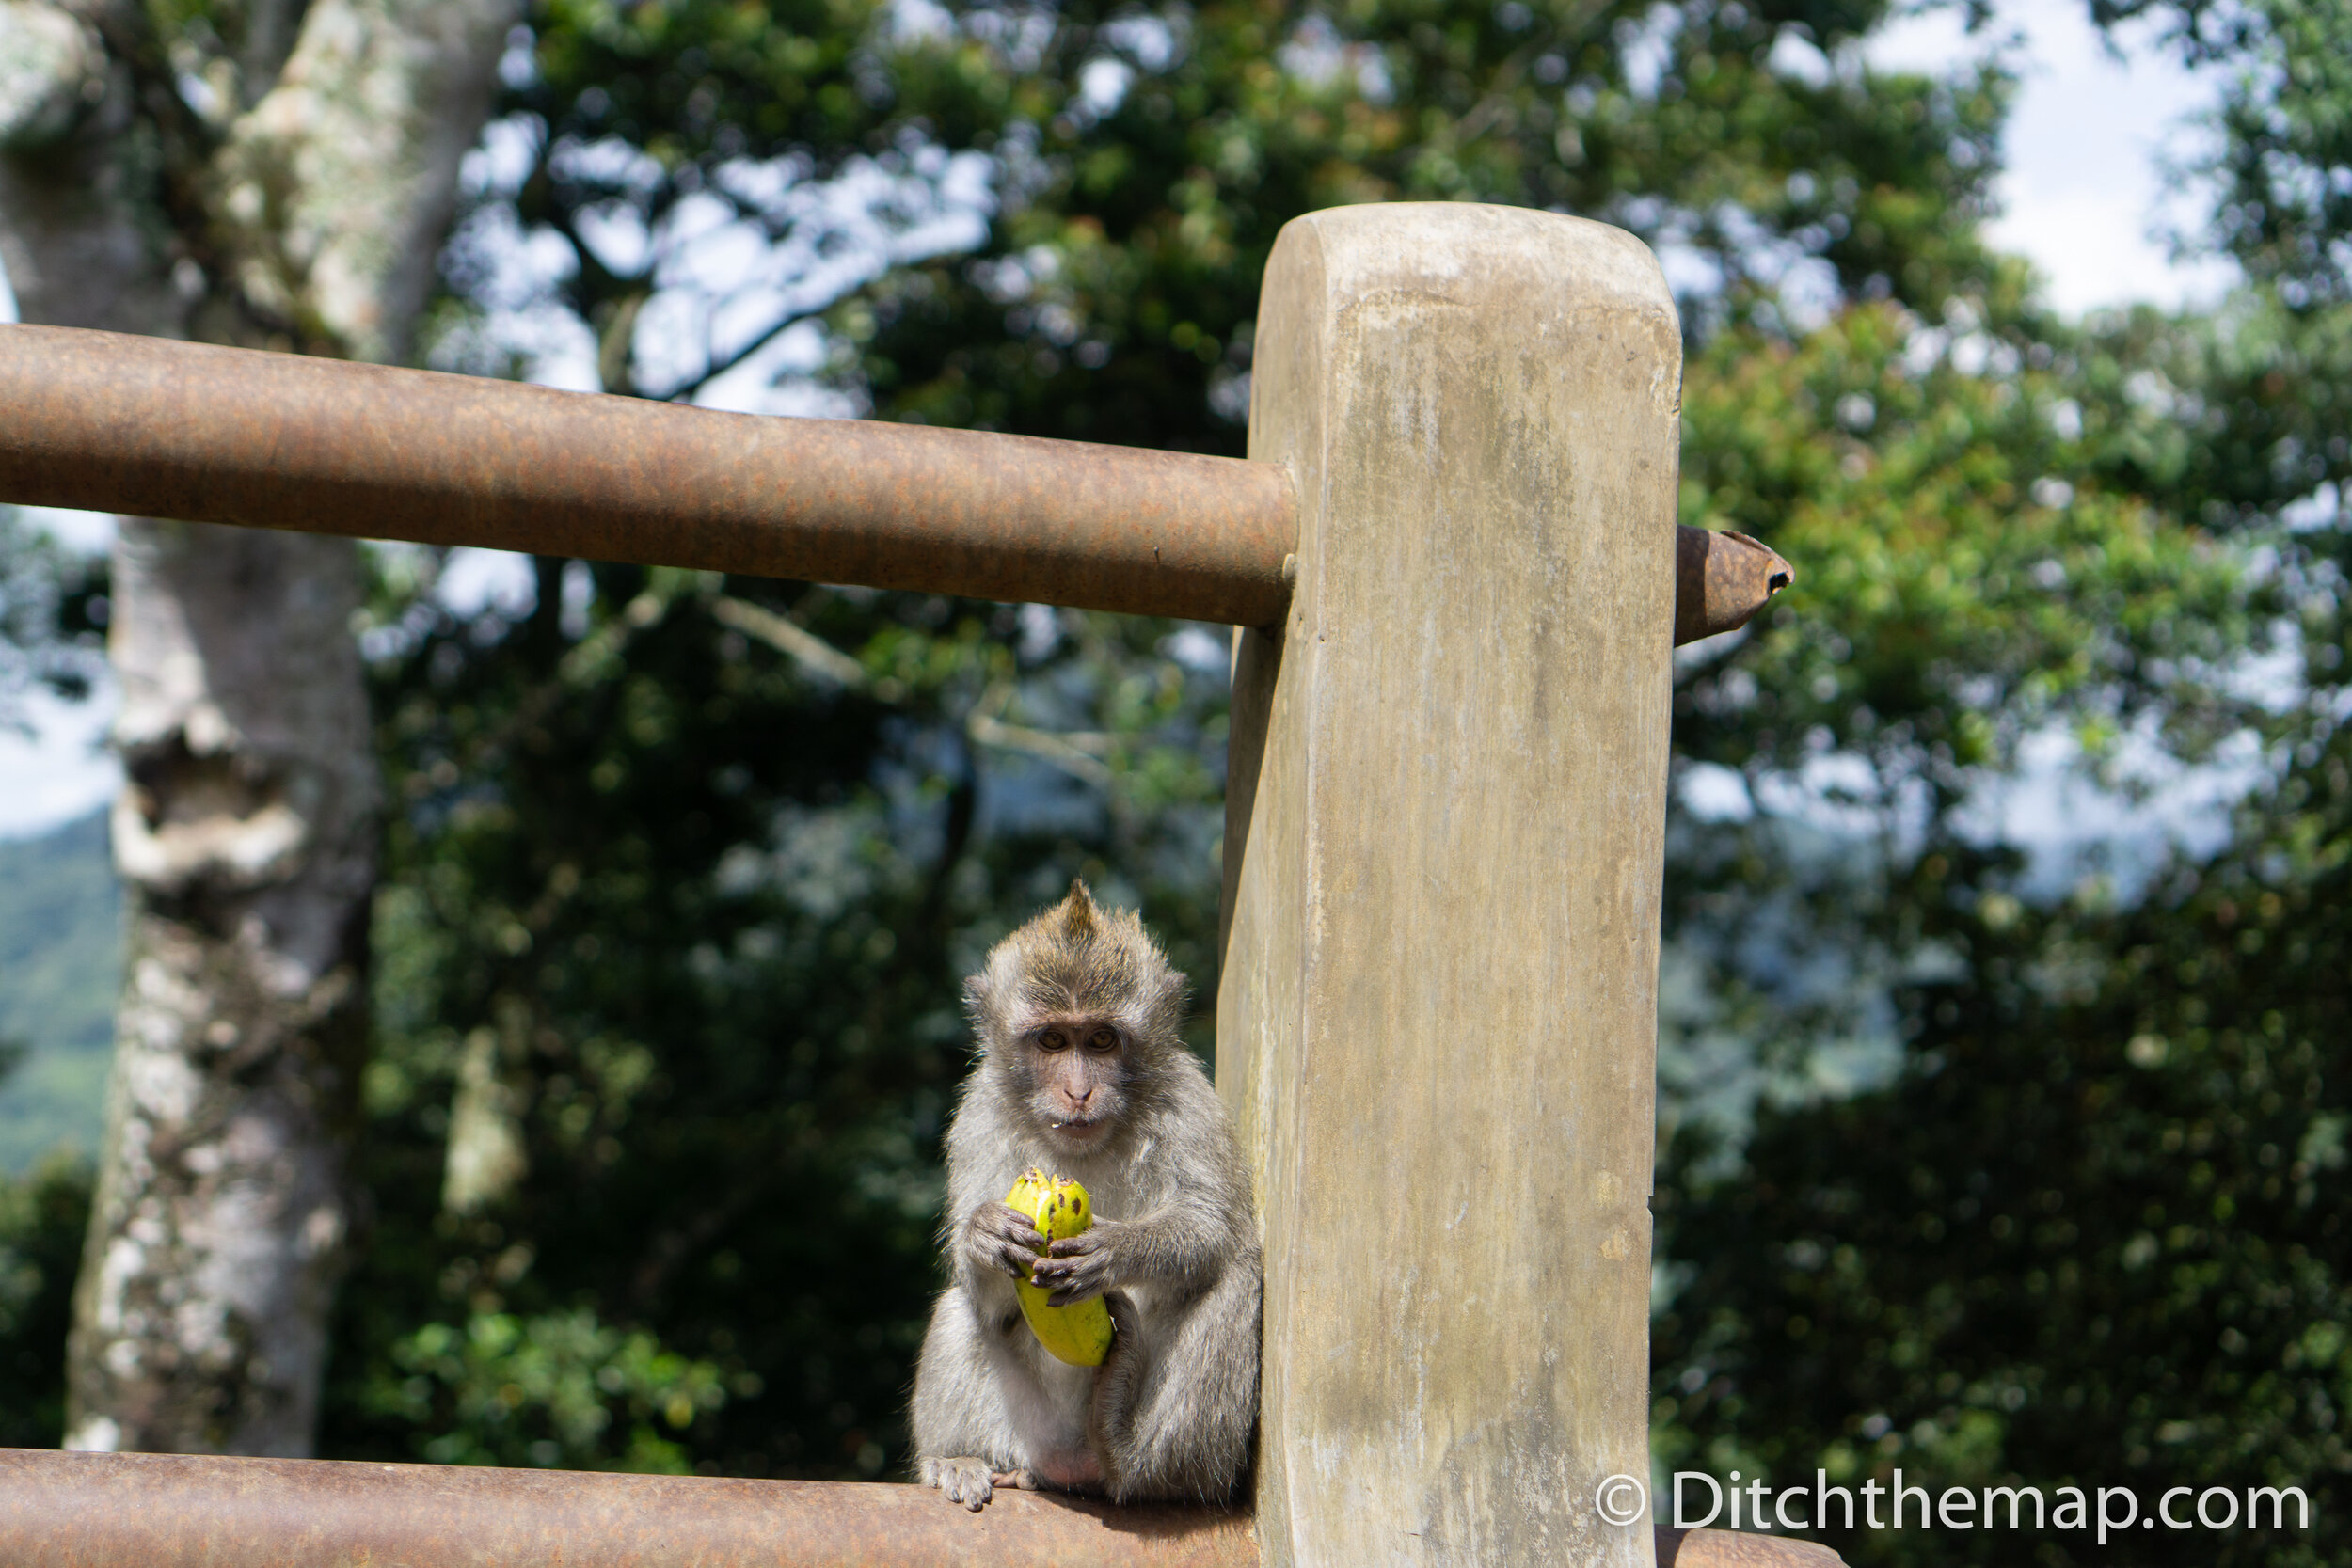
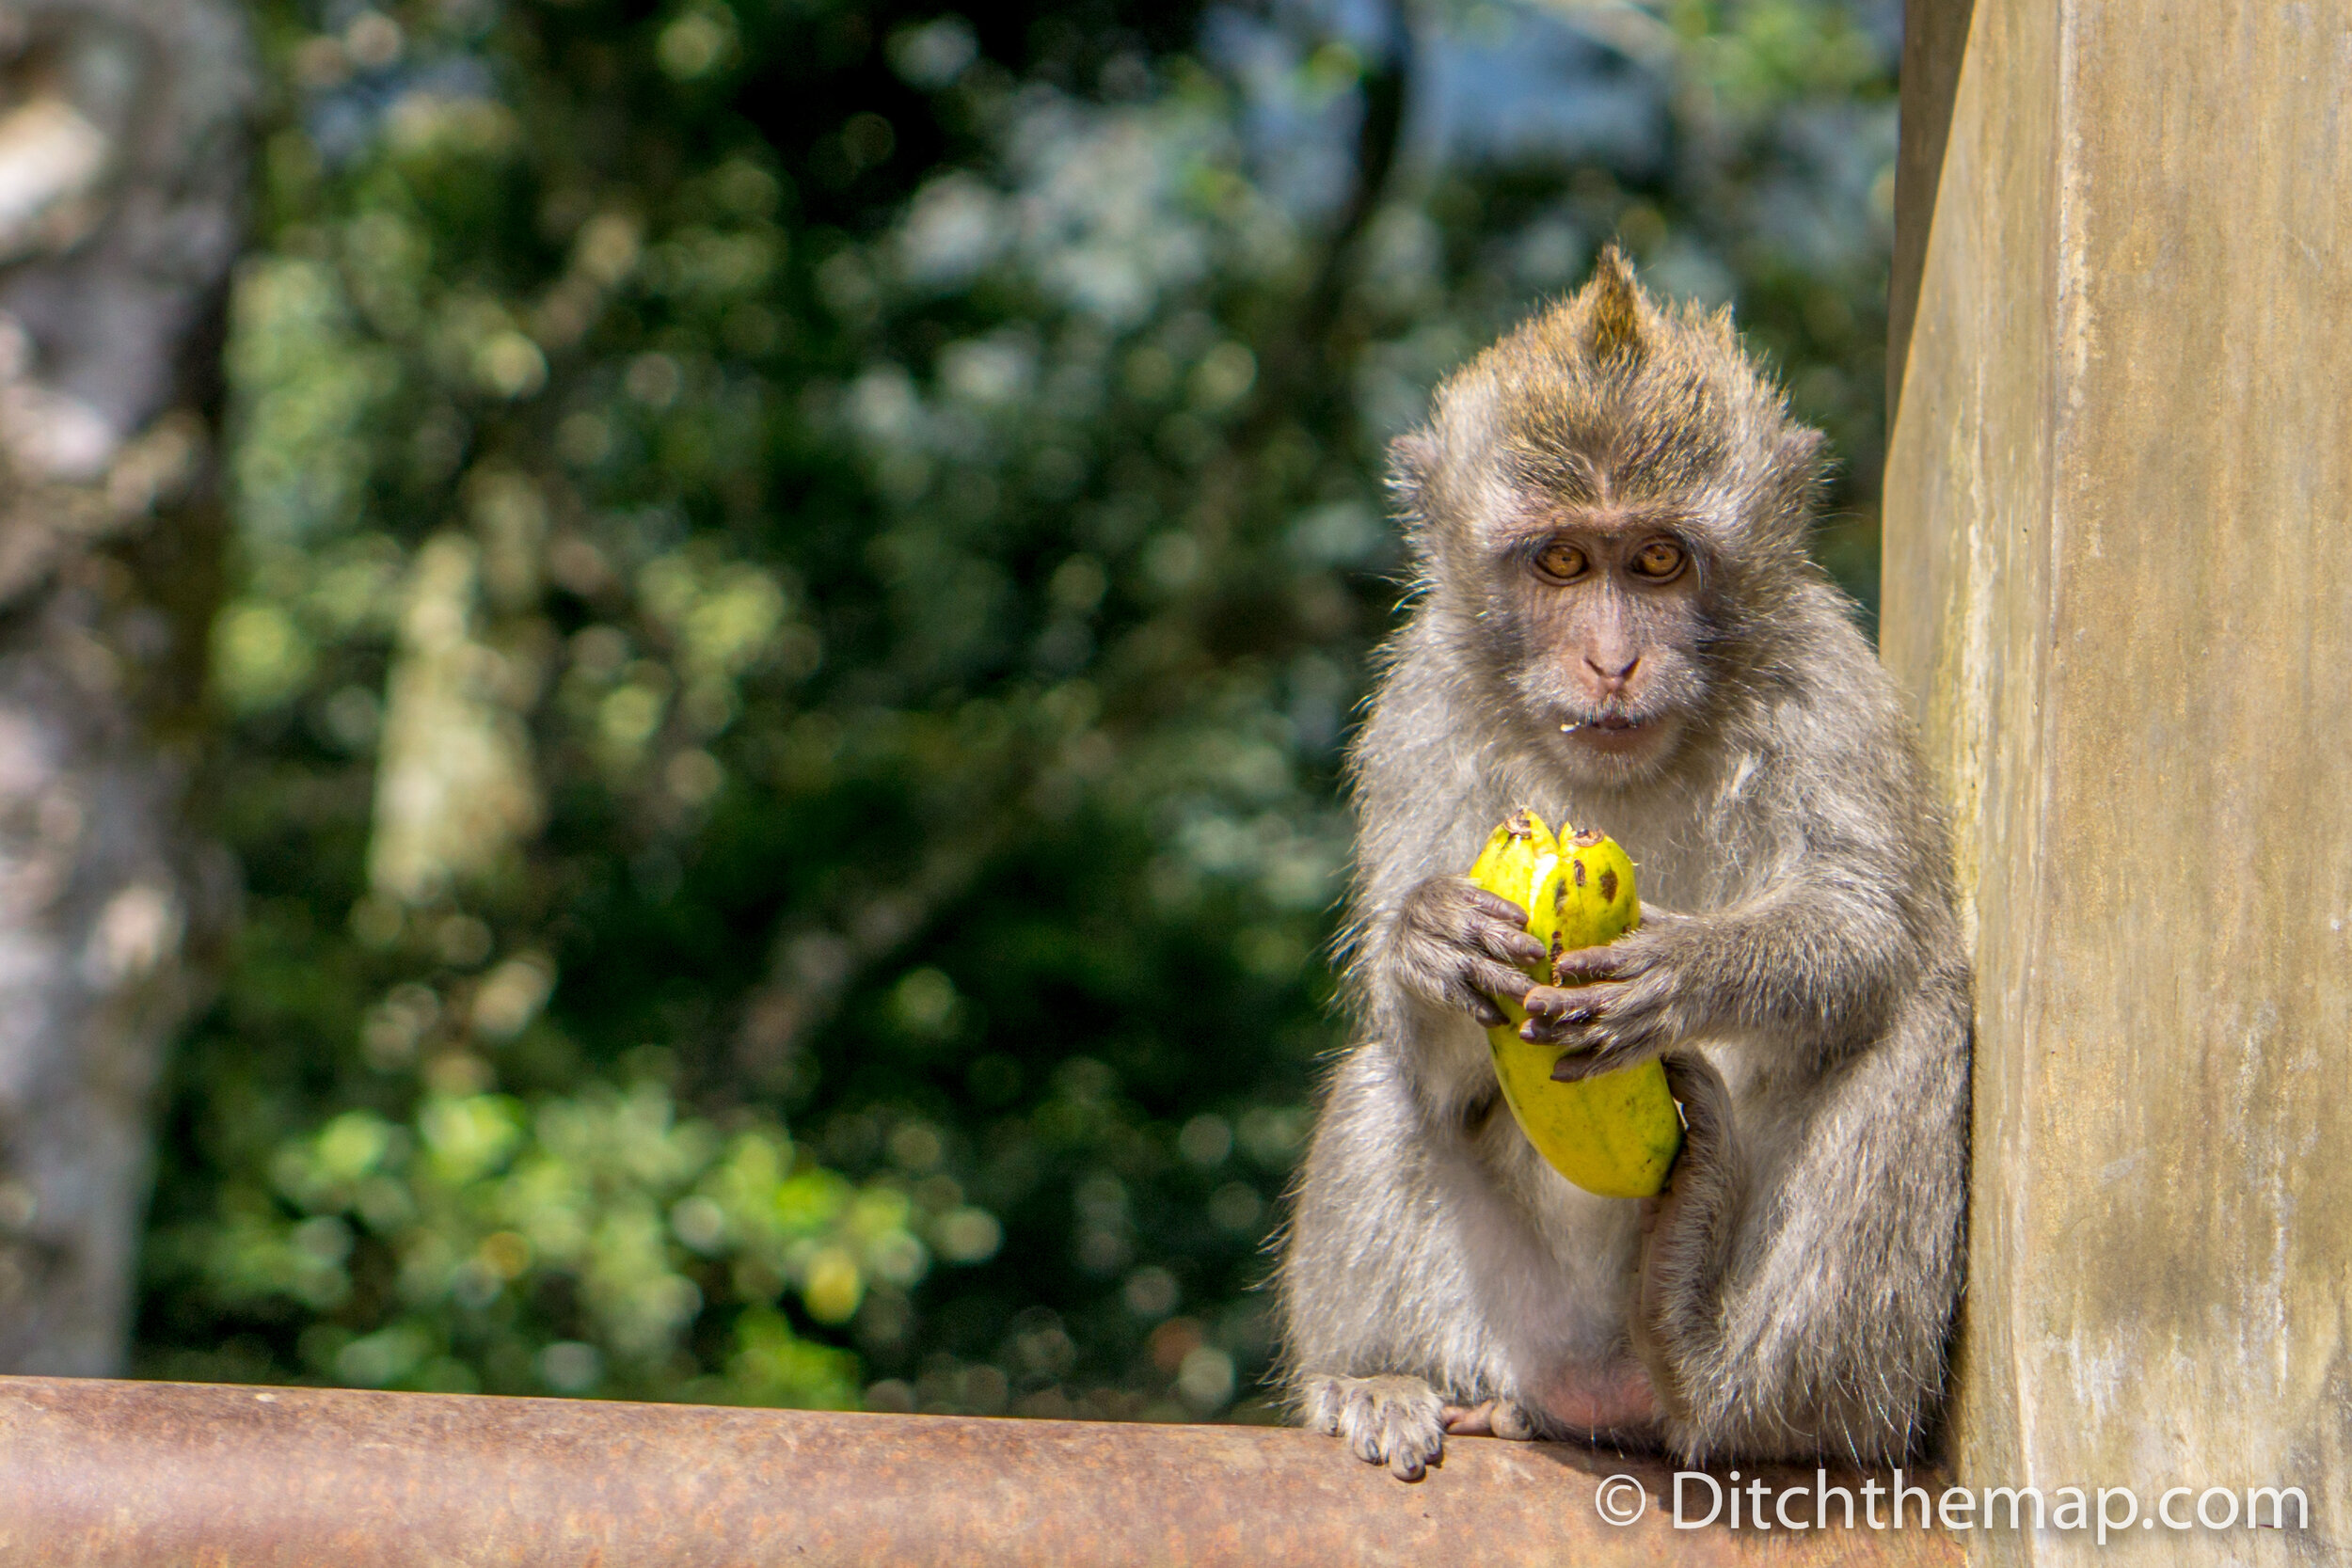
Framing:
The entire purpose of travel photography is to transport the viewer. Your travel lens arsenal is not as extensive as if you were shooting on set (maybe you do not have a zoom lens at your disposal). You can take a photo and crop it after the fact as was done with the monkey shot below. It was the monkey holding the banana that was interesting part of the photo anyways.
Sometimes you need to be creative to work around obstacles in the environment and crop out extraneous objects (HDR was used to bring down the highlights in the sky and the shadows up in the foreground).

Although being able to crop a photo is not new technology the ability to use it reliably is an advantage to modern photographers. Older cameras did not have the resolution to do this—cropped photos would be blurry or non-sharp when enlarged. You should still be careful when cropping as you’ll need a sharp lens to preserve sharpness in a cropped photo if you intend to use it for print or for HD photos online. Just because your camera says it has 1 billion megapixels does not mean that the photos are sharp. At the end of the day it is better to have a camera with lower resolution but takes sharper photos. Click here to learn about The Relationship Of Image Quality And Image Resolution.
The photo below illustrates several key elements to consider in regards to framing:
Straighten photos so the horizon line is completely horizontal
Avoid being constrained by in-camera 3x4 4x6 or 5x7 photo ratios.
If the foreground, background, or the side of an image does not add to the photo crop it out.
Equipment - Main Gear:
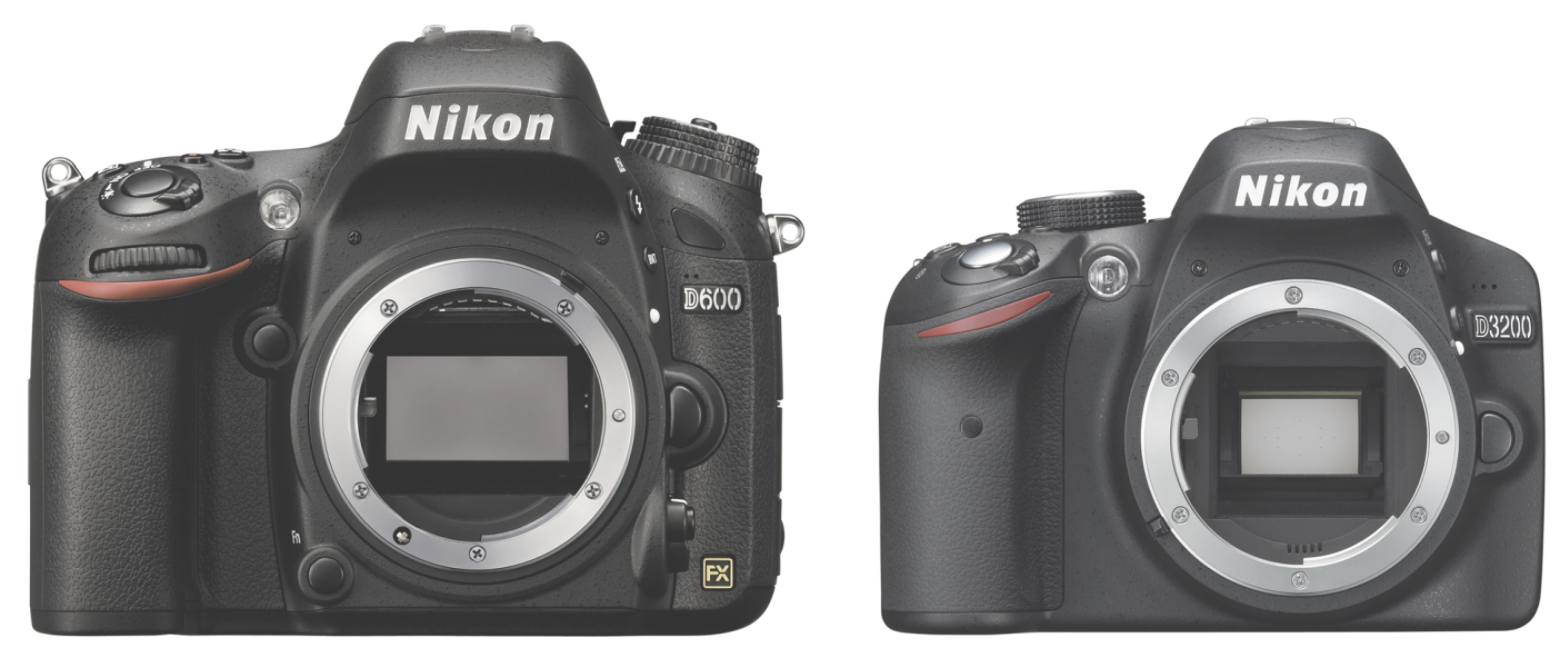
The size difference between a Full Frame and APS-C (DX) sensor
Camera - I currently shoot with a a mirrorless Sony a6500 but any camera with changeable lenses will suffice. Mirrorless cameras are the newest technology and recent innovations have eliminated the benefits of the once-superior traditional DSLRs. Mirrorless cameras are smaller than DSLRs and lend themselves to better video recording performance thanks to their design. Cameras come with a variety of sensor sizes (the largest (typically) being full-frame). Portrait and event photographers benefit from using full-frame cameras as they rely on using handhold techniques in low light (they also benefit from a shallower DoF which larger sensors also provide). Since travel photographers can (and should) use tripods a crop sensor will suffice for most landscape shots. A small digital camera/phone is great for framing shots and quick social media posts, but that’s it—A typical smart phone camera sensor is ~60x smaller than a full frame sensor. As I alluded to in the previous section megapixels are simply used as a marketing ploy and do not translate to picture quality, dynamic range, or accurate color reproduction. To read more about camera sensor size read this.

Comparing various sensor sizes for digital cameras
Lens(es) - The more lenses you have the more options to have. However in travel photography the weight of your gear is a determining factor in how many lenses to bring along. I travel long term so I limit myself to 3 lenses—however I typically leave at least 1 lens back in the room when I’m out shooting or hiking.
Prime vs Zoom: In very basic terms Zoom lenses give you flexibility and Prime lenses give you better quality. Higher quality zooms lenses exist but they are large, expensive, and still worse than cheaper primes. Click here to learn more about zooms and primes.
(Ultra) Wide Angle: Wide angle lenses let you capture ‘everything’ but do a horrible job capturing people—unless you want a person’s nose to loose 3 times larger than it is. Wide angle photography is much more difficult than other focal lengths as you have to take particular care of what is in the foreground as these objects are greatly magnified. Also, slight changes in the camera orientation will greatly effect how straight lines look, so use with care. Wide angle lenses are more versatile than their Ultra Wide cousins as they tend not to “fish-eye'“ as much. Wide angle lenses are great to capture the entire night sky, large wide-open landscapes, and architectural shots where you want to include as much as possible but make bad lenses for just walking around and taking snapshots. Learn more about Ultra Wide Lenses.
Capturing an entire building using an ultra wide angle lens
Just remember that ultra wide angle lenses cause severe distortion and must be corrected. Smartphones and digital cameras do this automatically but you will need to manage this manually once you progress with more advanced techniques.
Standard Lens: This is a focal range but typically centers around 50mm (on full frame) or 35mm (on a Sony crop sensor). This focal length recreates images closest to how the human eye sees. 50mm full frame lenses were so popular and affordable that they became the standard walking-around-lens for many photographers. These prime lenses became known as “nifty fifties” for that reason. The photo below was taken using a 50mm equivalent prime lens (35mm on crop). I removed the objects in the background using Adobe Photoshop, adjusted the overall color to make it warmer, straightened the photo, and brightened the woman in the foreground.

Telephoto Lens: These lenses are not overly useful in travel photography so unless you are shooting wildlife leave this lens behind. During my month-long overland trip to Africa I brought a zoom lens hat extended into the telephoto range.
The Three Lenses I Travel With:
1 ultra wide angle lens that I use for landscapes, starscapes, and architectural photos. (Rokinon 12mm F2.0)
1 very fast (F1.4) prime normal lens for handhold evening, indoor, food, and stylized shots. (Sigma 30mm F1.4)
1 slow but relatively compact zoom lens that I use for convenience. It goes from wide angle to telephoto and works in most circumstances during the middle of the day. This stays on my camera during long days of travel/or hiking around when changing lenses is not convenient. (Sony 18-135mm F3.5-5.6)
Tripod - A must have if you want to call yourself a travel photographer. From slowing down motion of a waterfall, getting rid of pesky passersby, smoothing the surface of a lake, taking vast panoramas, or capturing a full night’s sky a tripod is your only option. Slowing down your shutter speed requires a completely stable camera, something impossible to do without a tripod. I travel with a carbon fiber Sirui T-025x Carbon Fiber. You can buy it here. It packs up very small and only weighs 1.5 lbs. I conducted dozens of hours of research and found this to be the best value given the high quality it provides. It holds my camera stable and when fully extended it is about 5.5 feet tall.


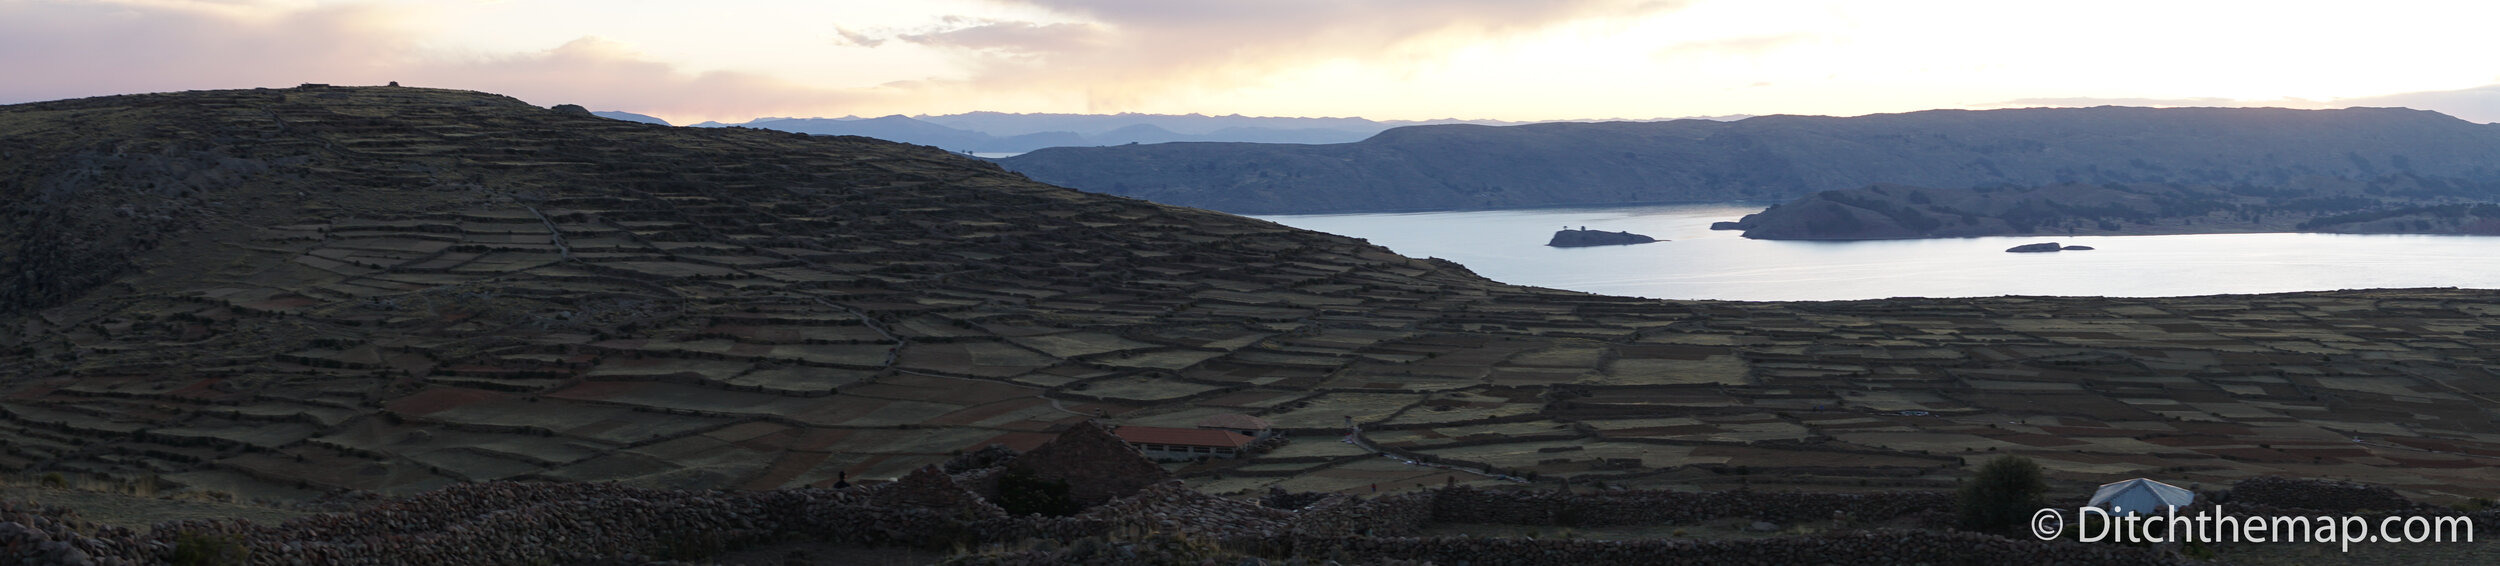
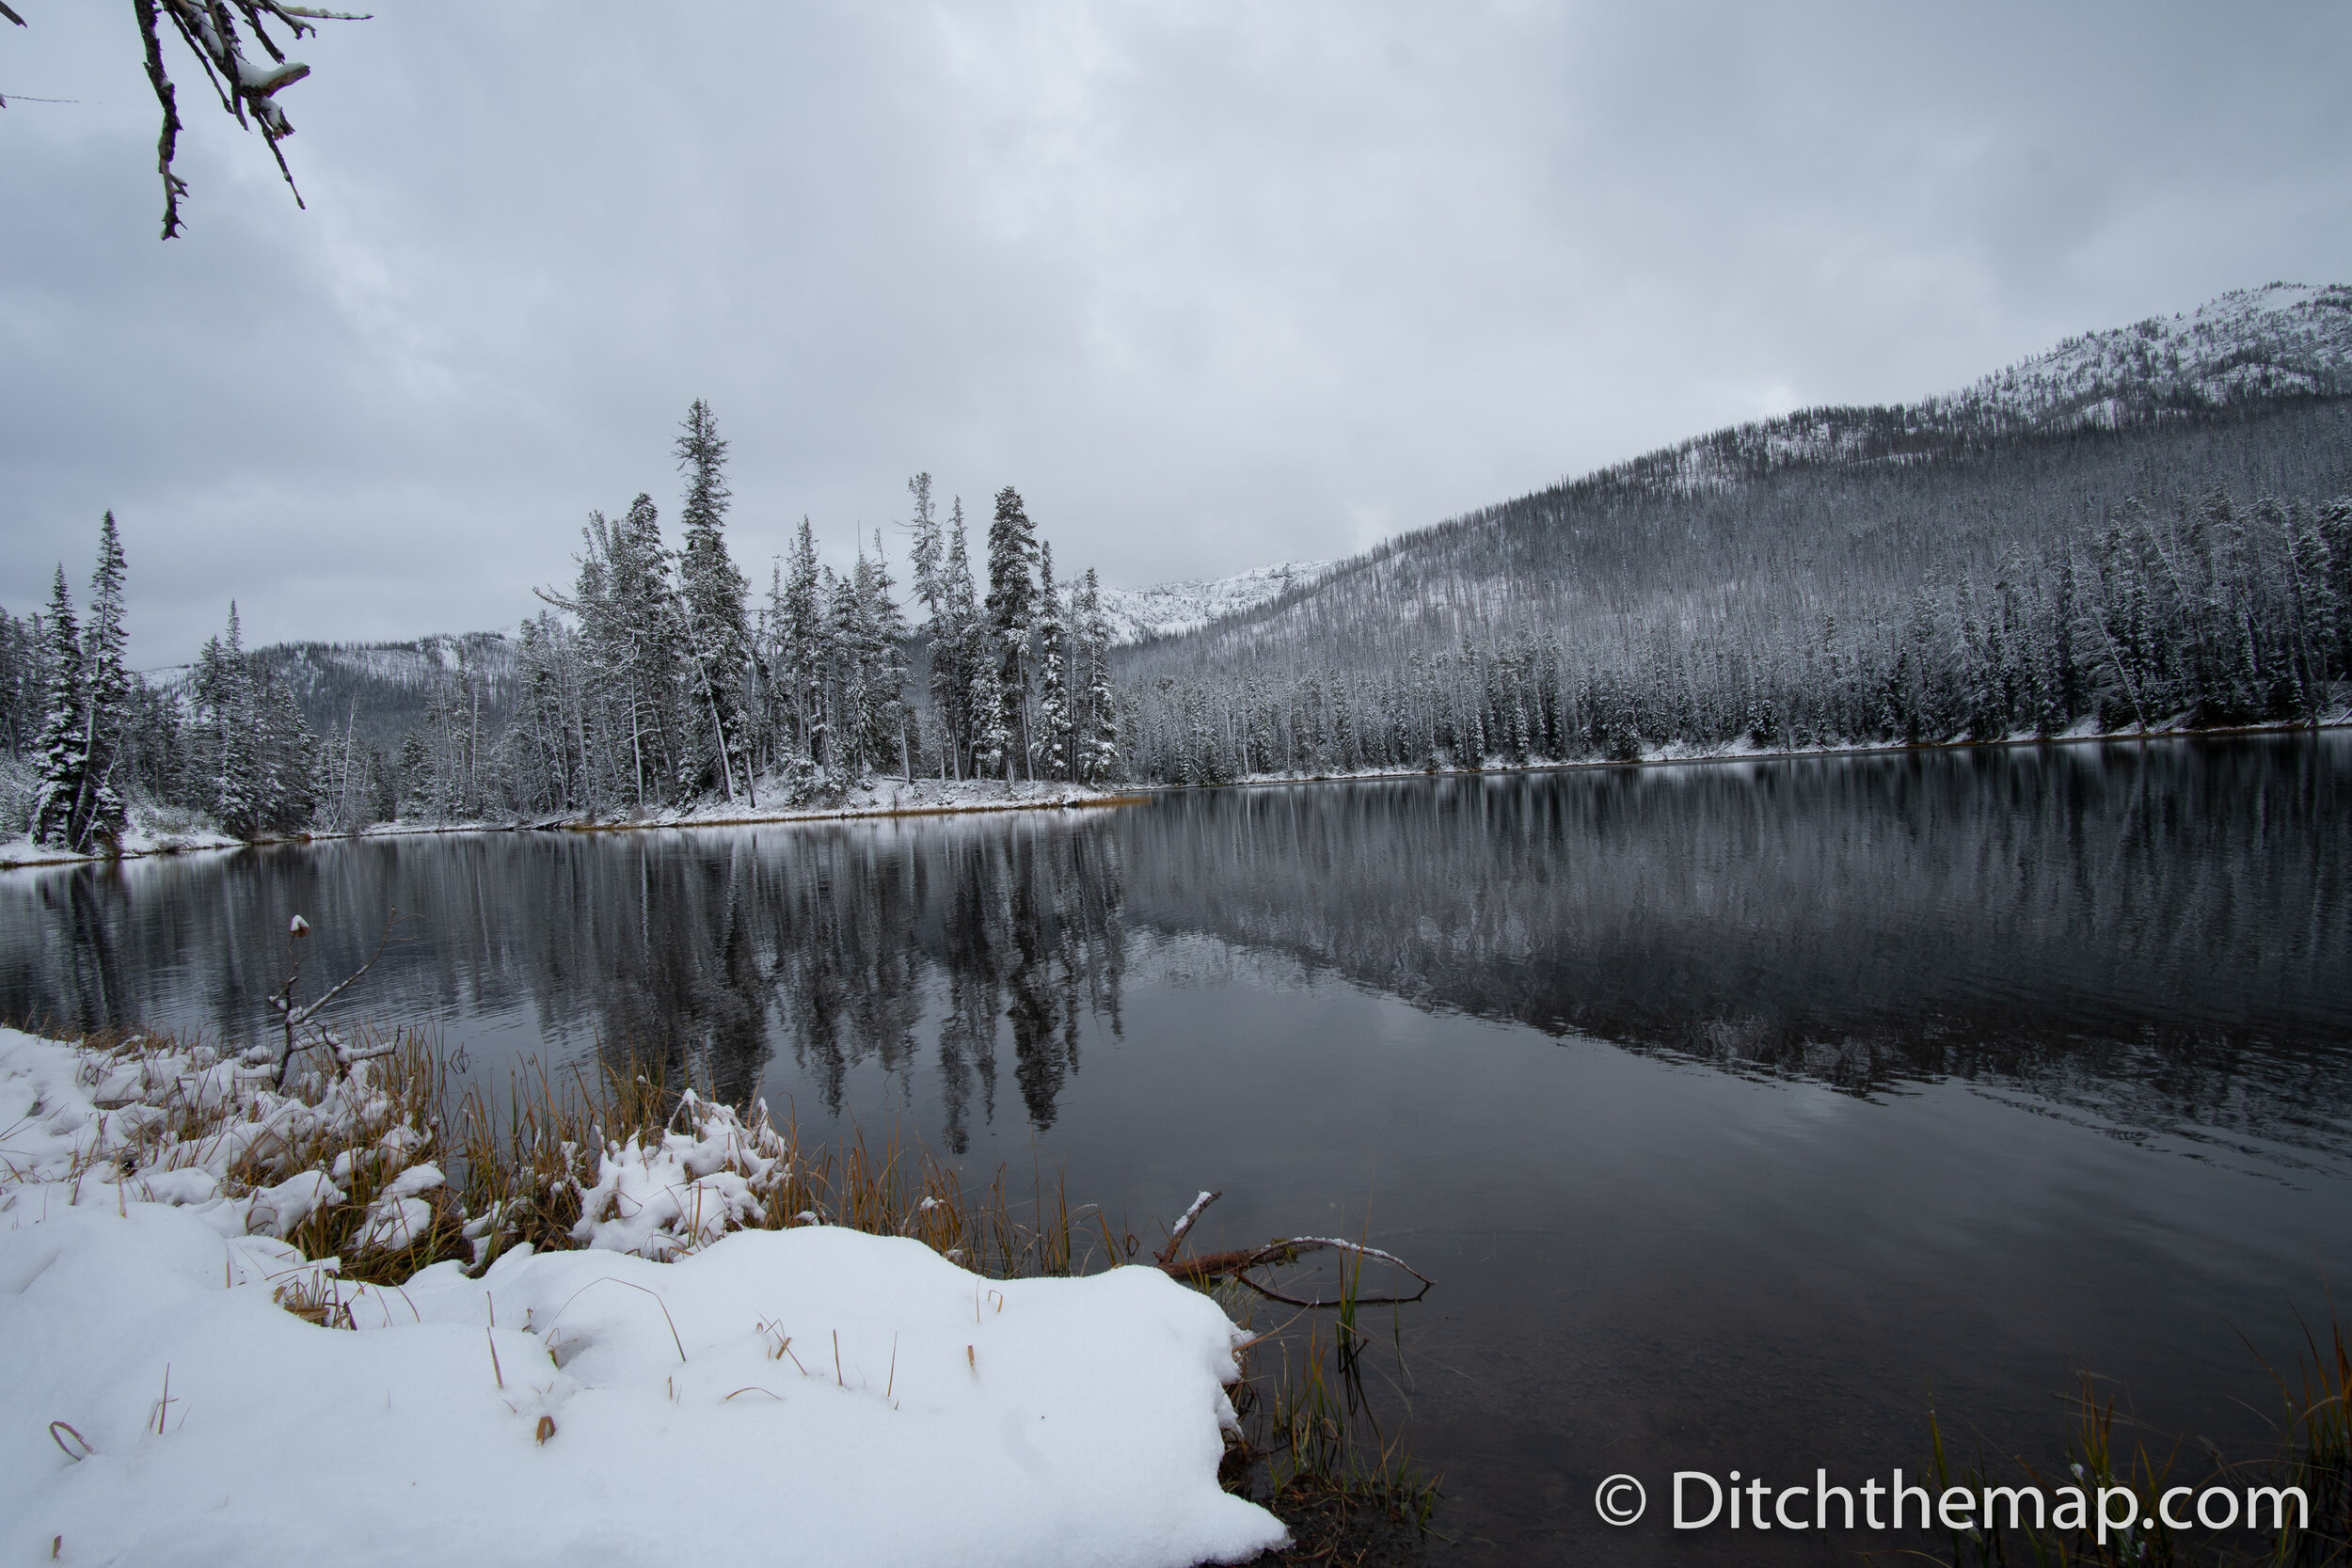
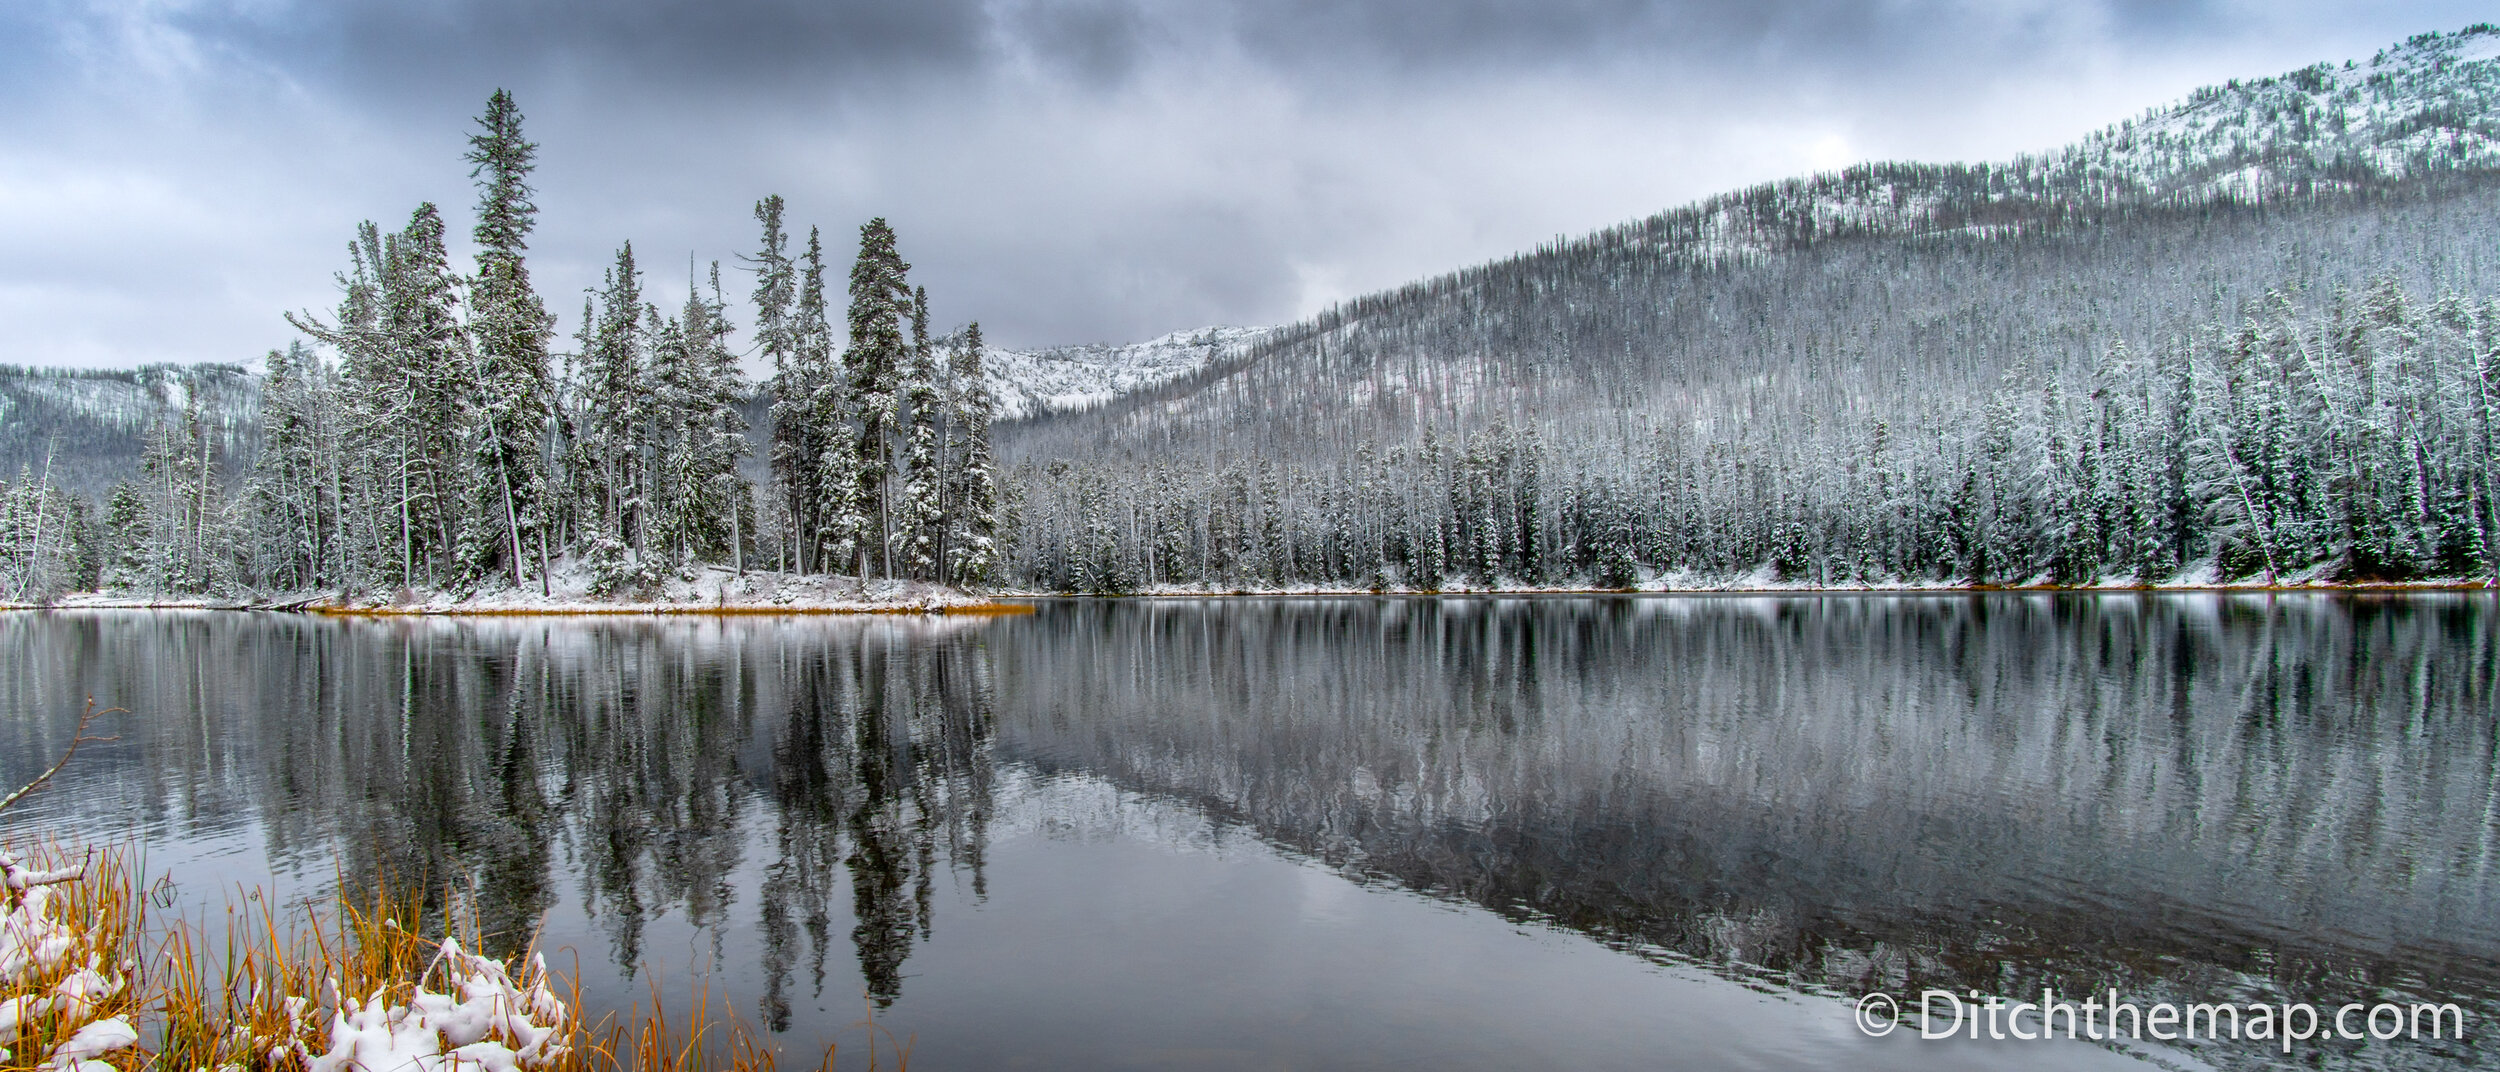
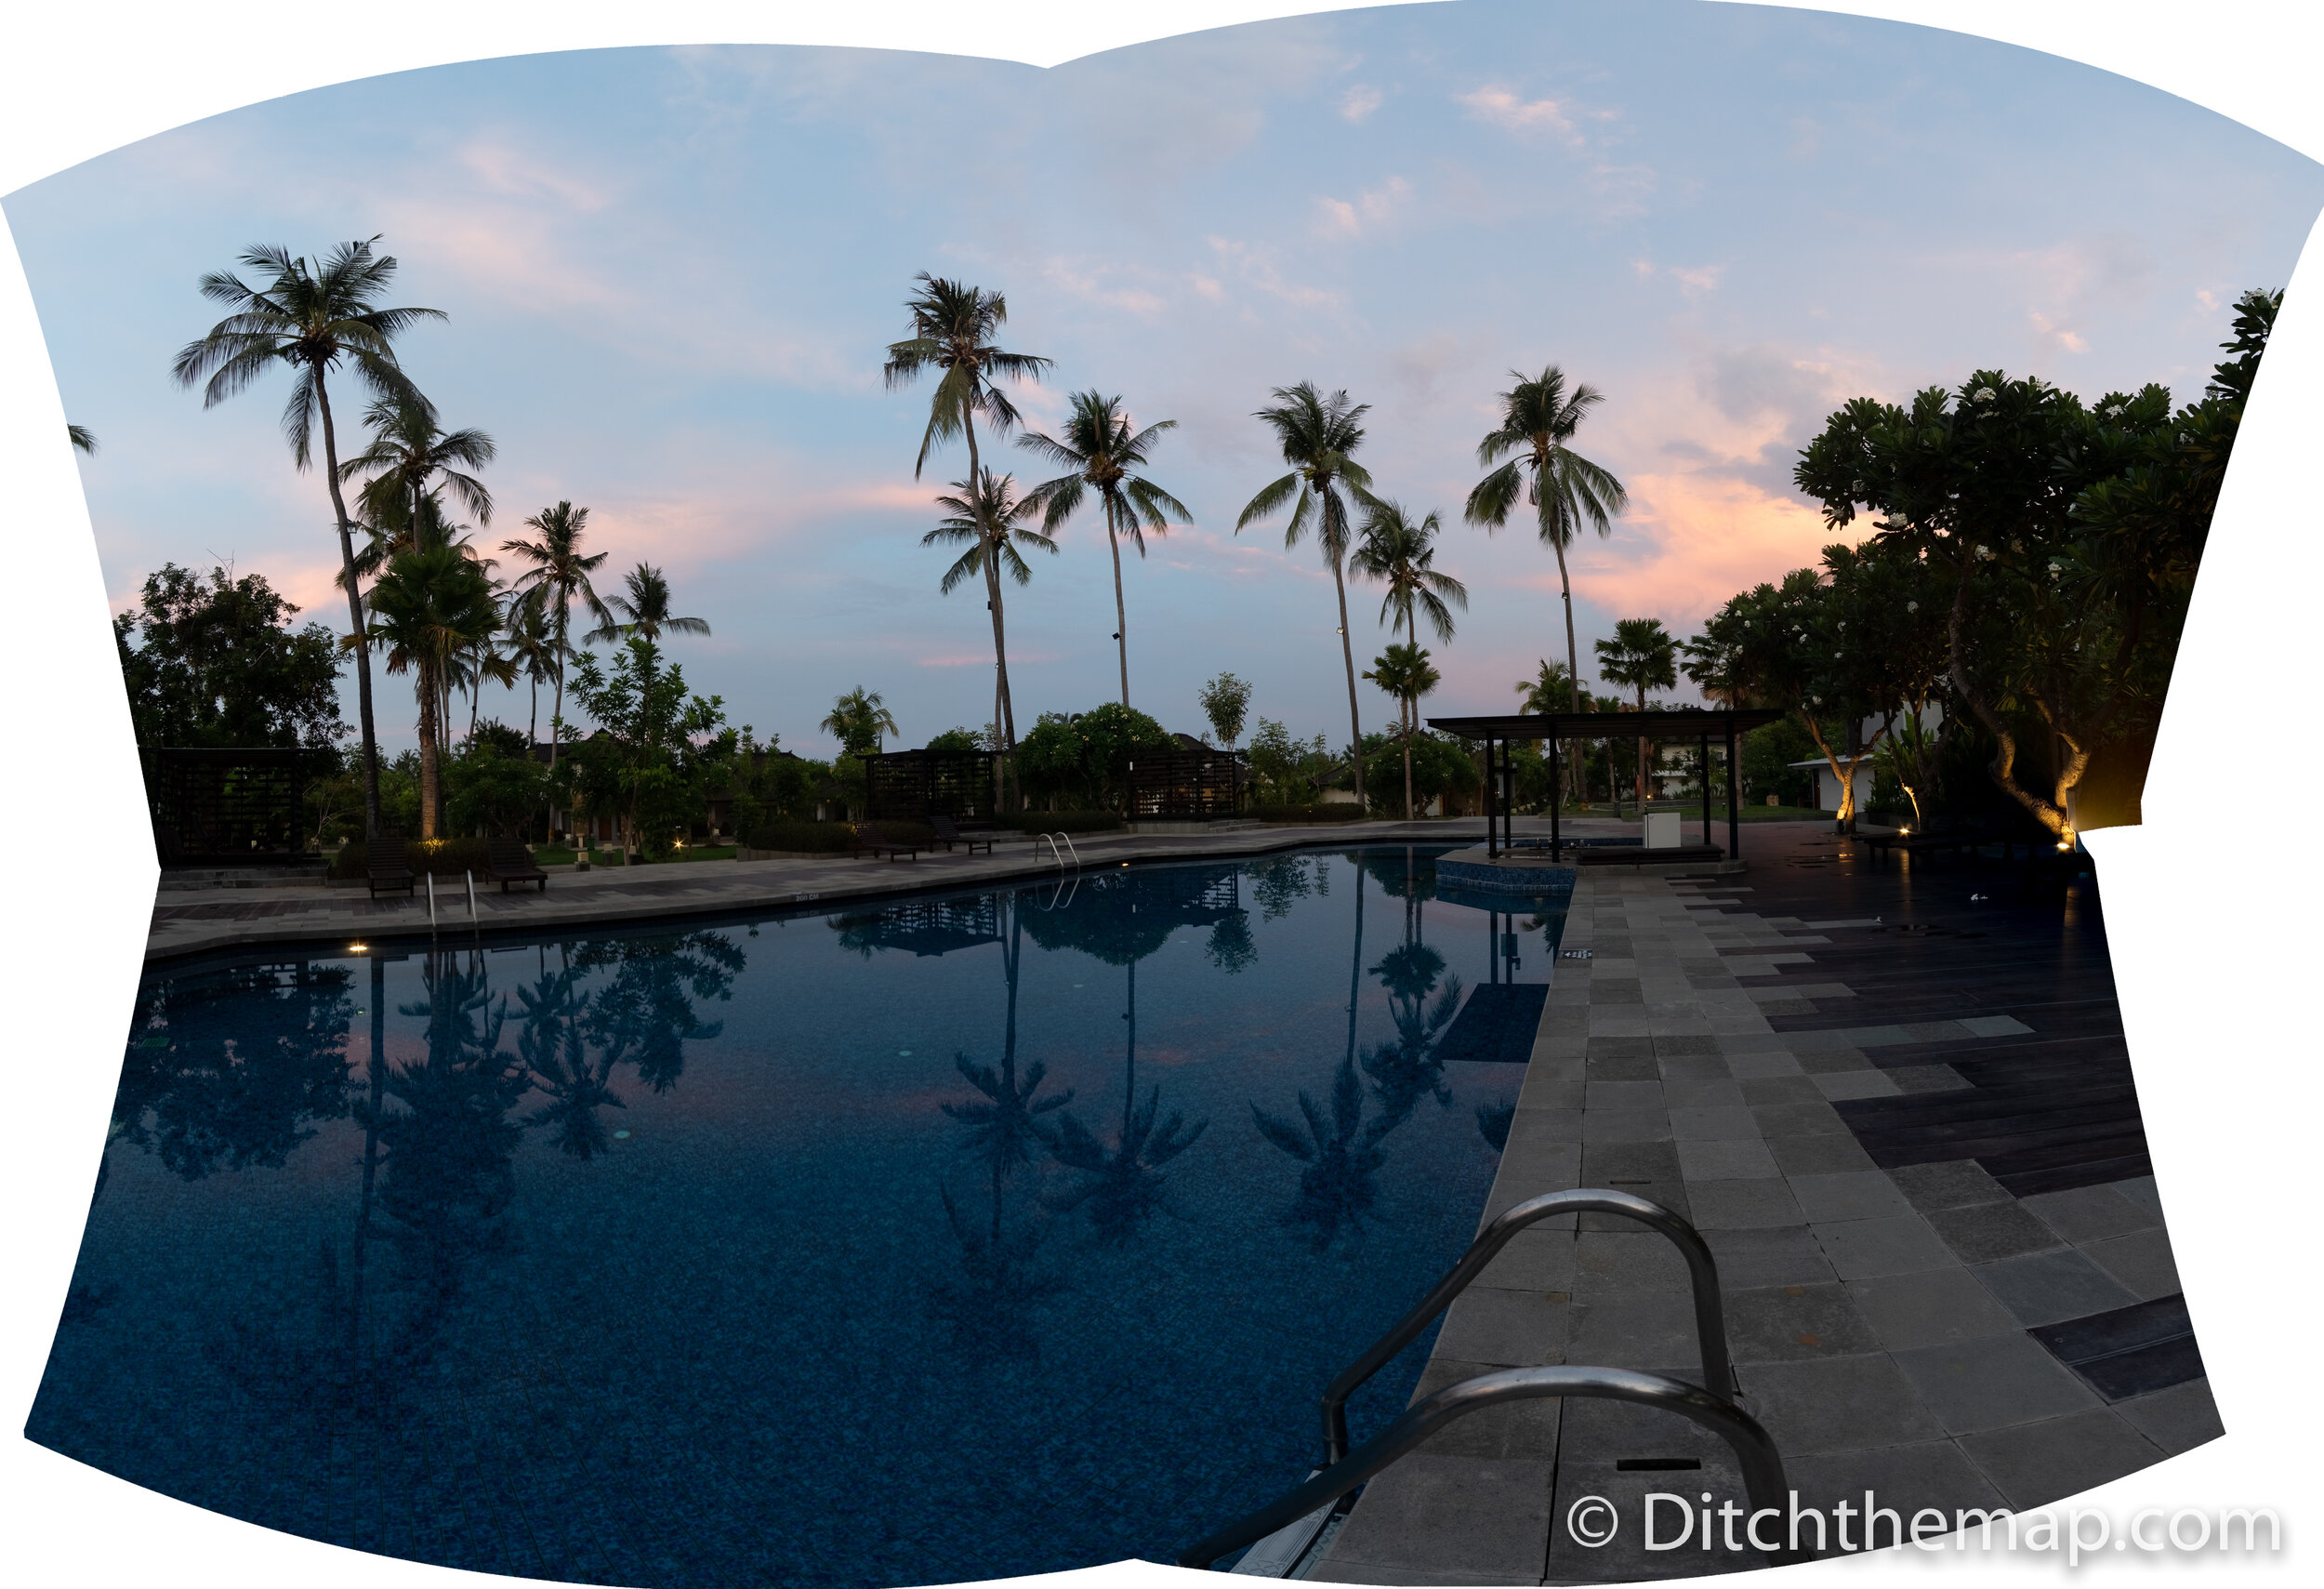
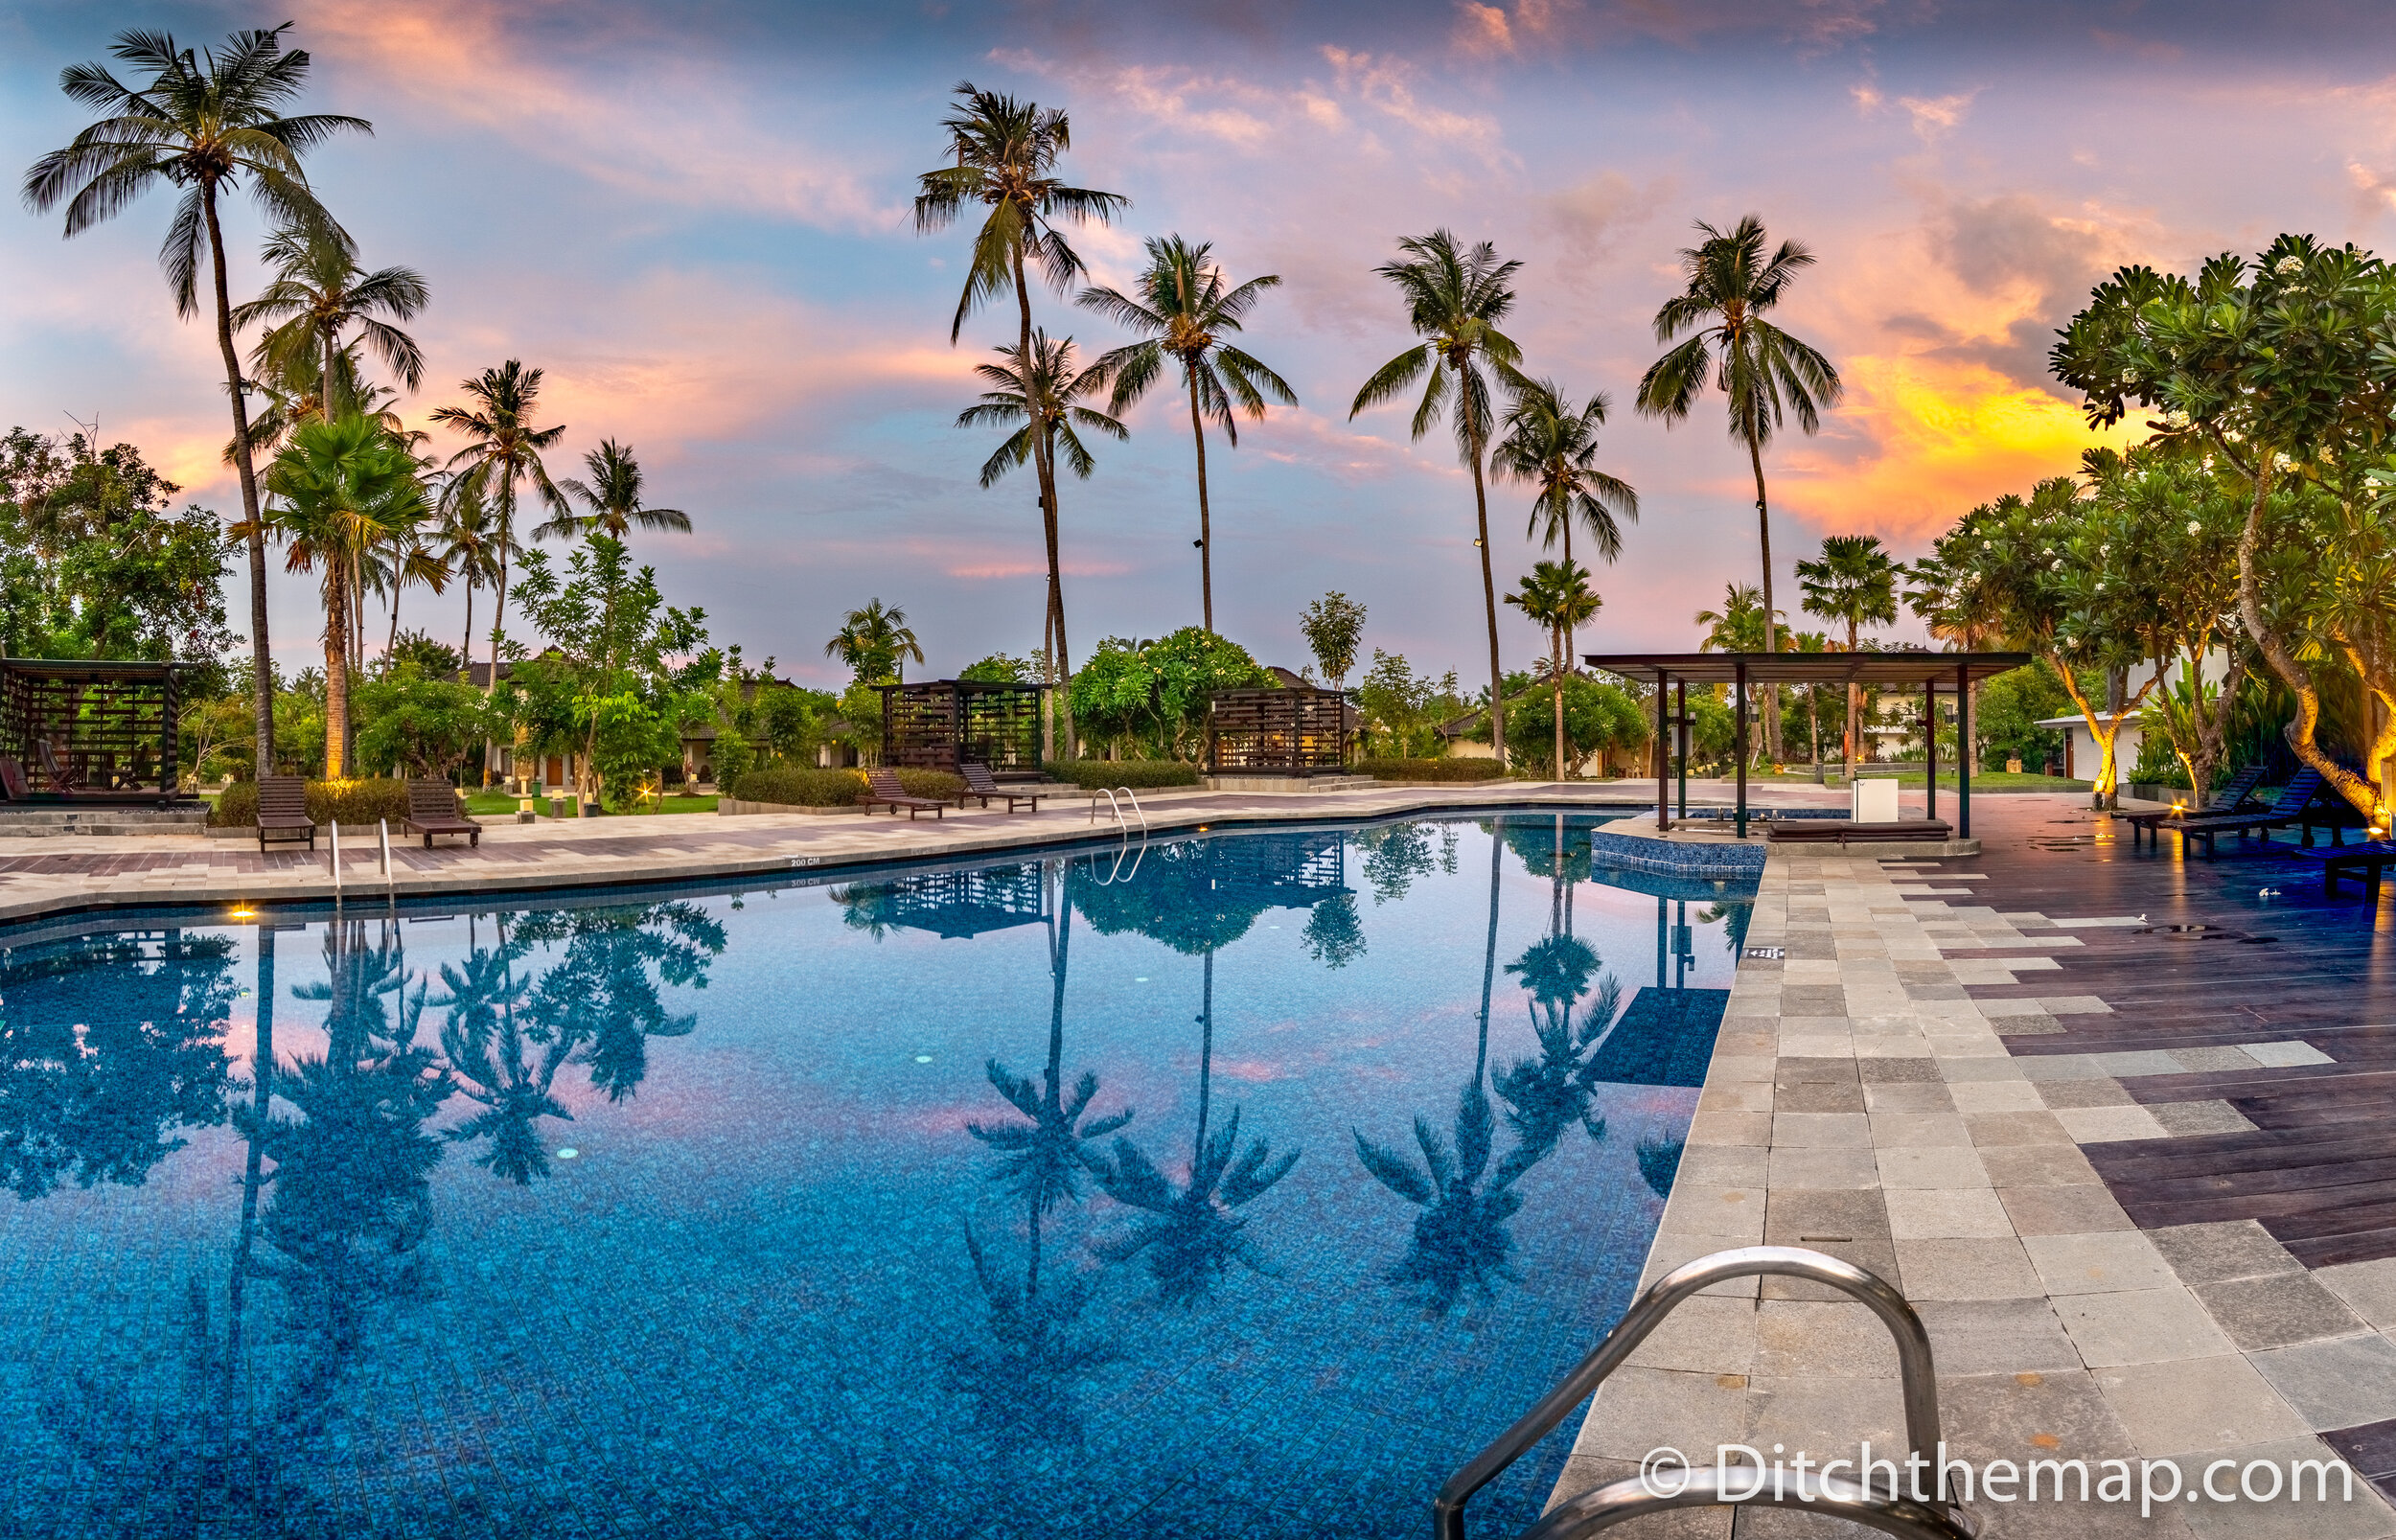
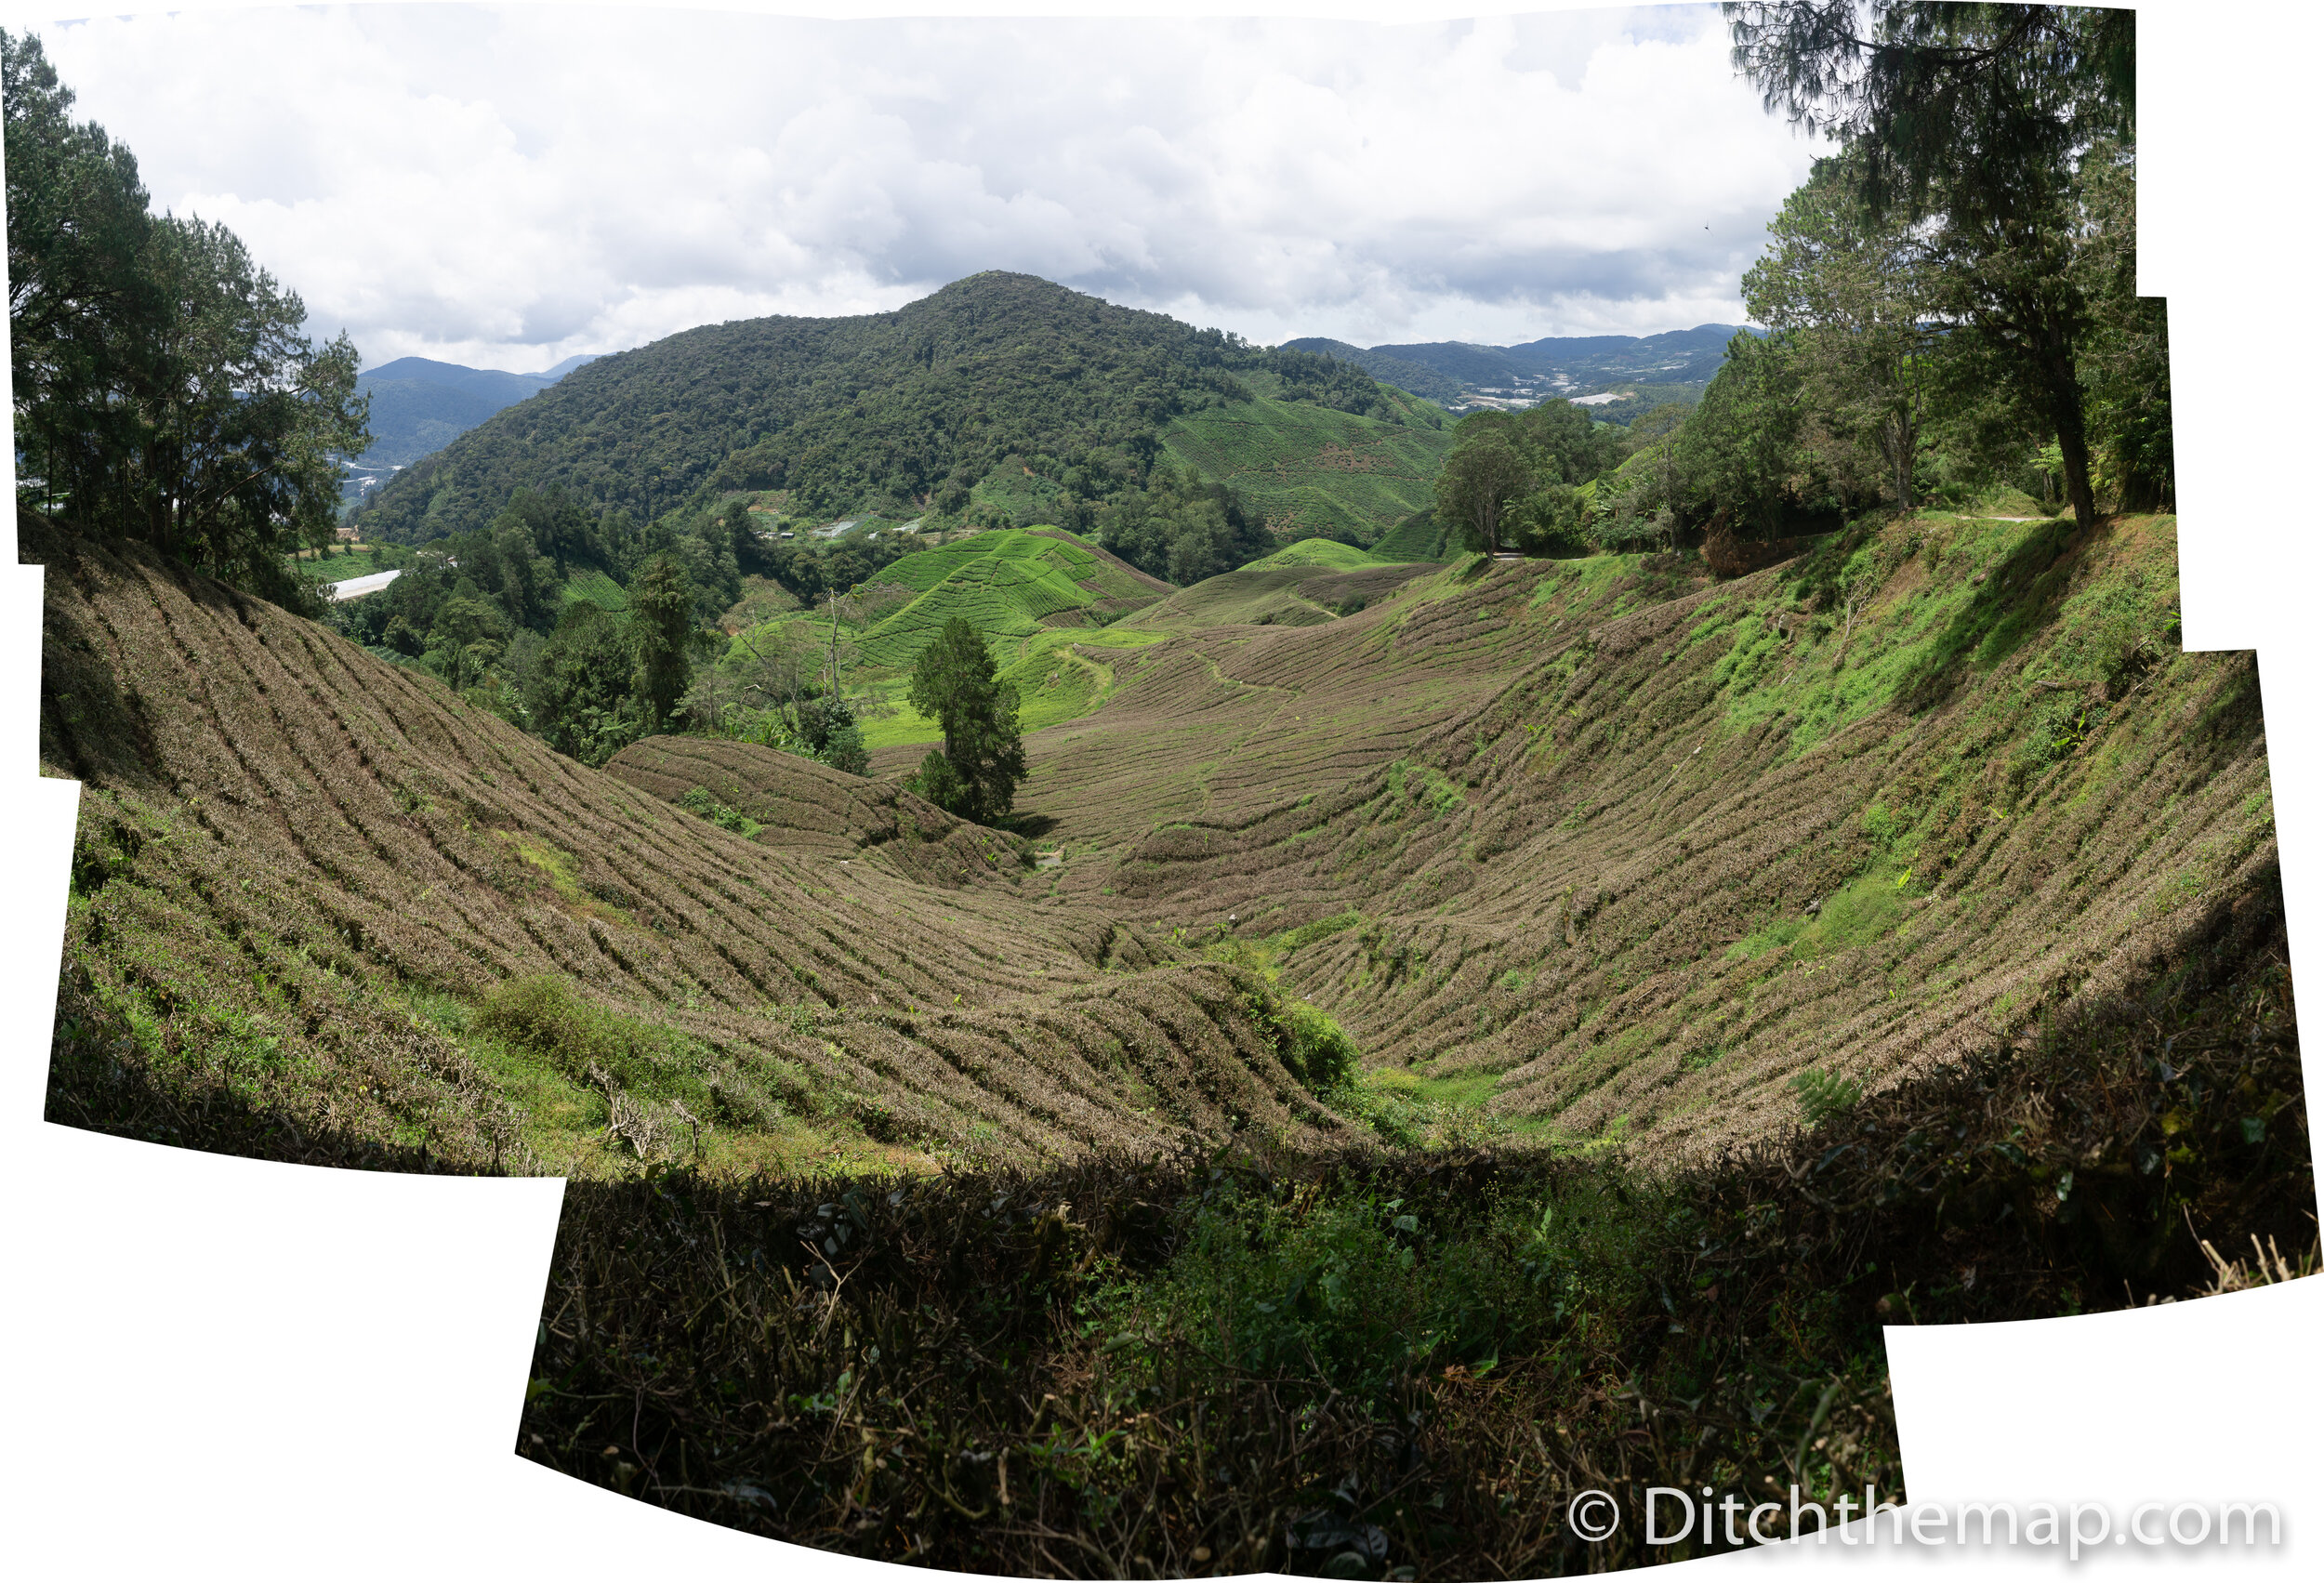
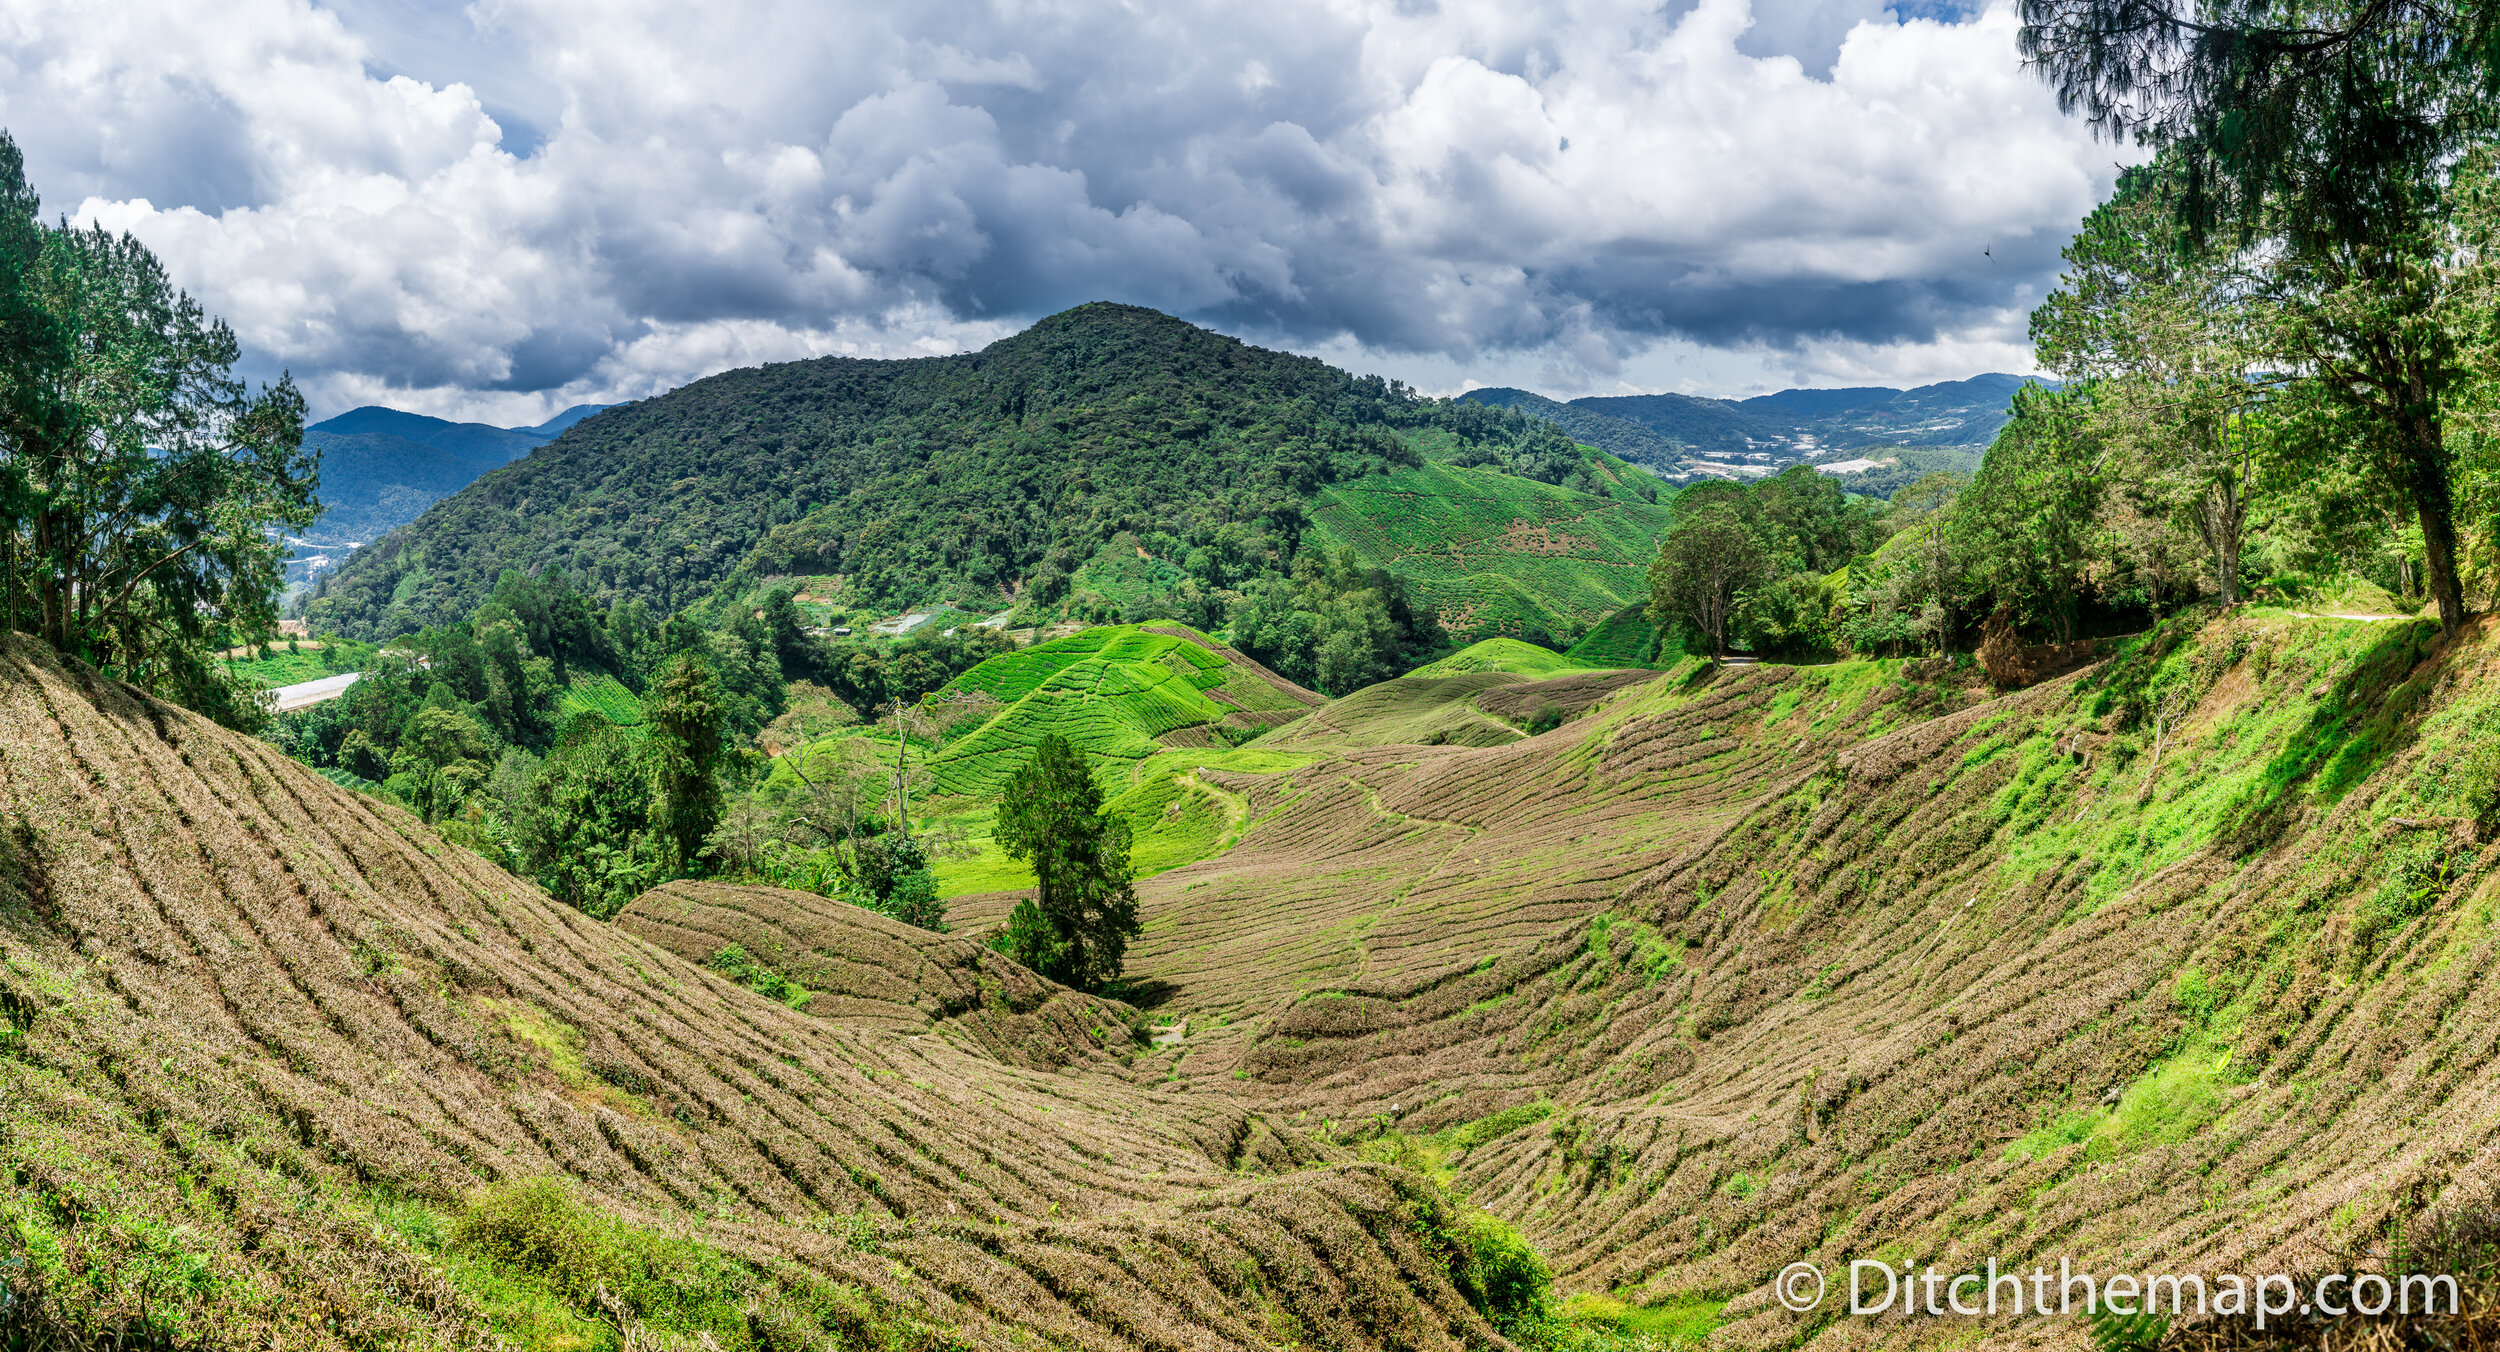
Tripods are also vital when taking multiple photos that need to be processed together, like as in the case of HDR shots. Additionally panoramic shots stitch together seamlessly when using a tripod. The photos below were each created using over 50 ultra wide angle high definition photographs at numerous exposure settings (HDR) to create the final photo. The camera was positioned on a tripod to ensure the photos could be properly aligned.
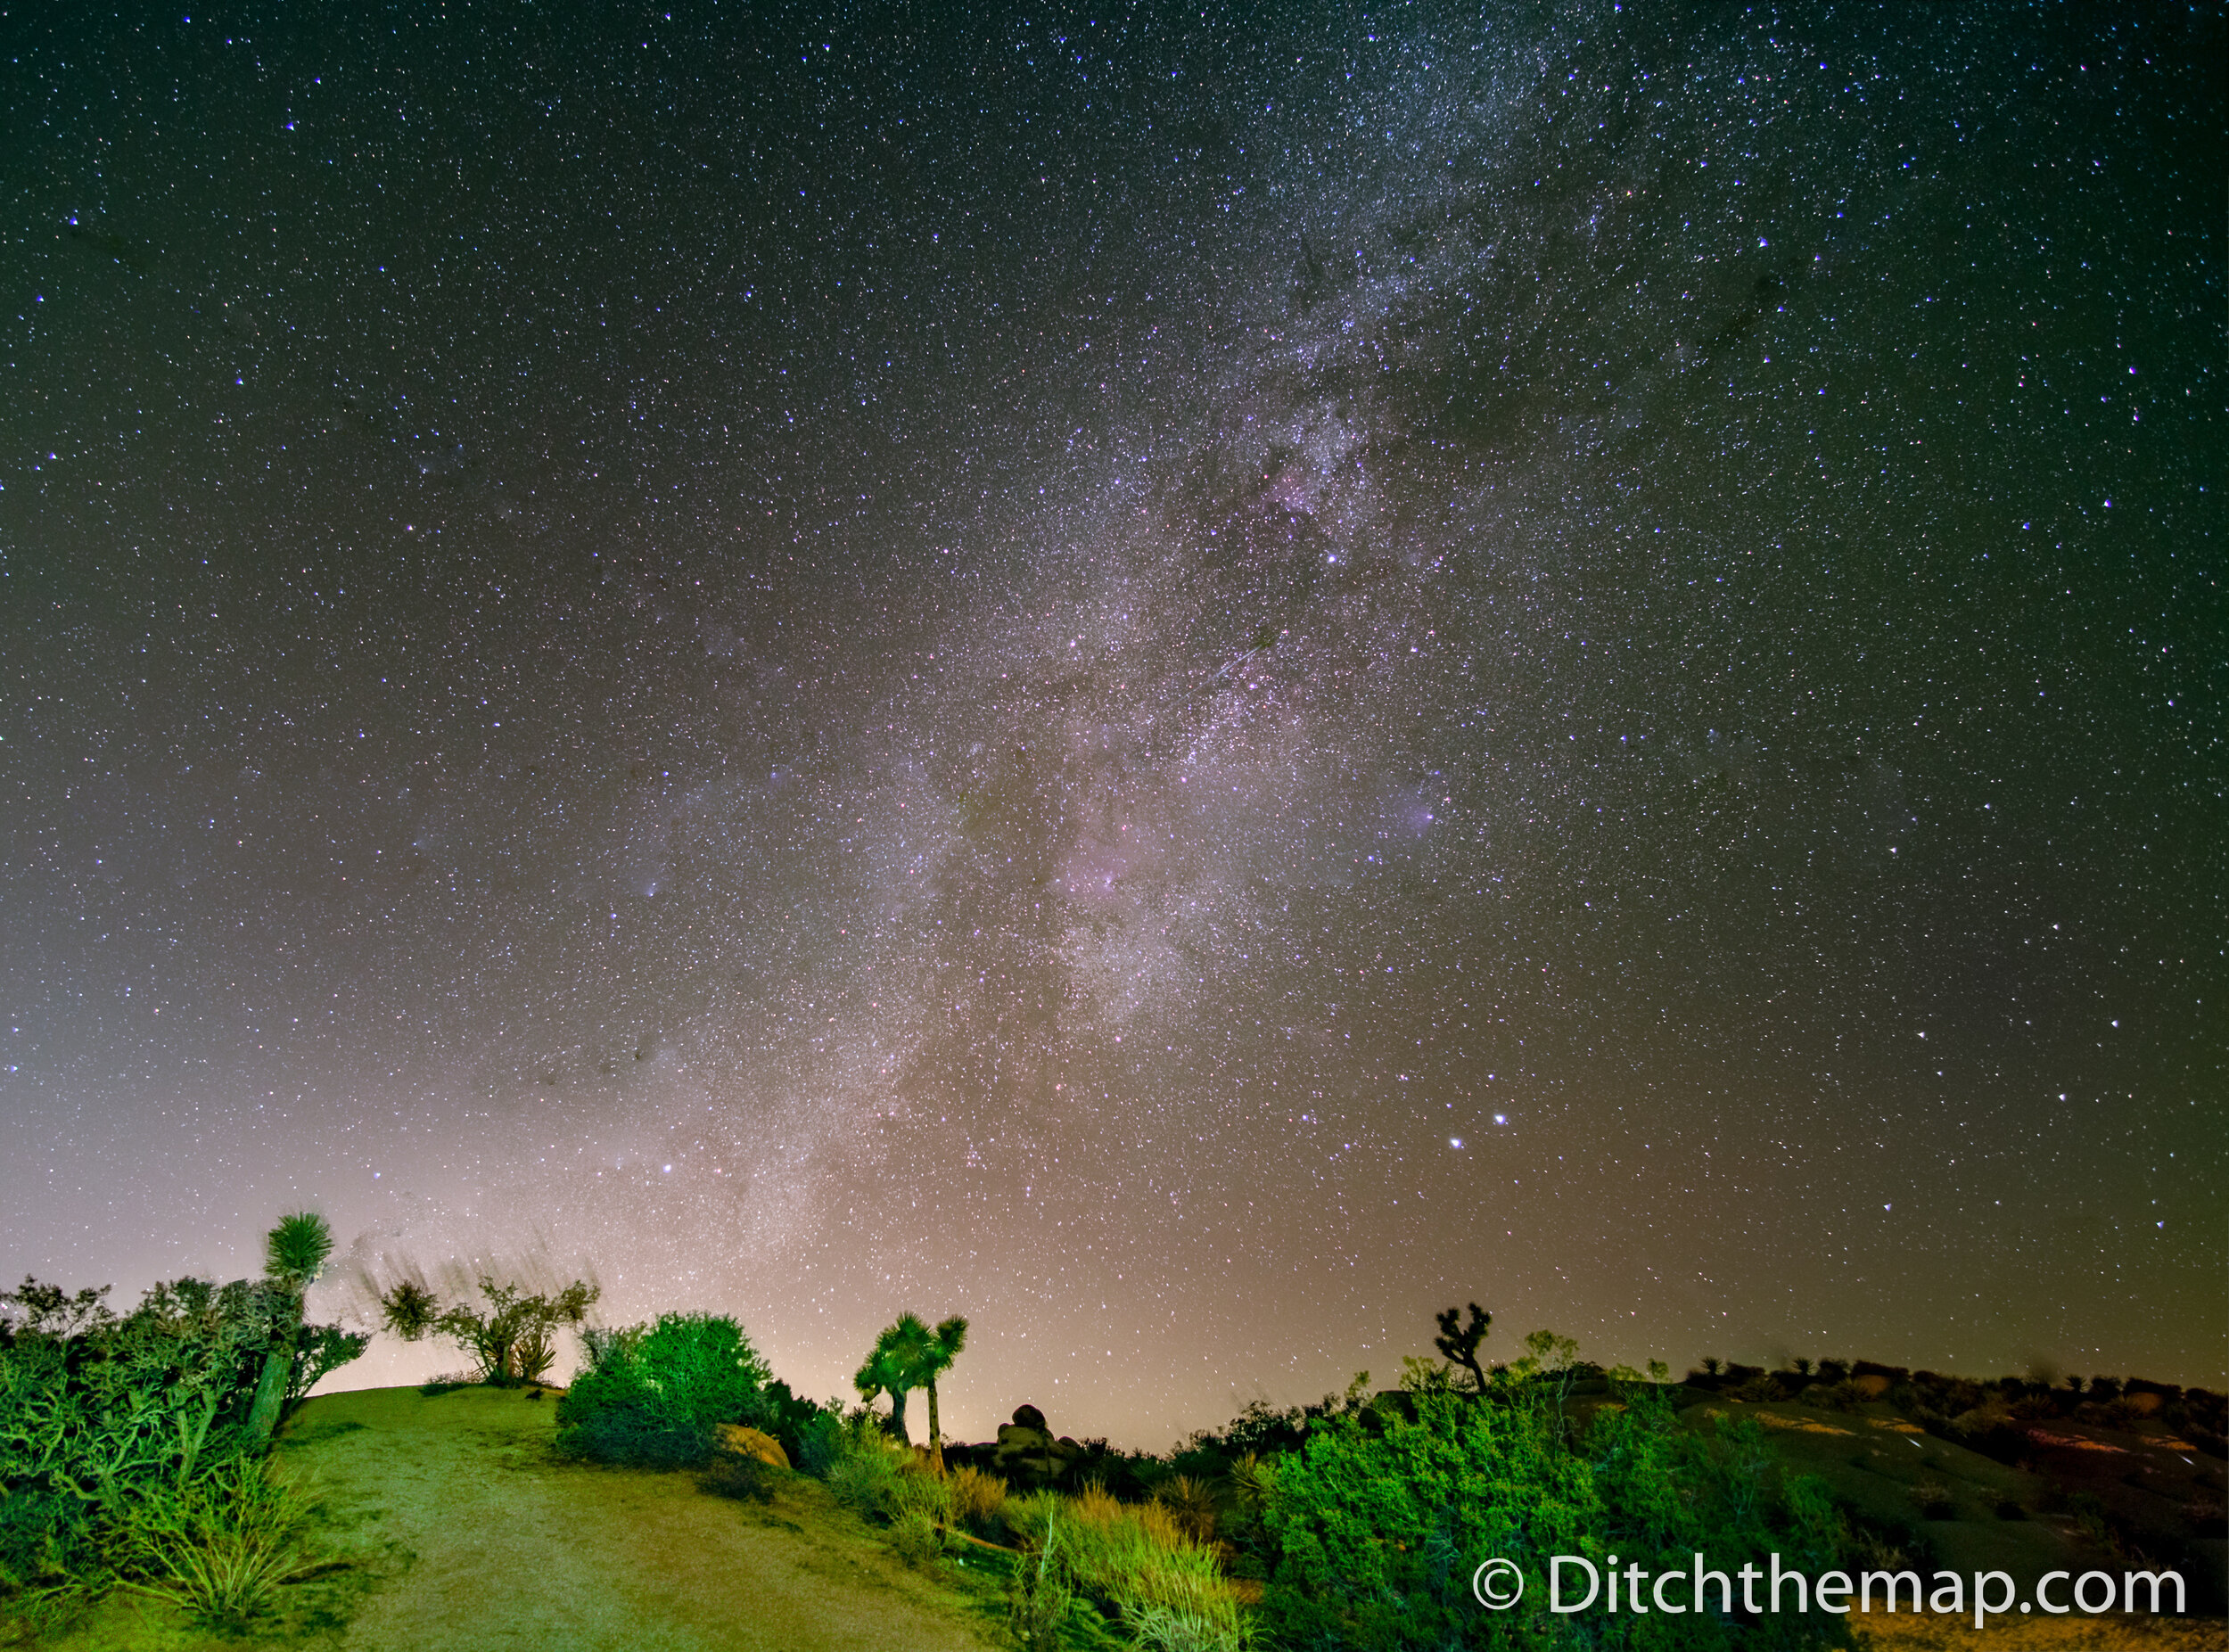
The starscape below was made possible through stacking numerous long exposures (~8 seconds per shots). By stacking multiple photos I was able to increase the amount of light to develop a final photo. If I had simply done 1 very long exposure the stars would have shifted too much and I would have created a star trail. By taking many shorter photos and then using software (Starry Landscape Stacker) to align the stars I was able to create the photo below, which clearly shows the Milky Way Galaxy. Additionally, in order to get the foreground illuminated I briefly shined my headlight for a few seconds during one of the numerous exposures. The photo was taken in Joshua Tree National Park during our 4-month USA road trip.

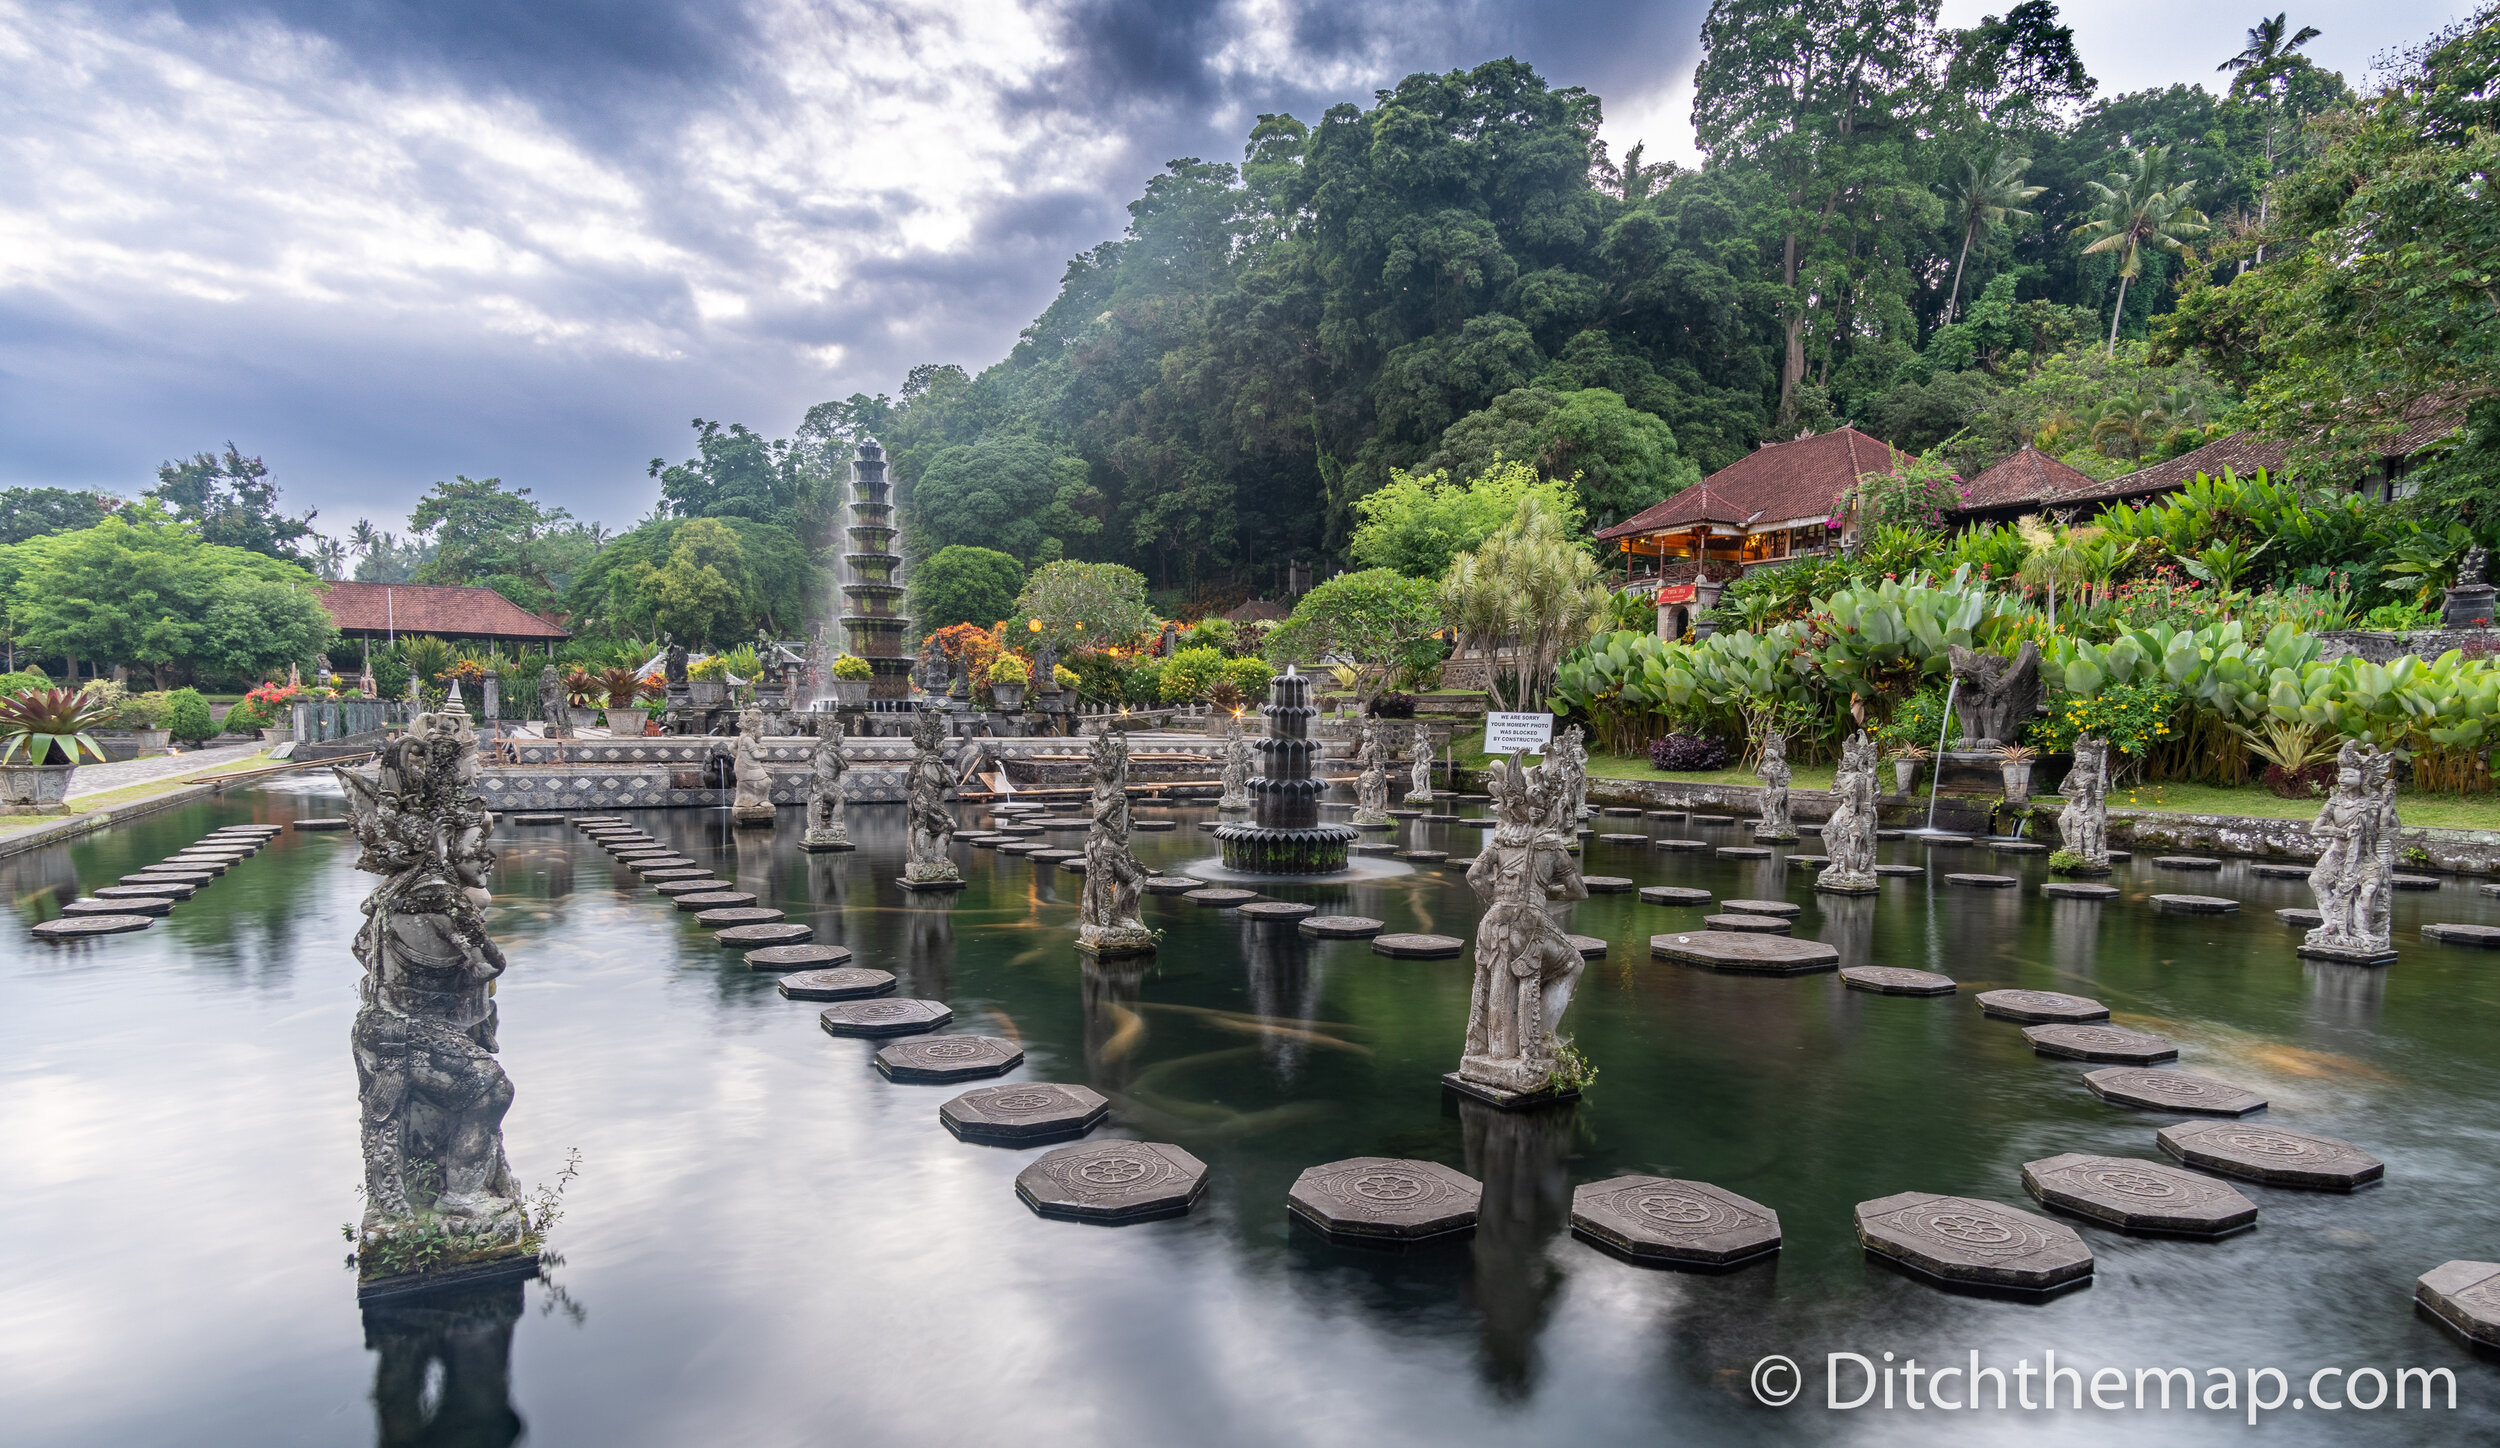
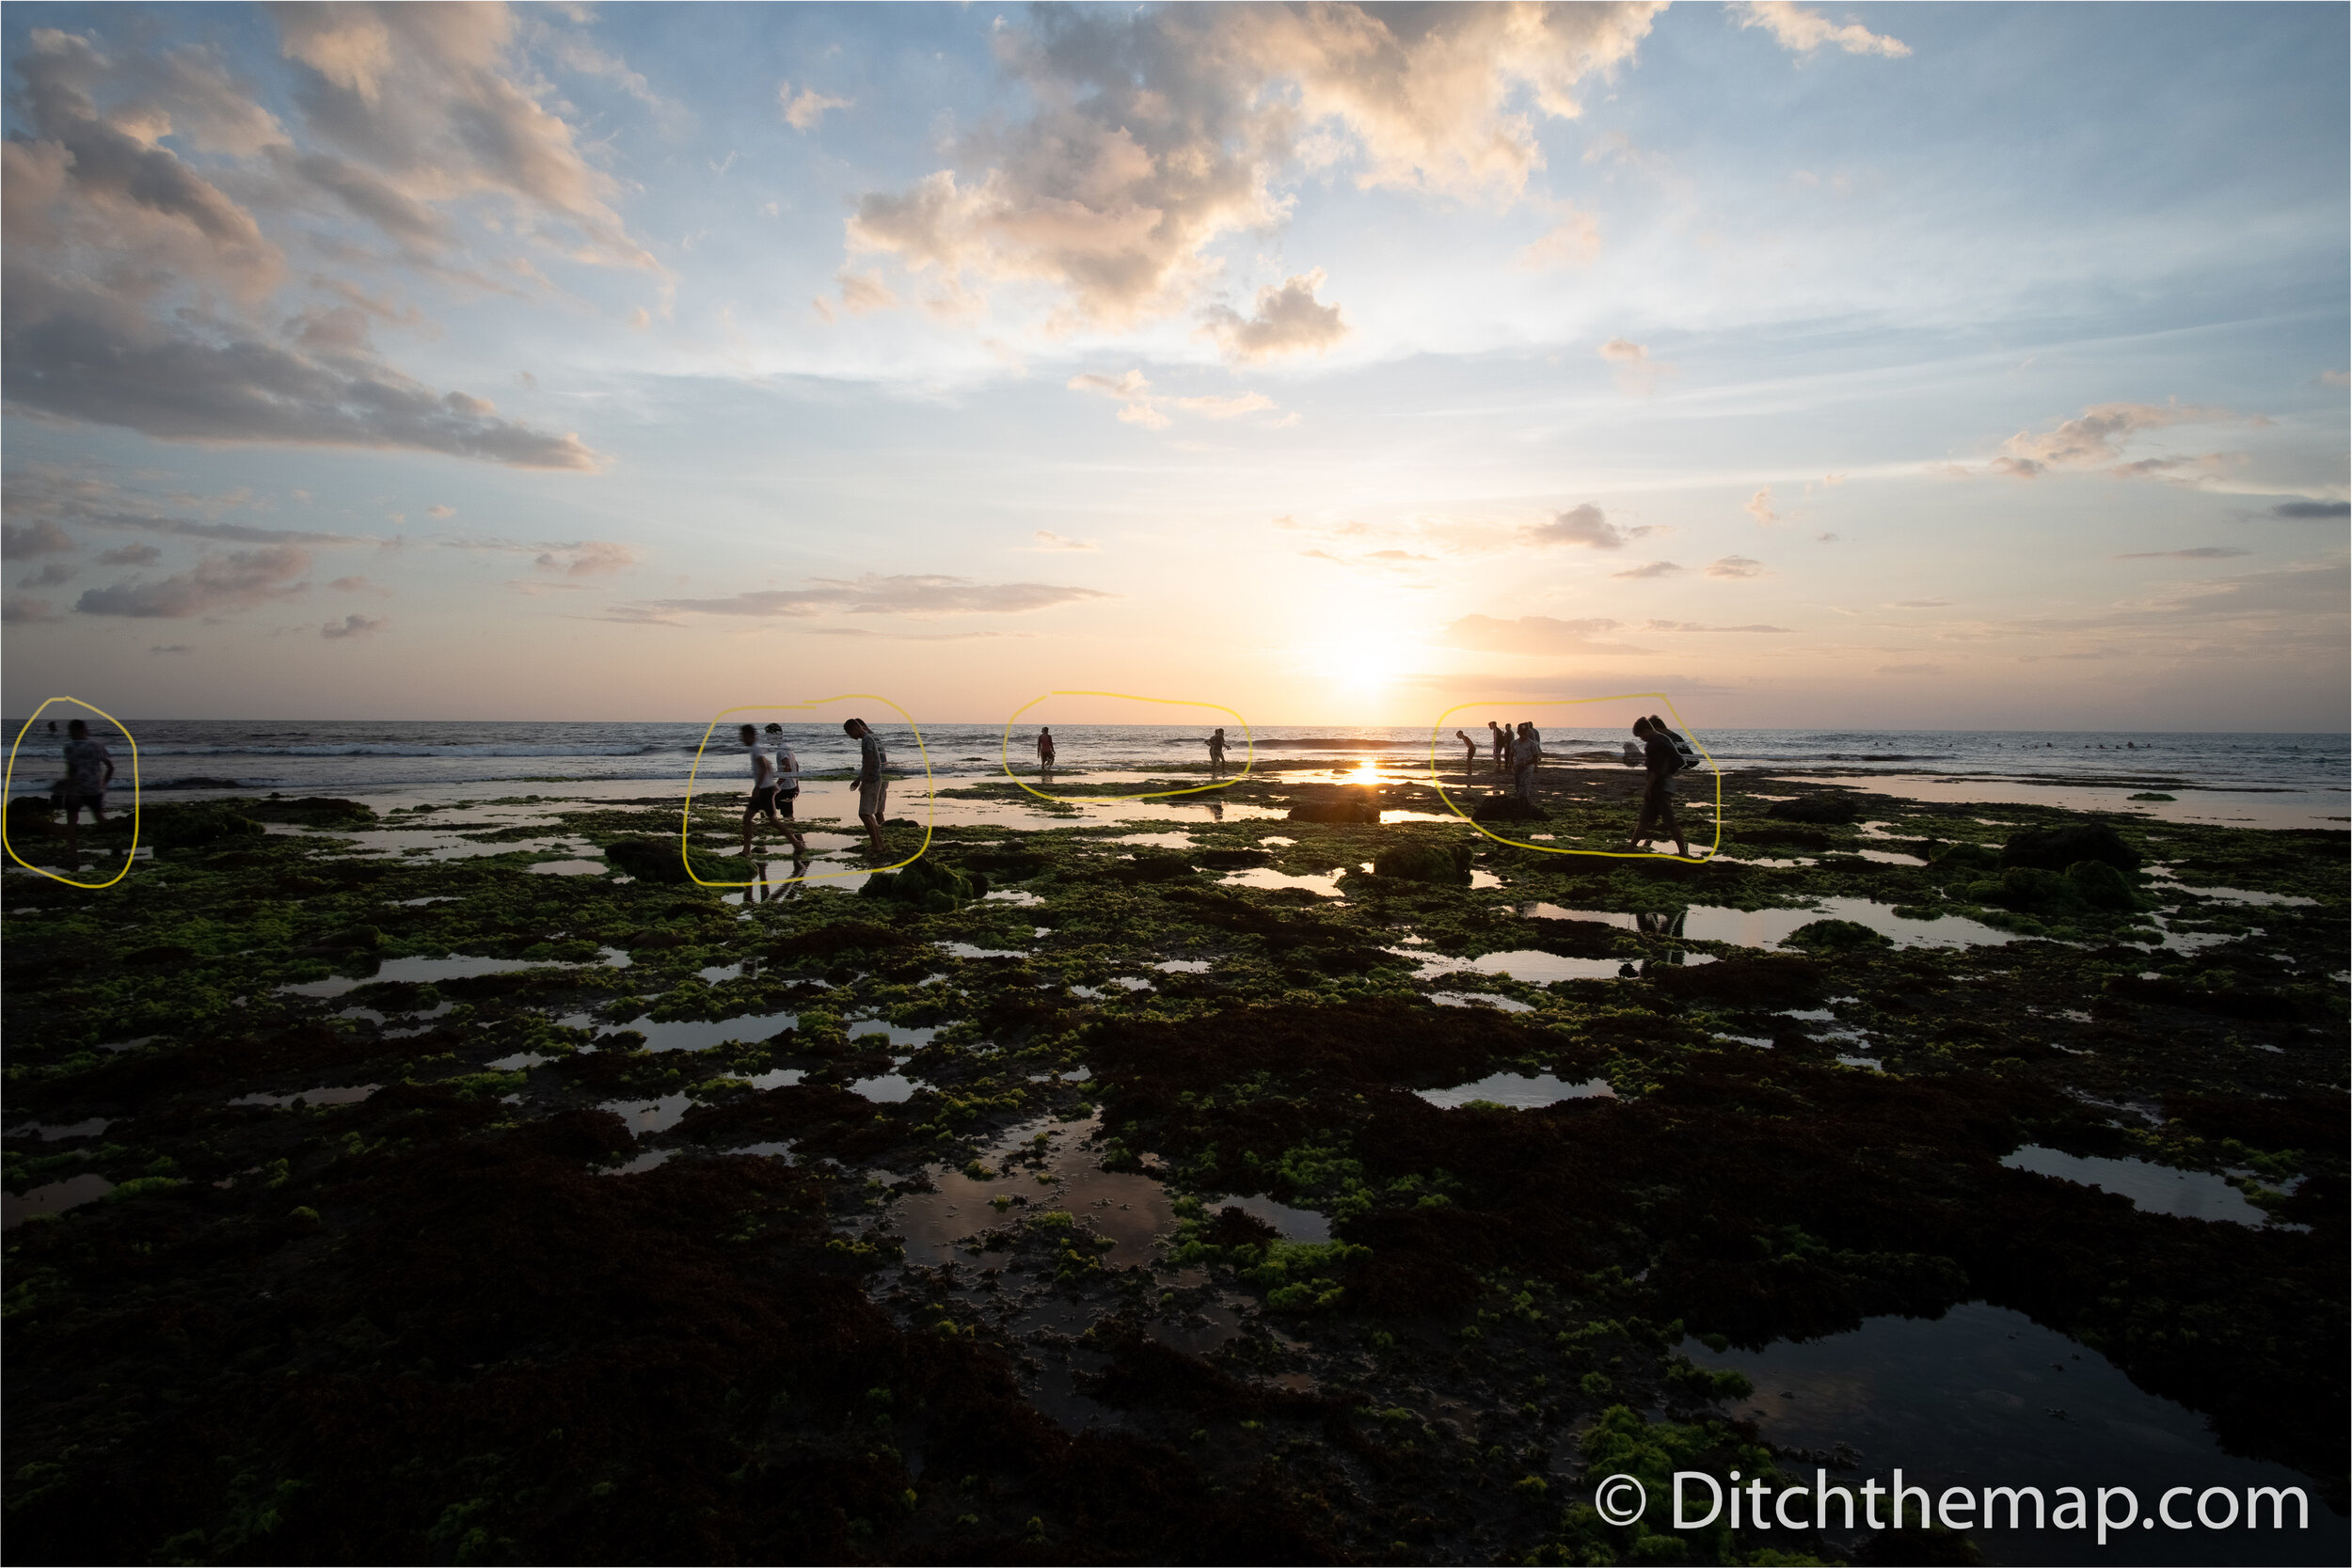
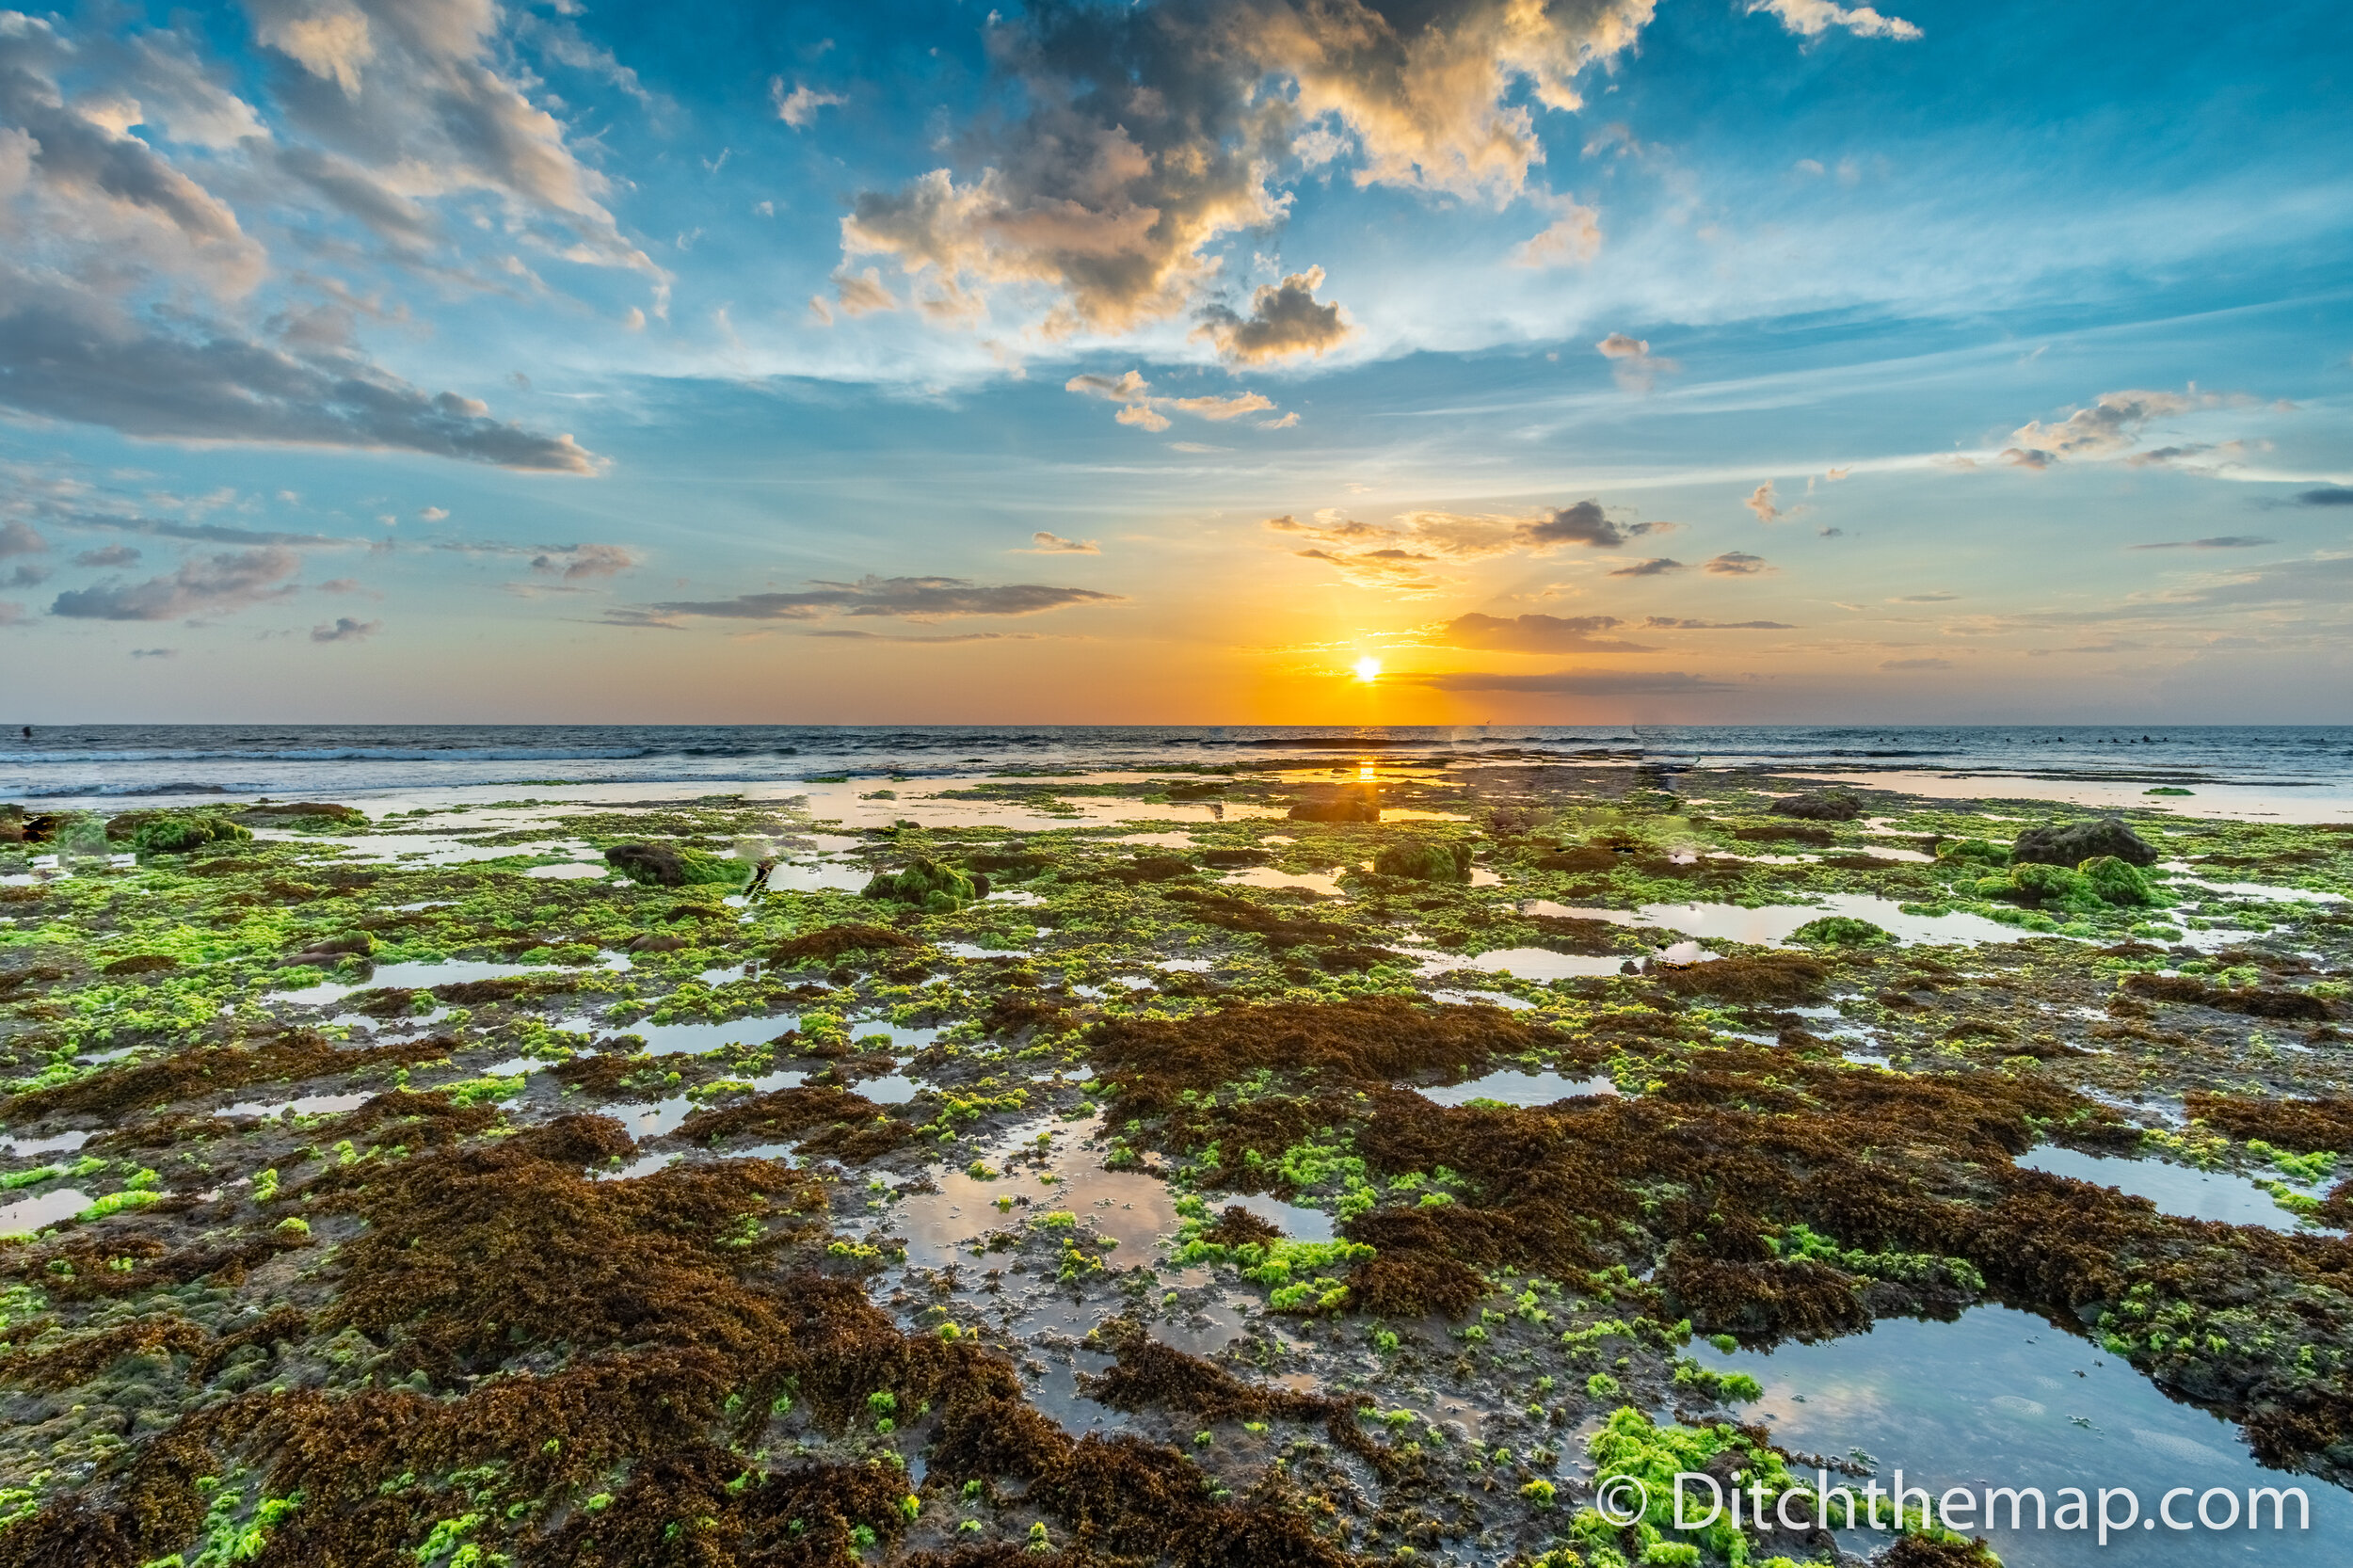
Using my tripod I was able to take a long exposure without any worry of camera shake. By taking several long exposures and stacking them in Photoshop I was able to accomplish two things. First I was able to smooth out the surface of the water (and with the help of my circular polarizer even able to capture the coy fish just under the surface). Second I was able to effectively ‘remove’ all the people in the frame. With a very long exposure only the objects that are stationary the entire time remain in the photo—since the people were moving around the frame they were effectively ‘averaged out’. You can read more about technique here.
Equipment - Accessories:
Batteries - Bring extra because oftentimes you cannot charge when you are in the wilderness. Also the cold weather will greatly reduce your battery’s claimed ~400 shot capacity to 20 photos. A common technique is to keep your spare batteries in your pocket to keep them warm to preserve their function.
SD Card(s) - Bring as many as you need. I’ve met travelers who switch their SD cards often to help prevent against loss or broken components. I simply use a hard drive to backup my photos regularly.
Strap - I use this when walking around town and want to be unencumbered.
Filter(s) - VERY IMPORTANT and probably not taken seriously enough by many amateur and photo hobbyists! In a world with Instagram filters being as easy as a click of a button who can blame them. Although digital cameras have replaced their manual counterparts digital filters are fundamentally different and can never replace actual on-lens filters. Digital filters are only able to alter photos already captured by a camera. On-lens filters, on the other hand, filter the light that hits your sensor. While there are on-lens filters that can be easily replaced with simple photo editing software there are several types of filters that cannot be replicated.
Circular Polarizer (CP) Filter - Without getting into the physics this type of filter blocks out certain types of glare caused by reflected sunlight. These filters work great for reducing glare on smooth surfaces like water and windows. Even green foliage looks greener as the filter cuts down on the shiny glare caused by the sun. Learn more about CP filters here.
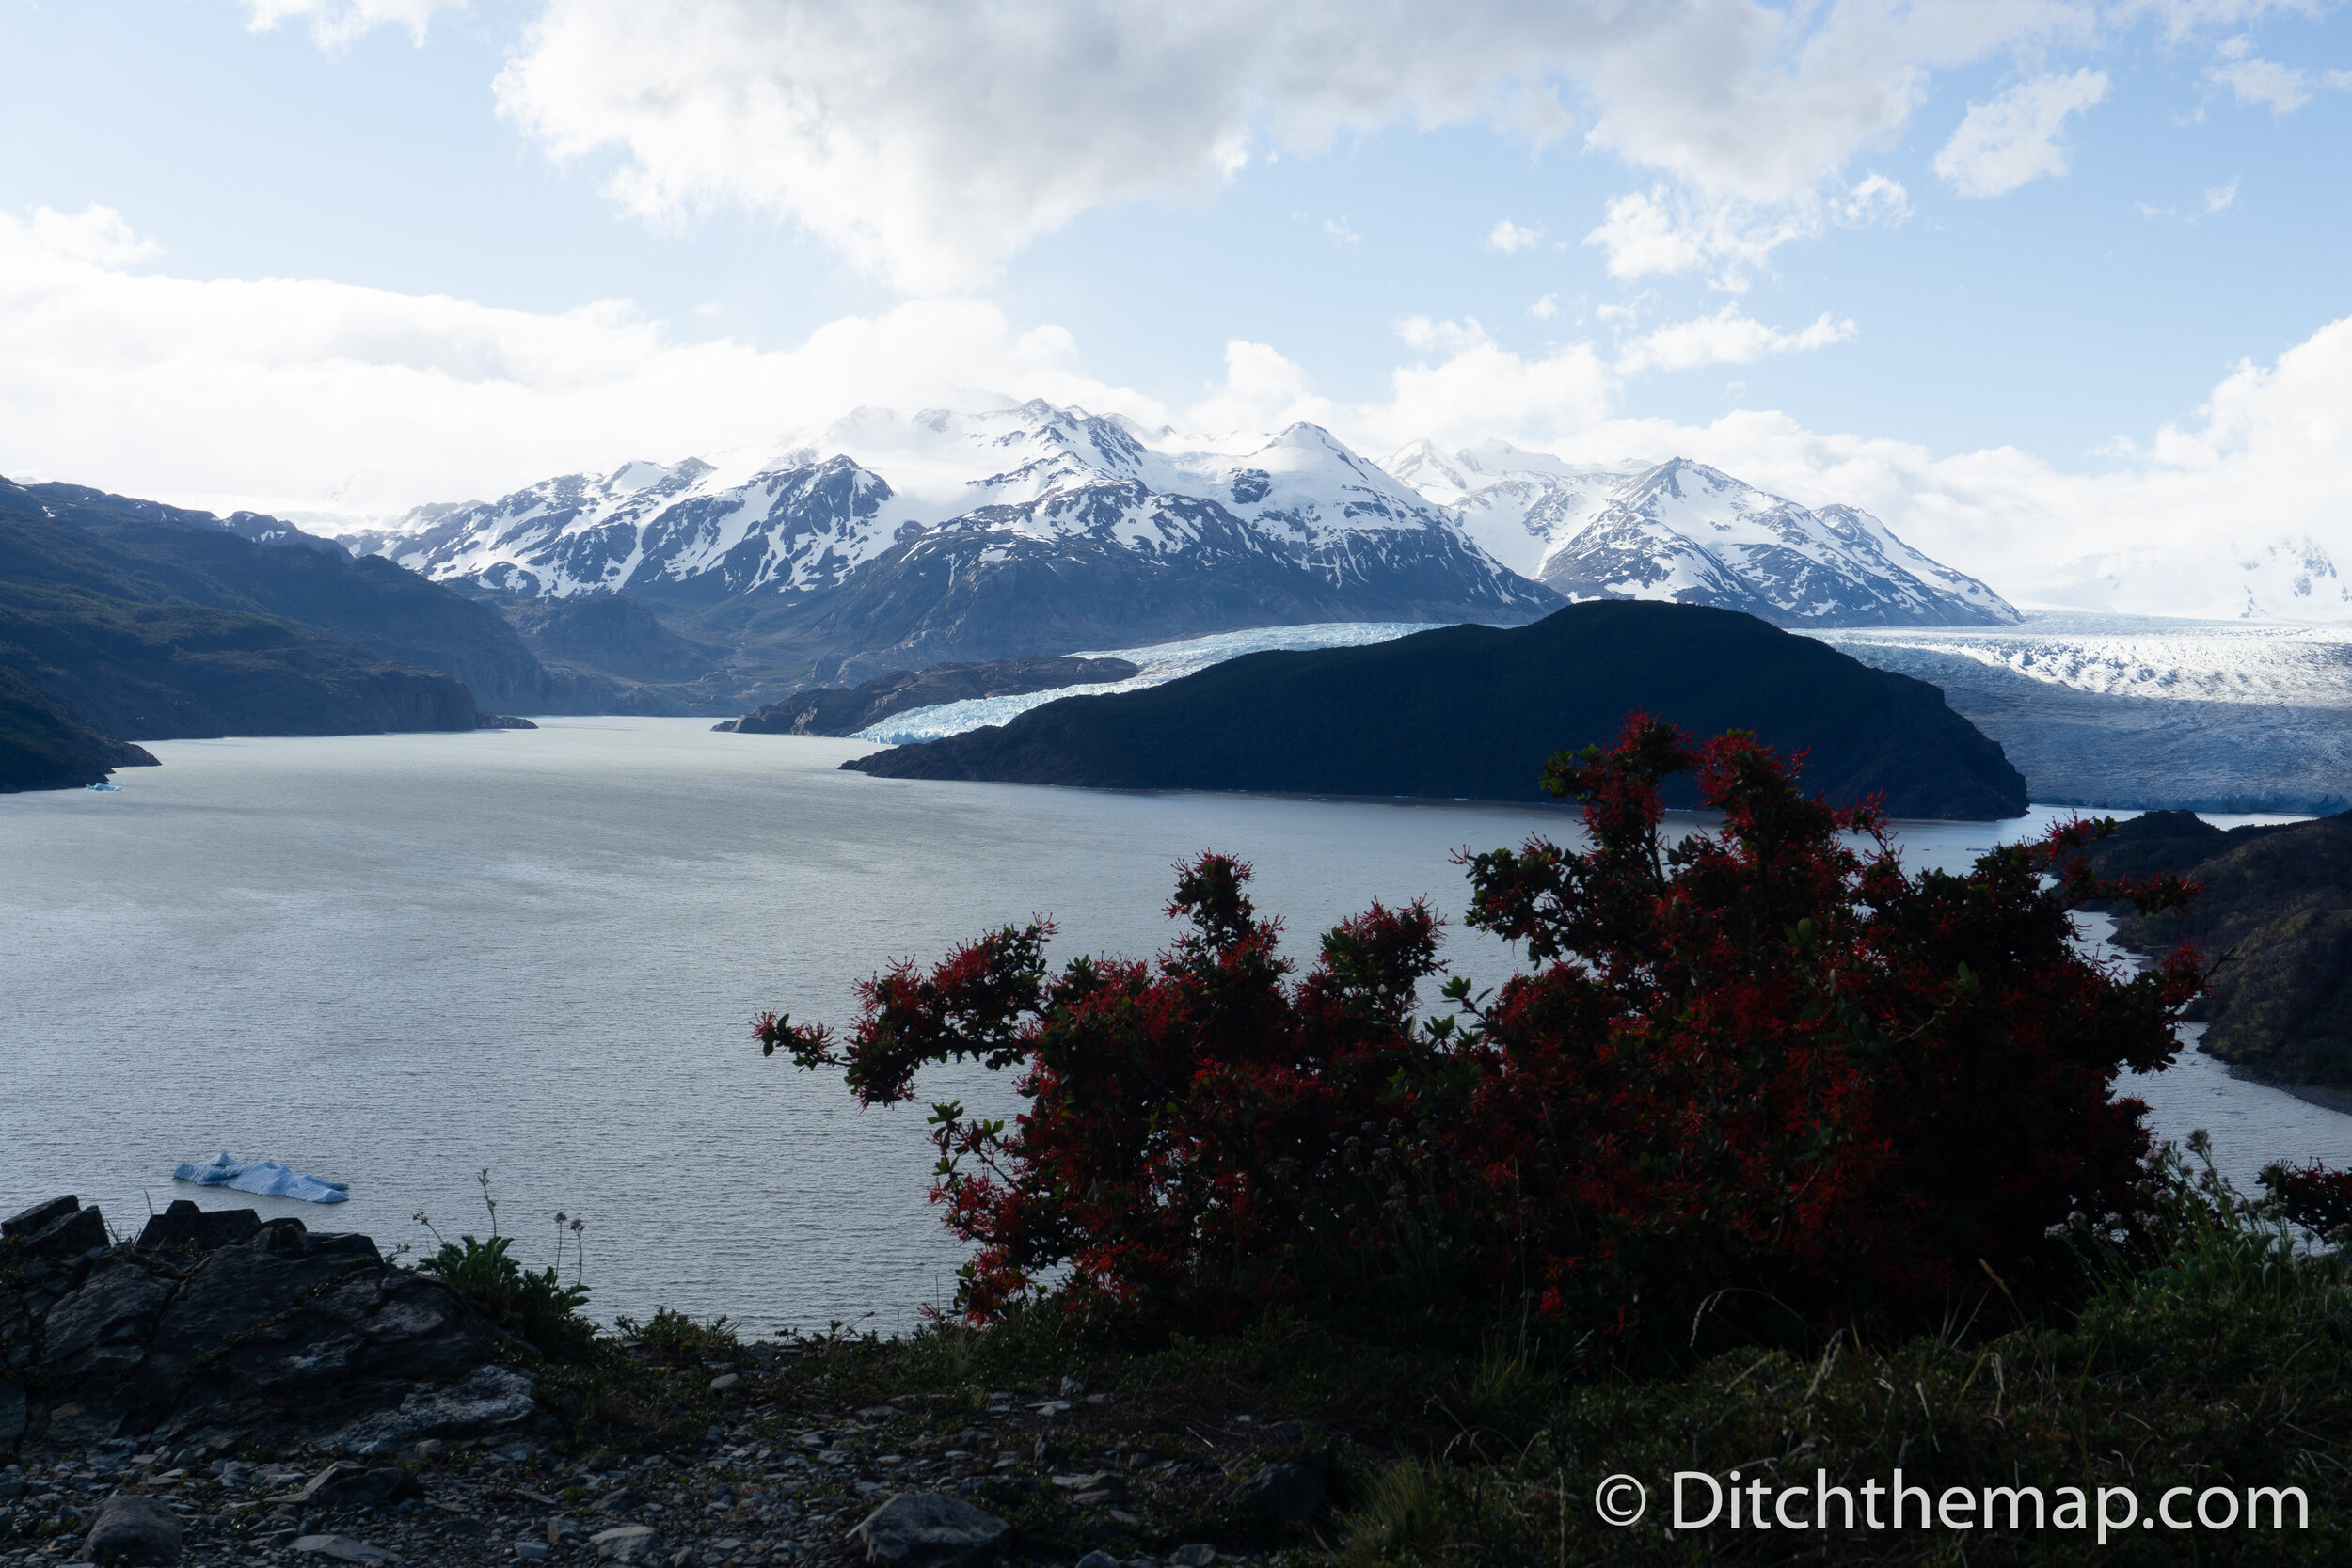
Neutral Density (ND) Filter - This filter is like sunglasses for your lens. Using this filter cuts down on available light forcing a longer exposure (or wider aperture) for proper exposure. For example, say your lens has a sweet spot at F5.6 and you want to capture a glacier lake during twilight (like the photo below). Without an ND filter your exposure might only be 0.5 seconds. You can add an ND filter to extend your shutter speed to 10 seconds giving you a nice glossy smooth surface. An ND filter was used in the glacial lake photo below.
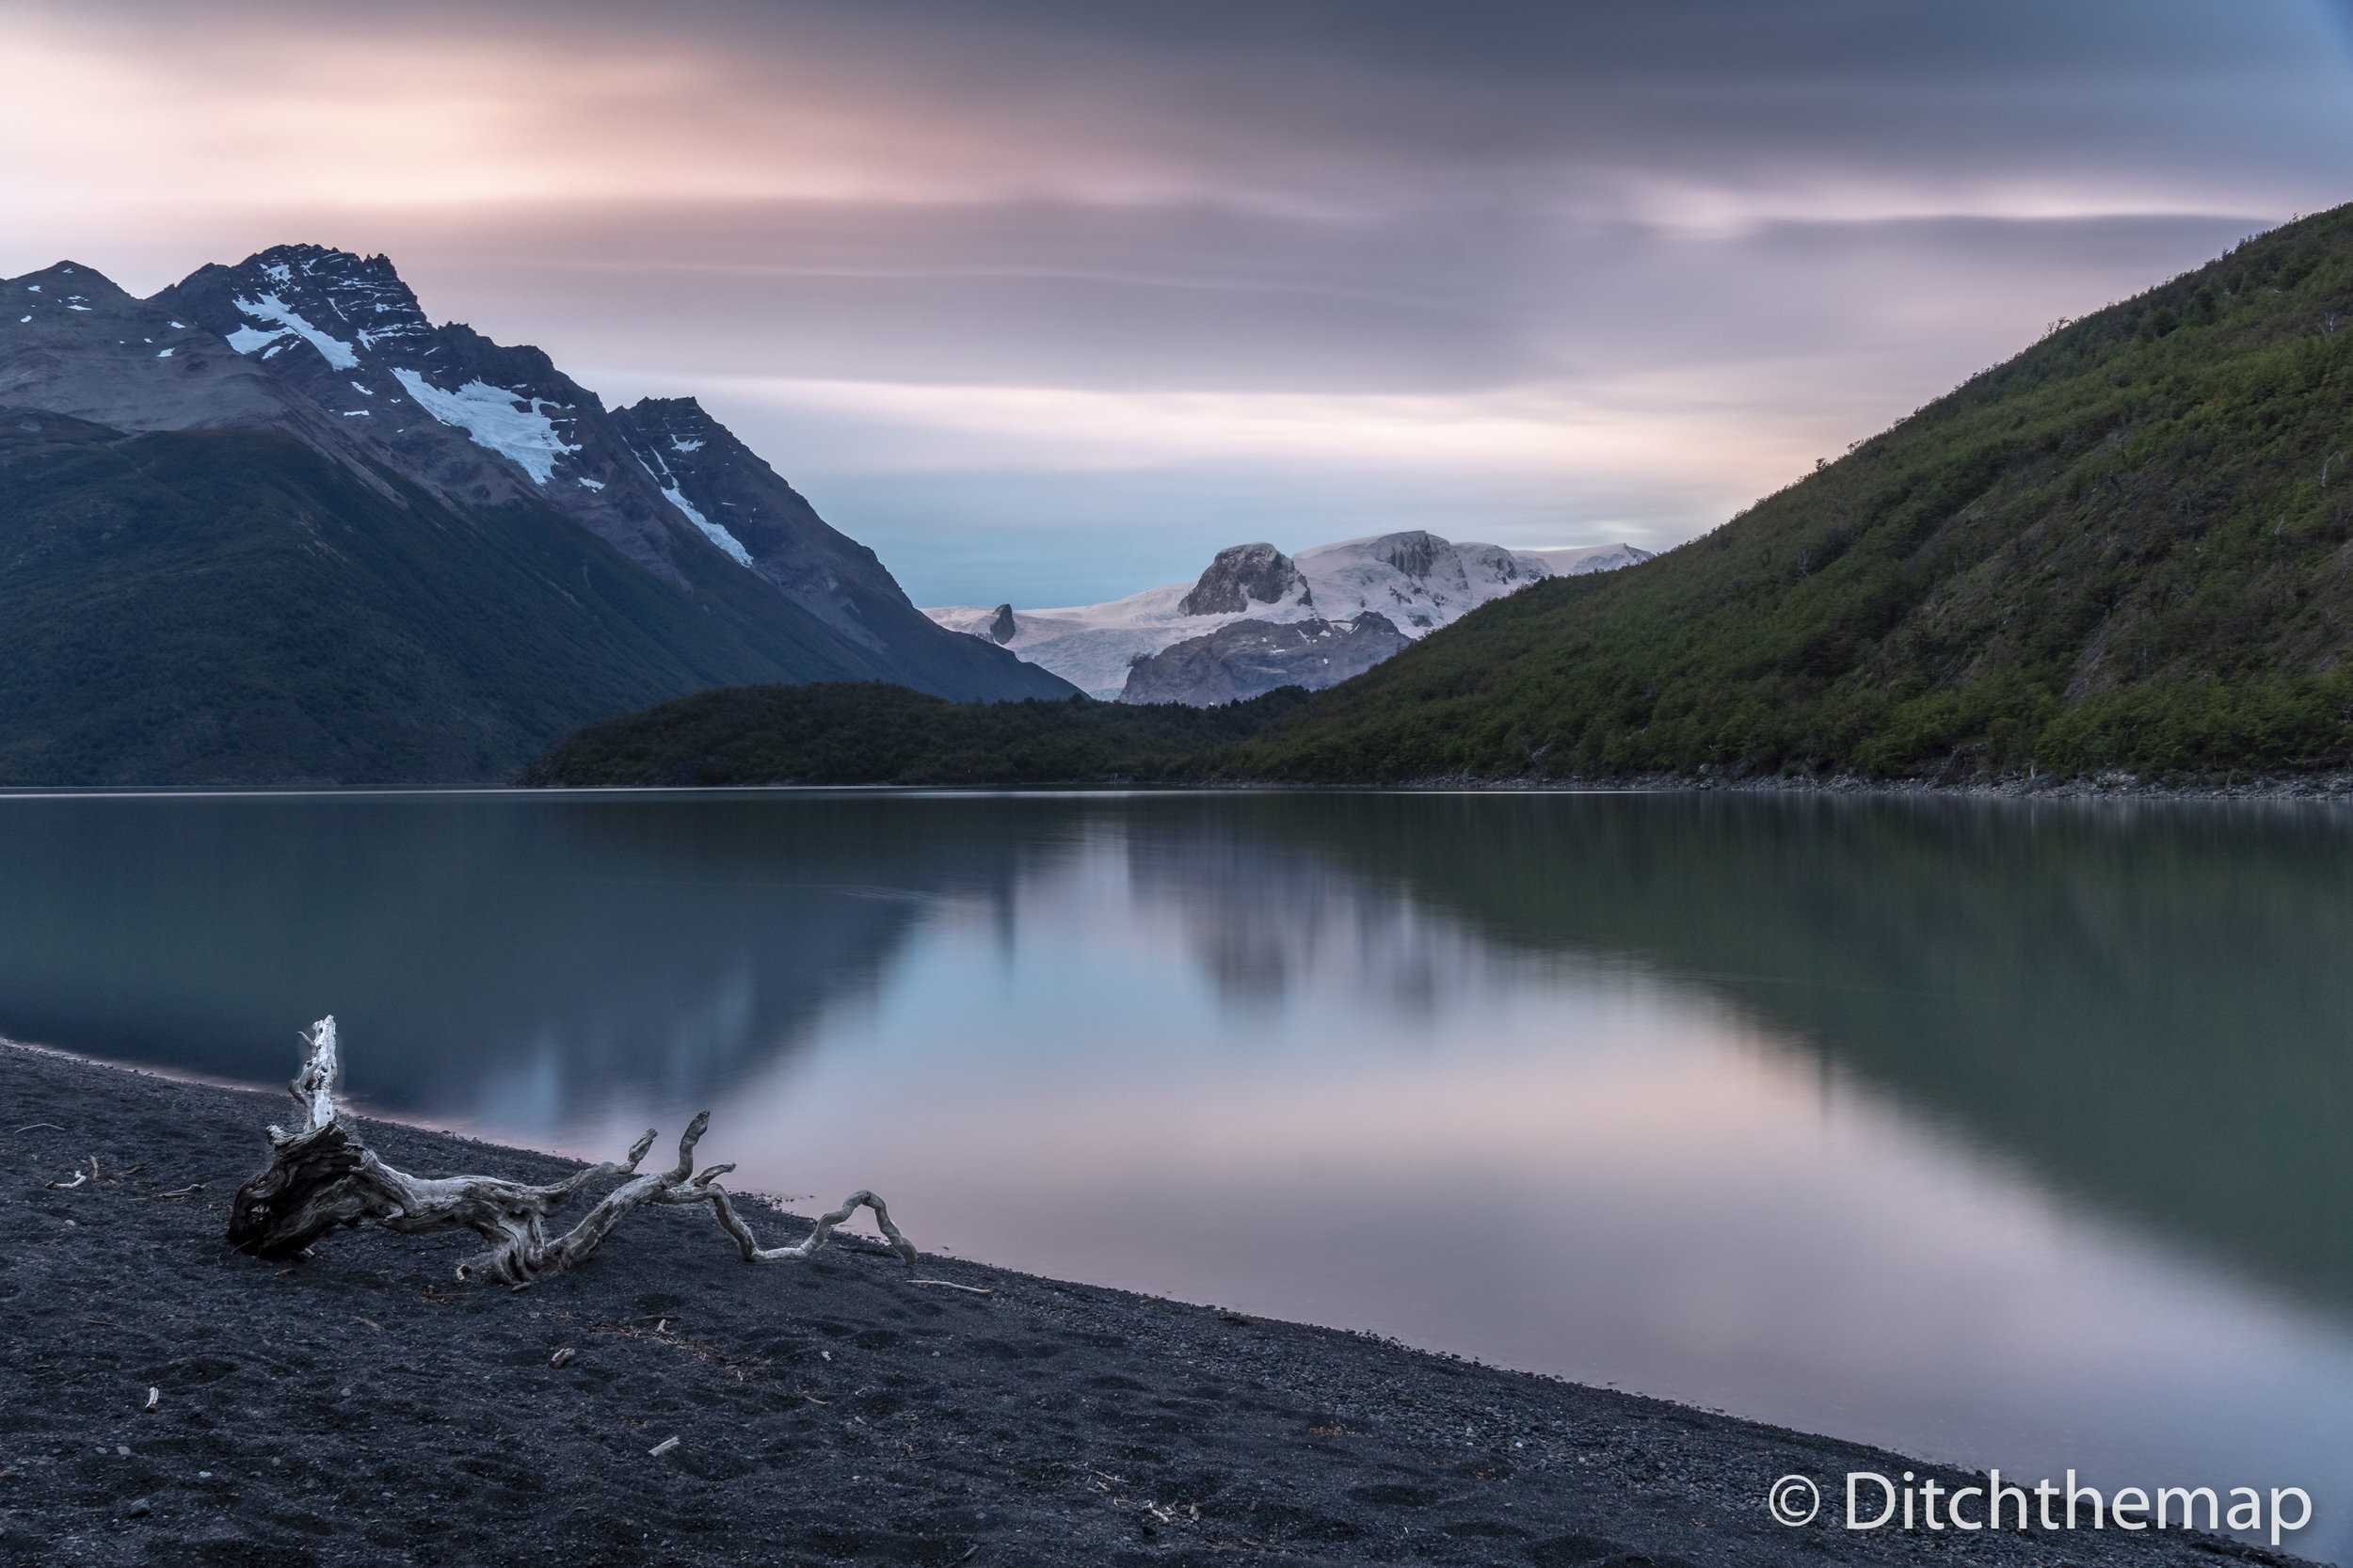
The glassy water surface and the silky clouds were produced using an ND filter to extend the shutter speed.
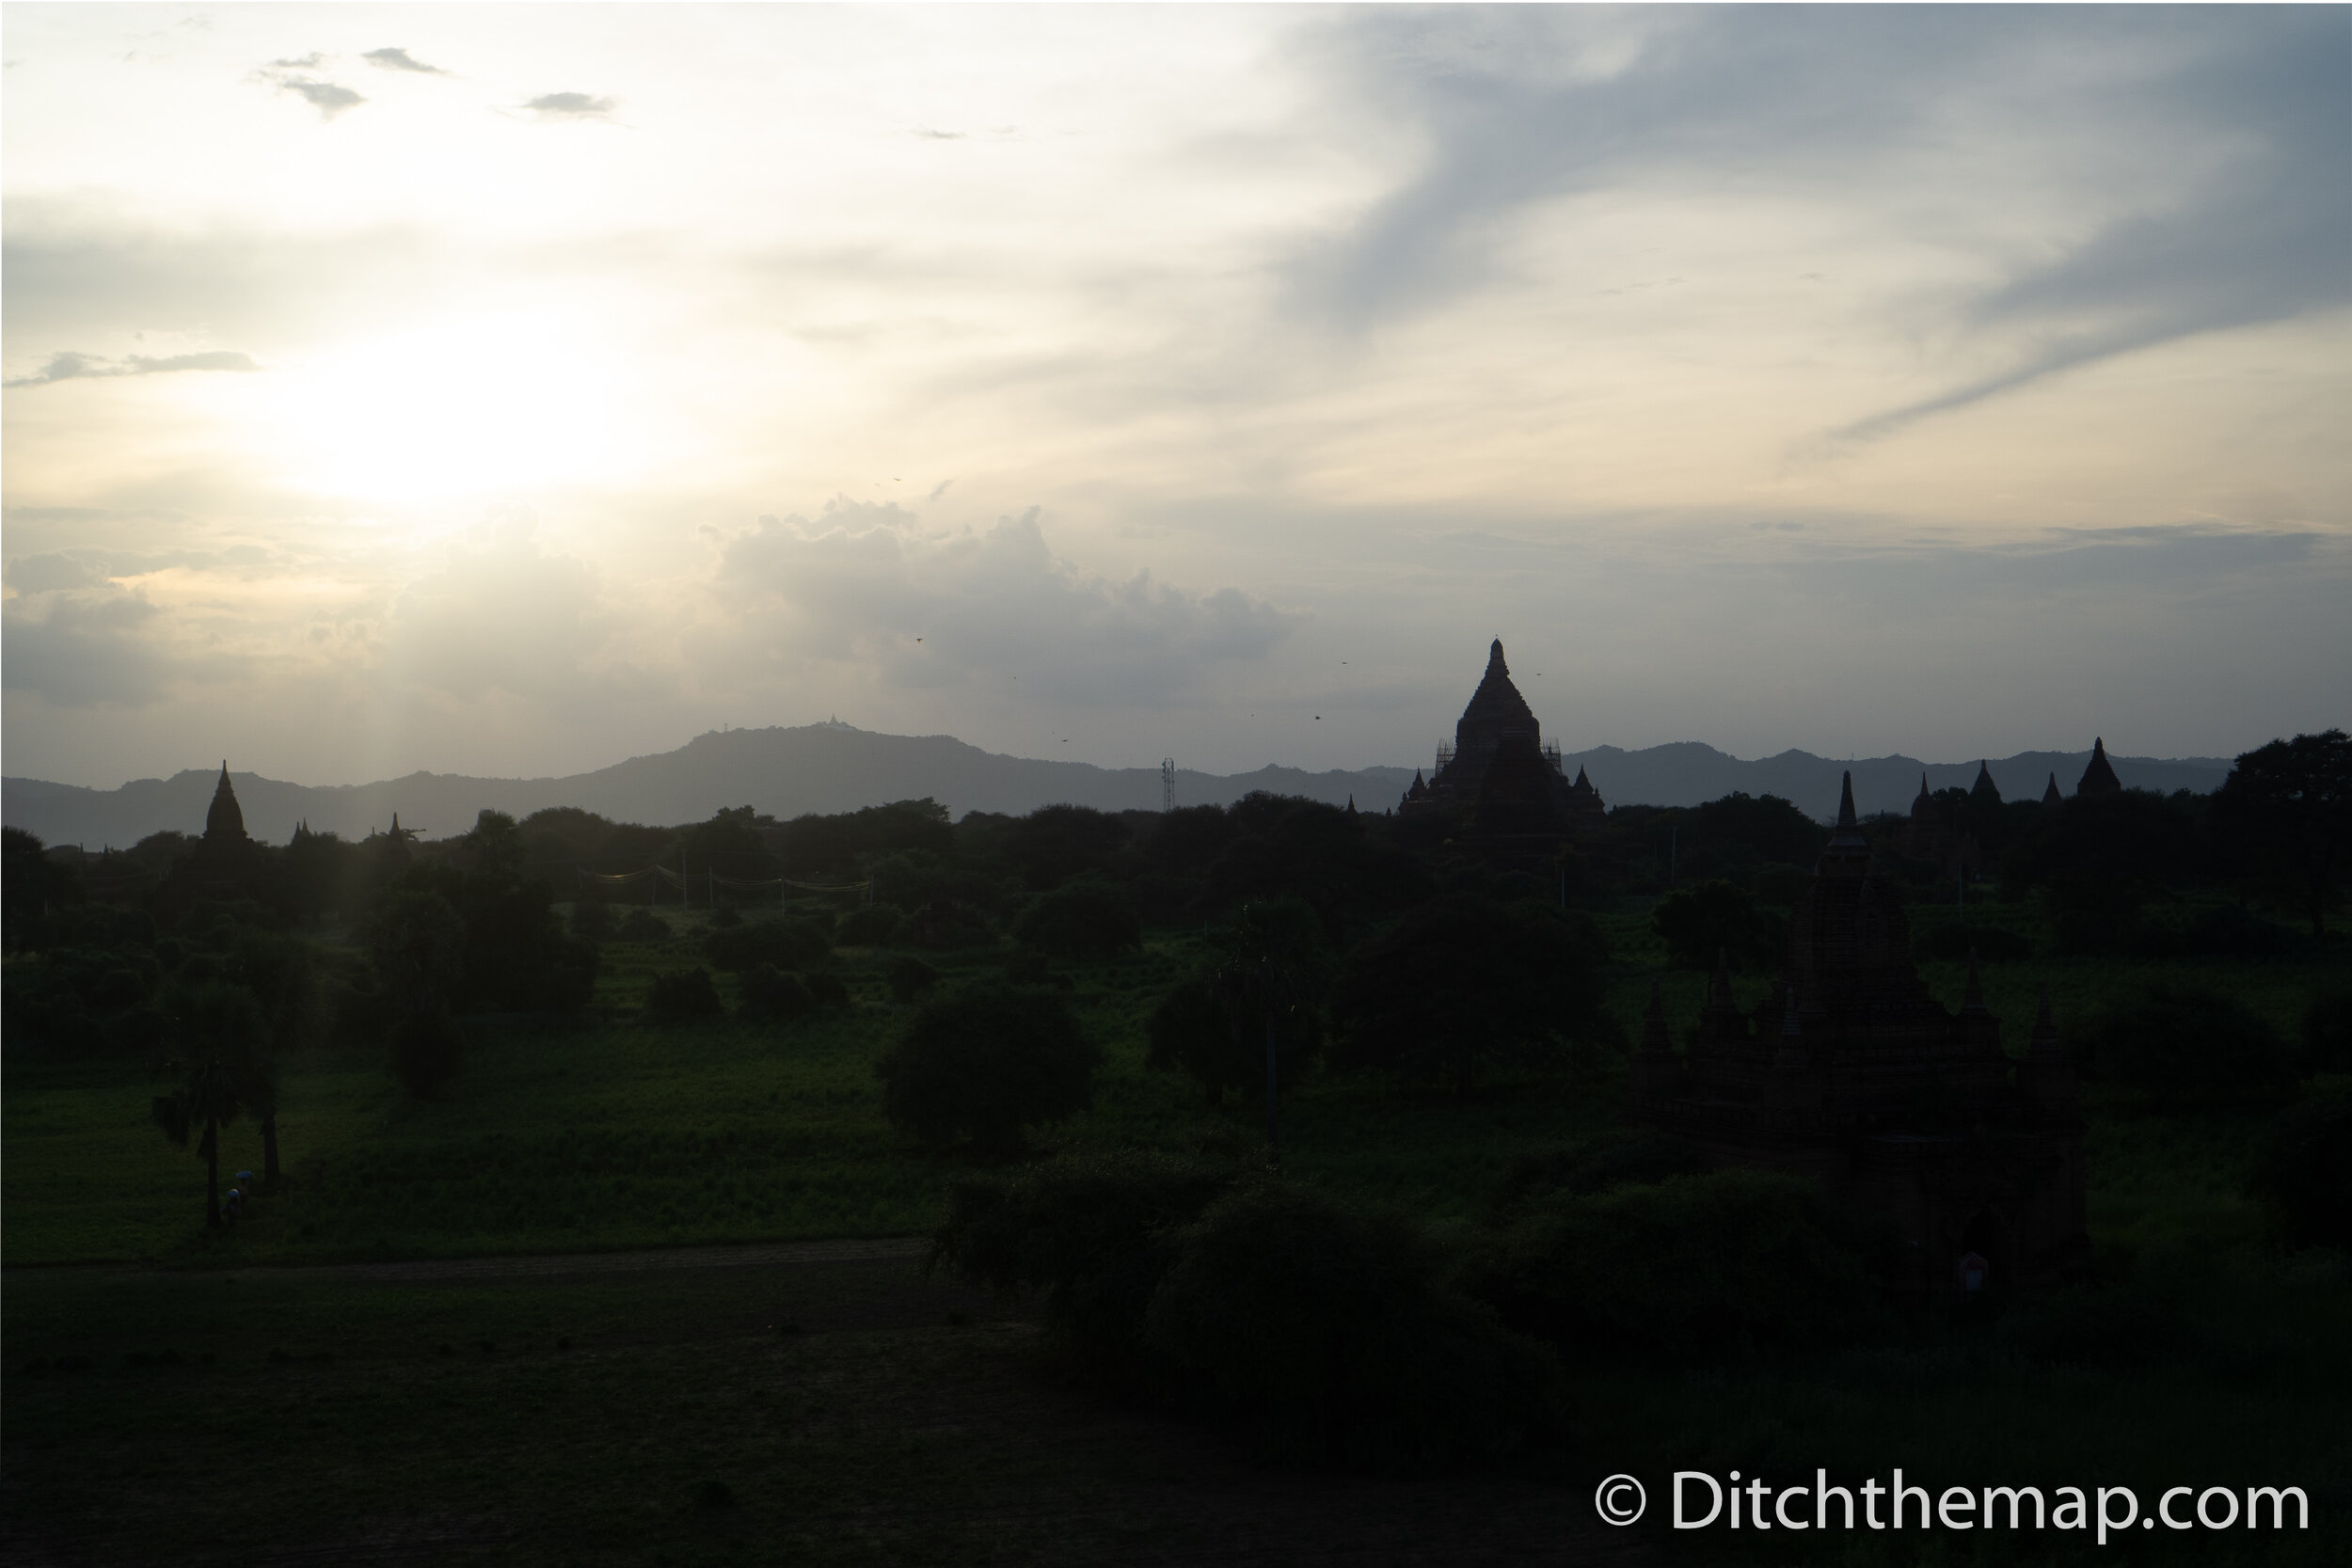
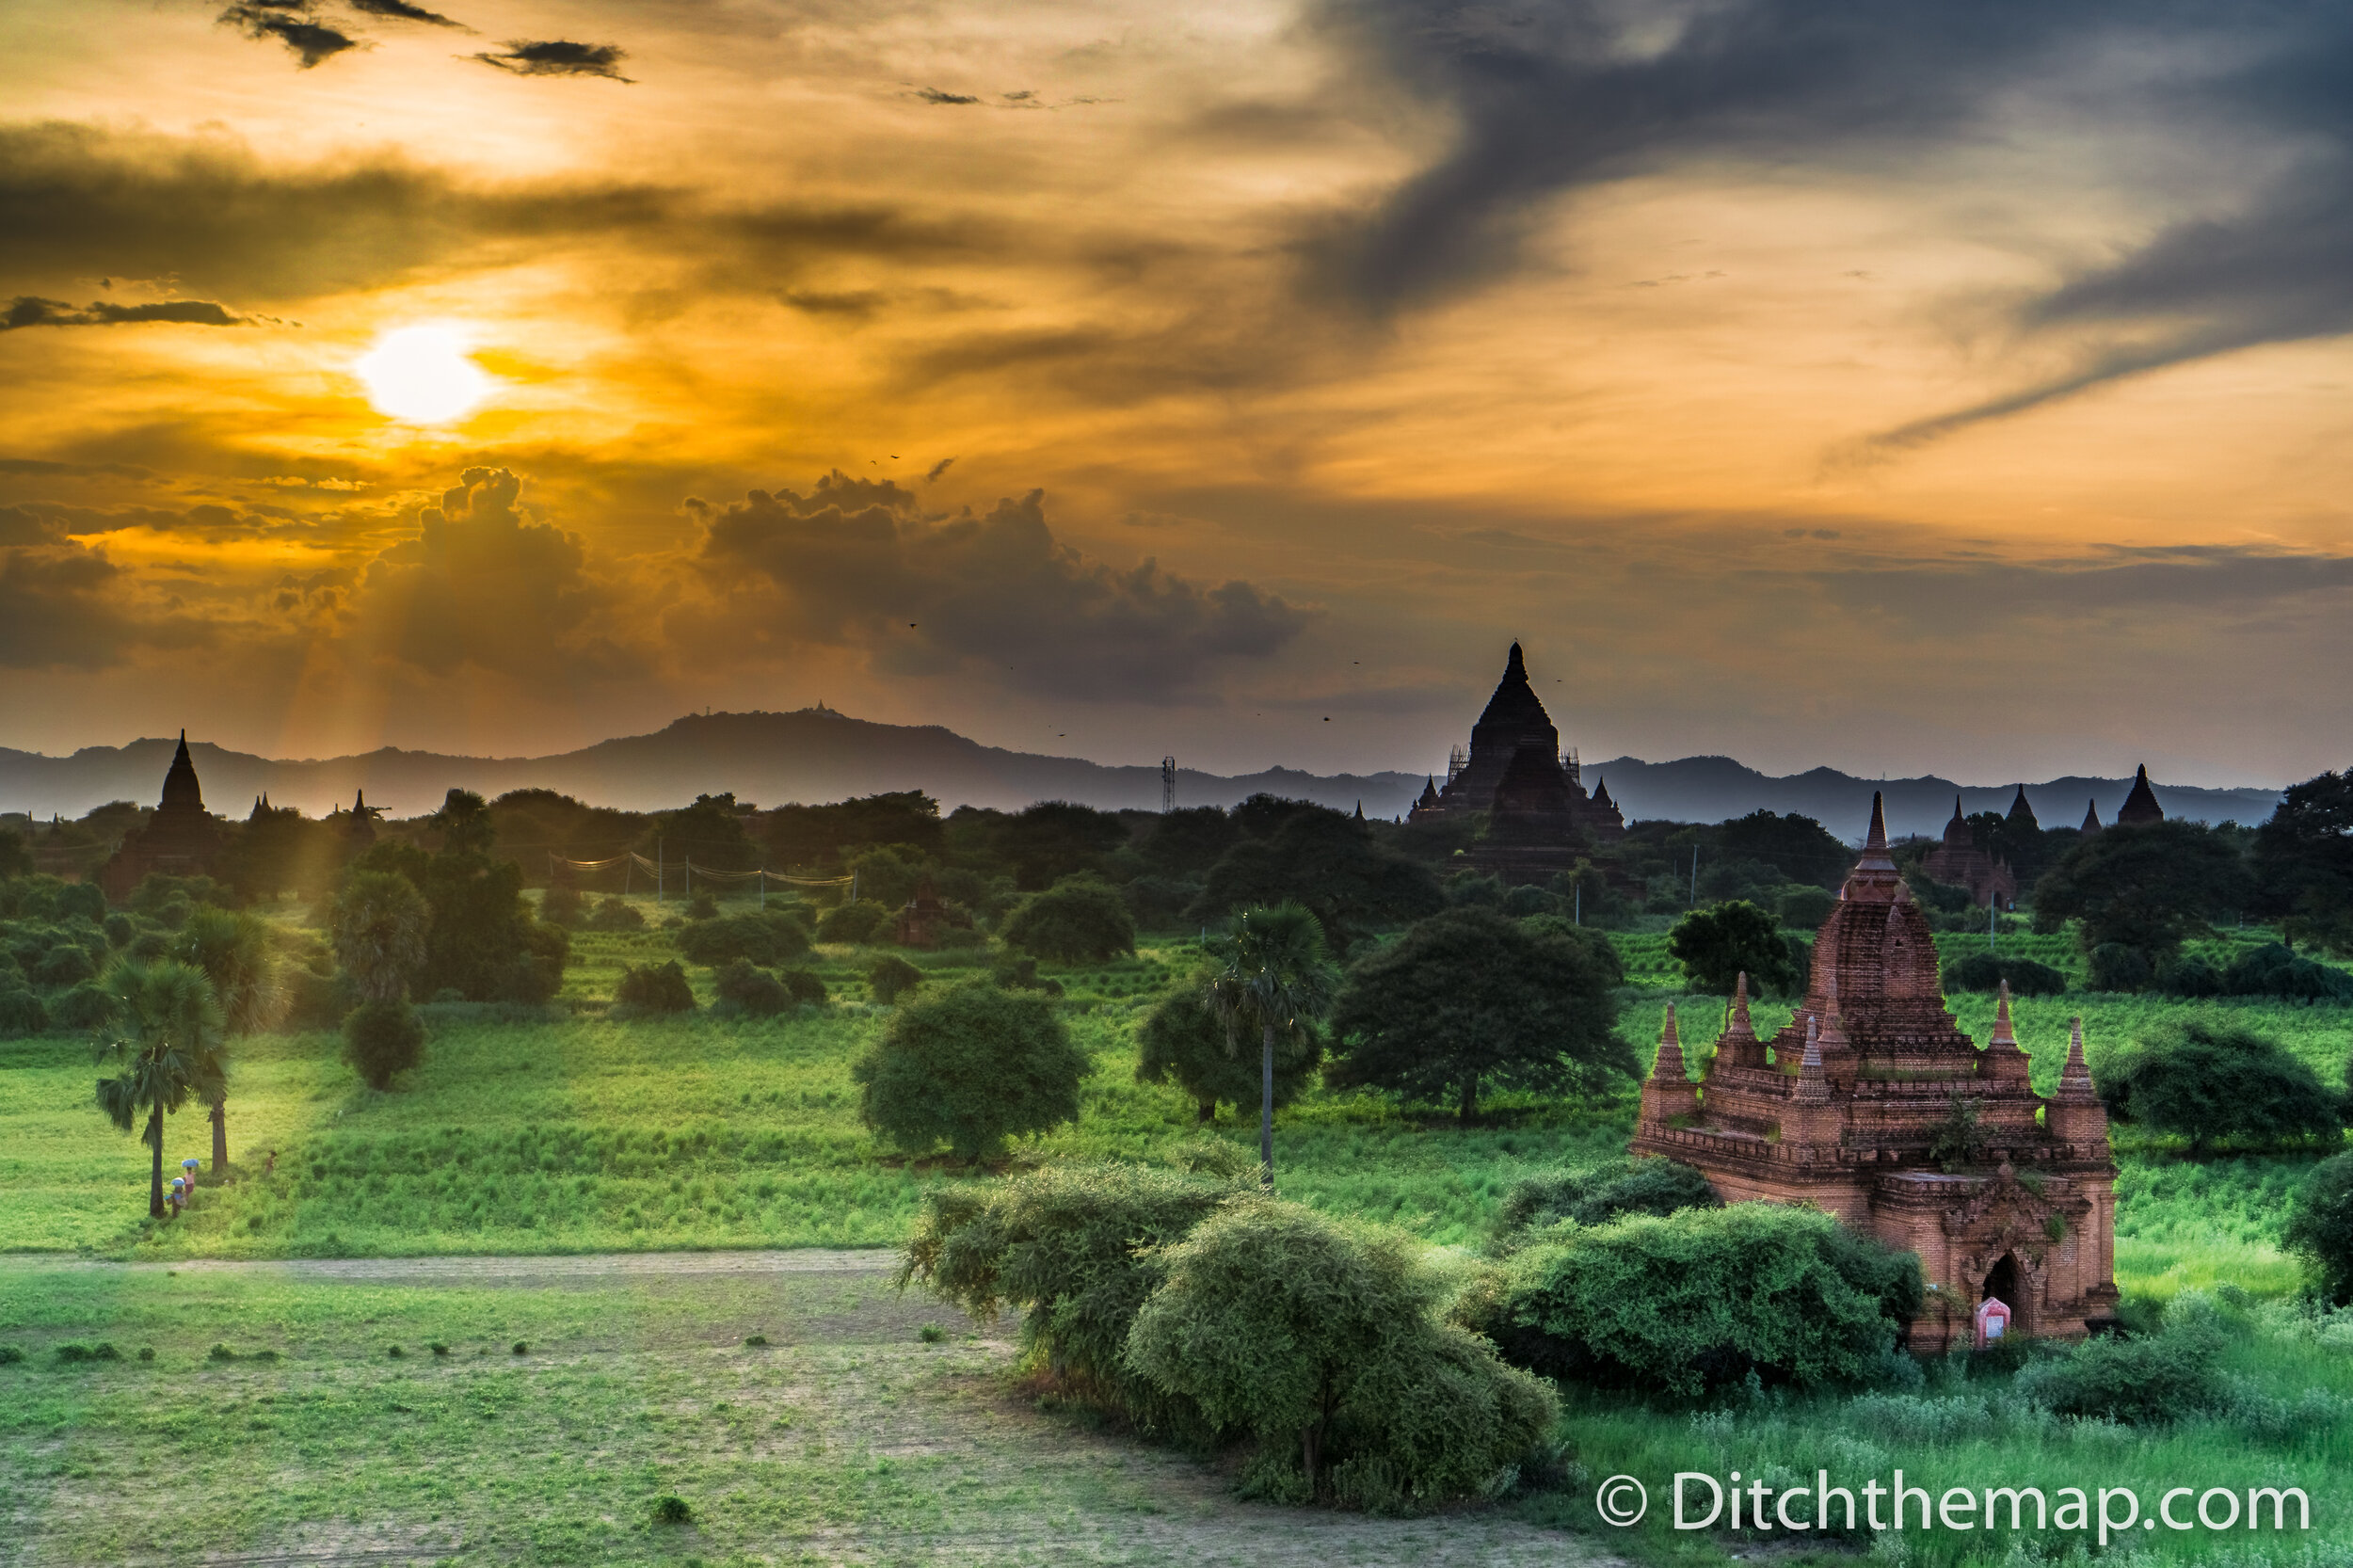
Graduated Neutral Density (ND) Filter - This filter is similar to the ND filter described above except that only half the filter is shaded (the other half is clear). This filter allows the photographer to selectively darken half of the image. This is useful in shots where half the image is much brighter (or darker). Photographers use graduated ND filters to darken the sky during sunrise/sunset photos. This technique is often coupled with using HDR composite photos to produce very powerful landscapes. The photo below was used with a graduated ND filter, greatly reducing the brightness of the sky, allowing the camera to capture the deep orange hues originally washed out by the bright sun. The photo was taken in Bagan, Myanmar.
Cleaning Kit - Due to frequent lens changes, sandy environments, and the overall rigor of travel photography camera sensors are bound to get dirty. Not only will dirt slowly degrade your gear but a dirty sensor will show up in ALL your photos. A good cleaning kit will include a small blow brush, a cleaning detergent, and scratch free wipes to keep your sensor in pristine shape. Wipes and carbon pens will help erase smudges on your lenses.
Research, Patience, Effort, & Disappointment
Imagine hiking for days to get to a particular lookout point. As you arrive 30 minutes ahead of the glorious sunset you notice a line of people ahead. What is this you ask? They are the dozen travelers waiting for their chance to have a great social media post. You are determined to get a photo so you decide to set up camp nearby and try the next morning. You set your alarm, wake up to freezing mountain air, and hike back to the infamous lookout by 4am. Hiking with your headlight, trekking poles, down jacket, gloves, hat, tripod, numerous lenses, batteries, and a snack you are severely uncomfortable. You set up your gear and are all ready for a beautiful sunrise. You are horrified to learn that the sunrise was hugely disappointing since the sun’s rays are actually illuminating the mountain behind you. You forgot to do you research and will learn for next time!
Research - Know what you’re shooting. Where will the sun rise/set and how will this translate to a good photo. Will the time of year impact the sun’s location? Are there less popular locations or less touristy seasons that will give you better chance of a clear photo. Can you use your flash inside this temple? Will I really need my heavy zoom lens for this sunset? What is the weather forecast like?
Tip from a pro: Keep your camera gear in the bathroom with the windows open in tropical climates if your bedroom has a/c. This prevents condensation on your gear that quickly forms when moving from an air-conditioned room to the humid tropic air.
Patience - Come early and scout the area. Know your framing, focal length, and vantage point before its time to take your photo. Sit back and enjoy the scenery until it’s time. Wait for people to pass or that pesky cloud to move over the sun—great things come to those who wait.
The photos of Tanah Lot, Bali (below) illustrate the benefits of being patient. The shot on the left was taken too early, was improperly framed, and set to an improper exposure. For the photo on the right I spent time framing my shot and waited for the right time of day. I used a tripod and with the help of an ND filter had a very long shutter speed. The long exposure time let me ‘cancel’ out the people walking around the temple.
Tanah Lot, Bali, Indonesia with poor framing, short shutter speed, and bad lighting conditions
Tanah Lot, Bali, Indonesia. Ultra wide angle lens during sunset, using a long shutter speed I was able to ‘cancel out’ people
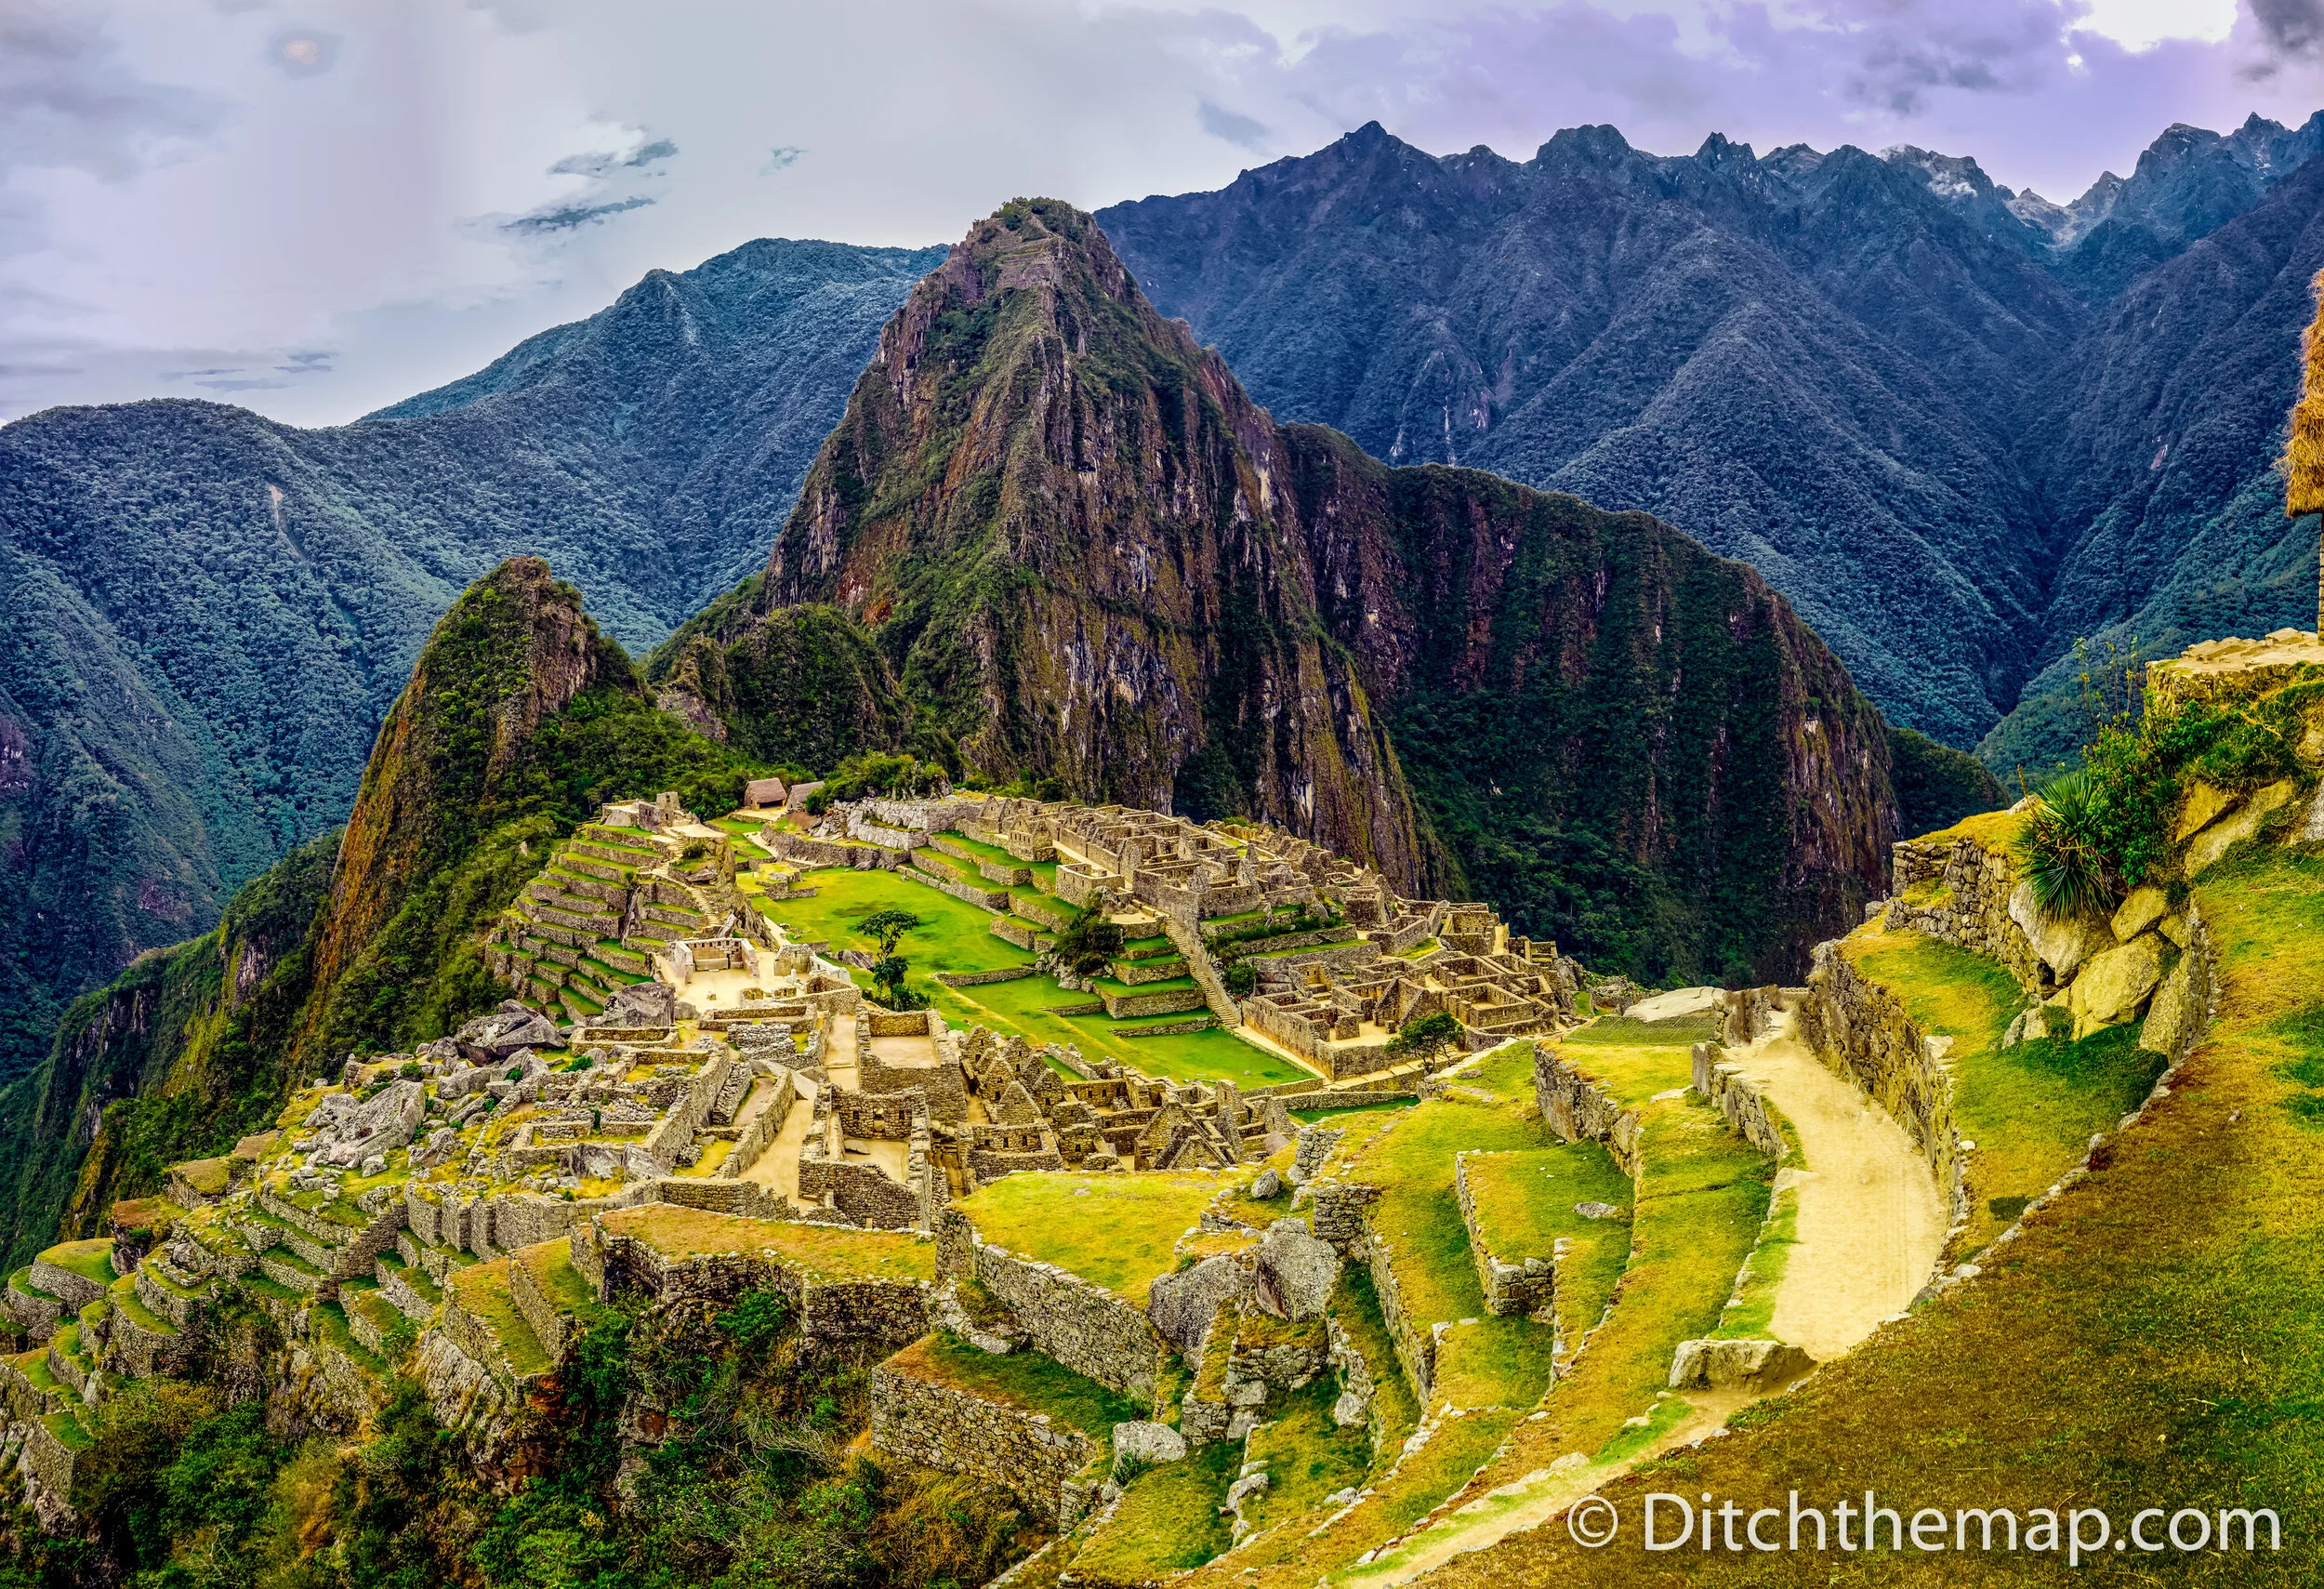
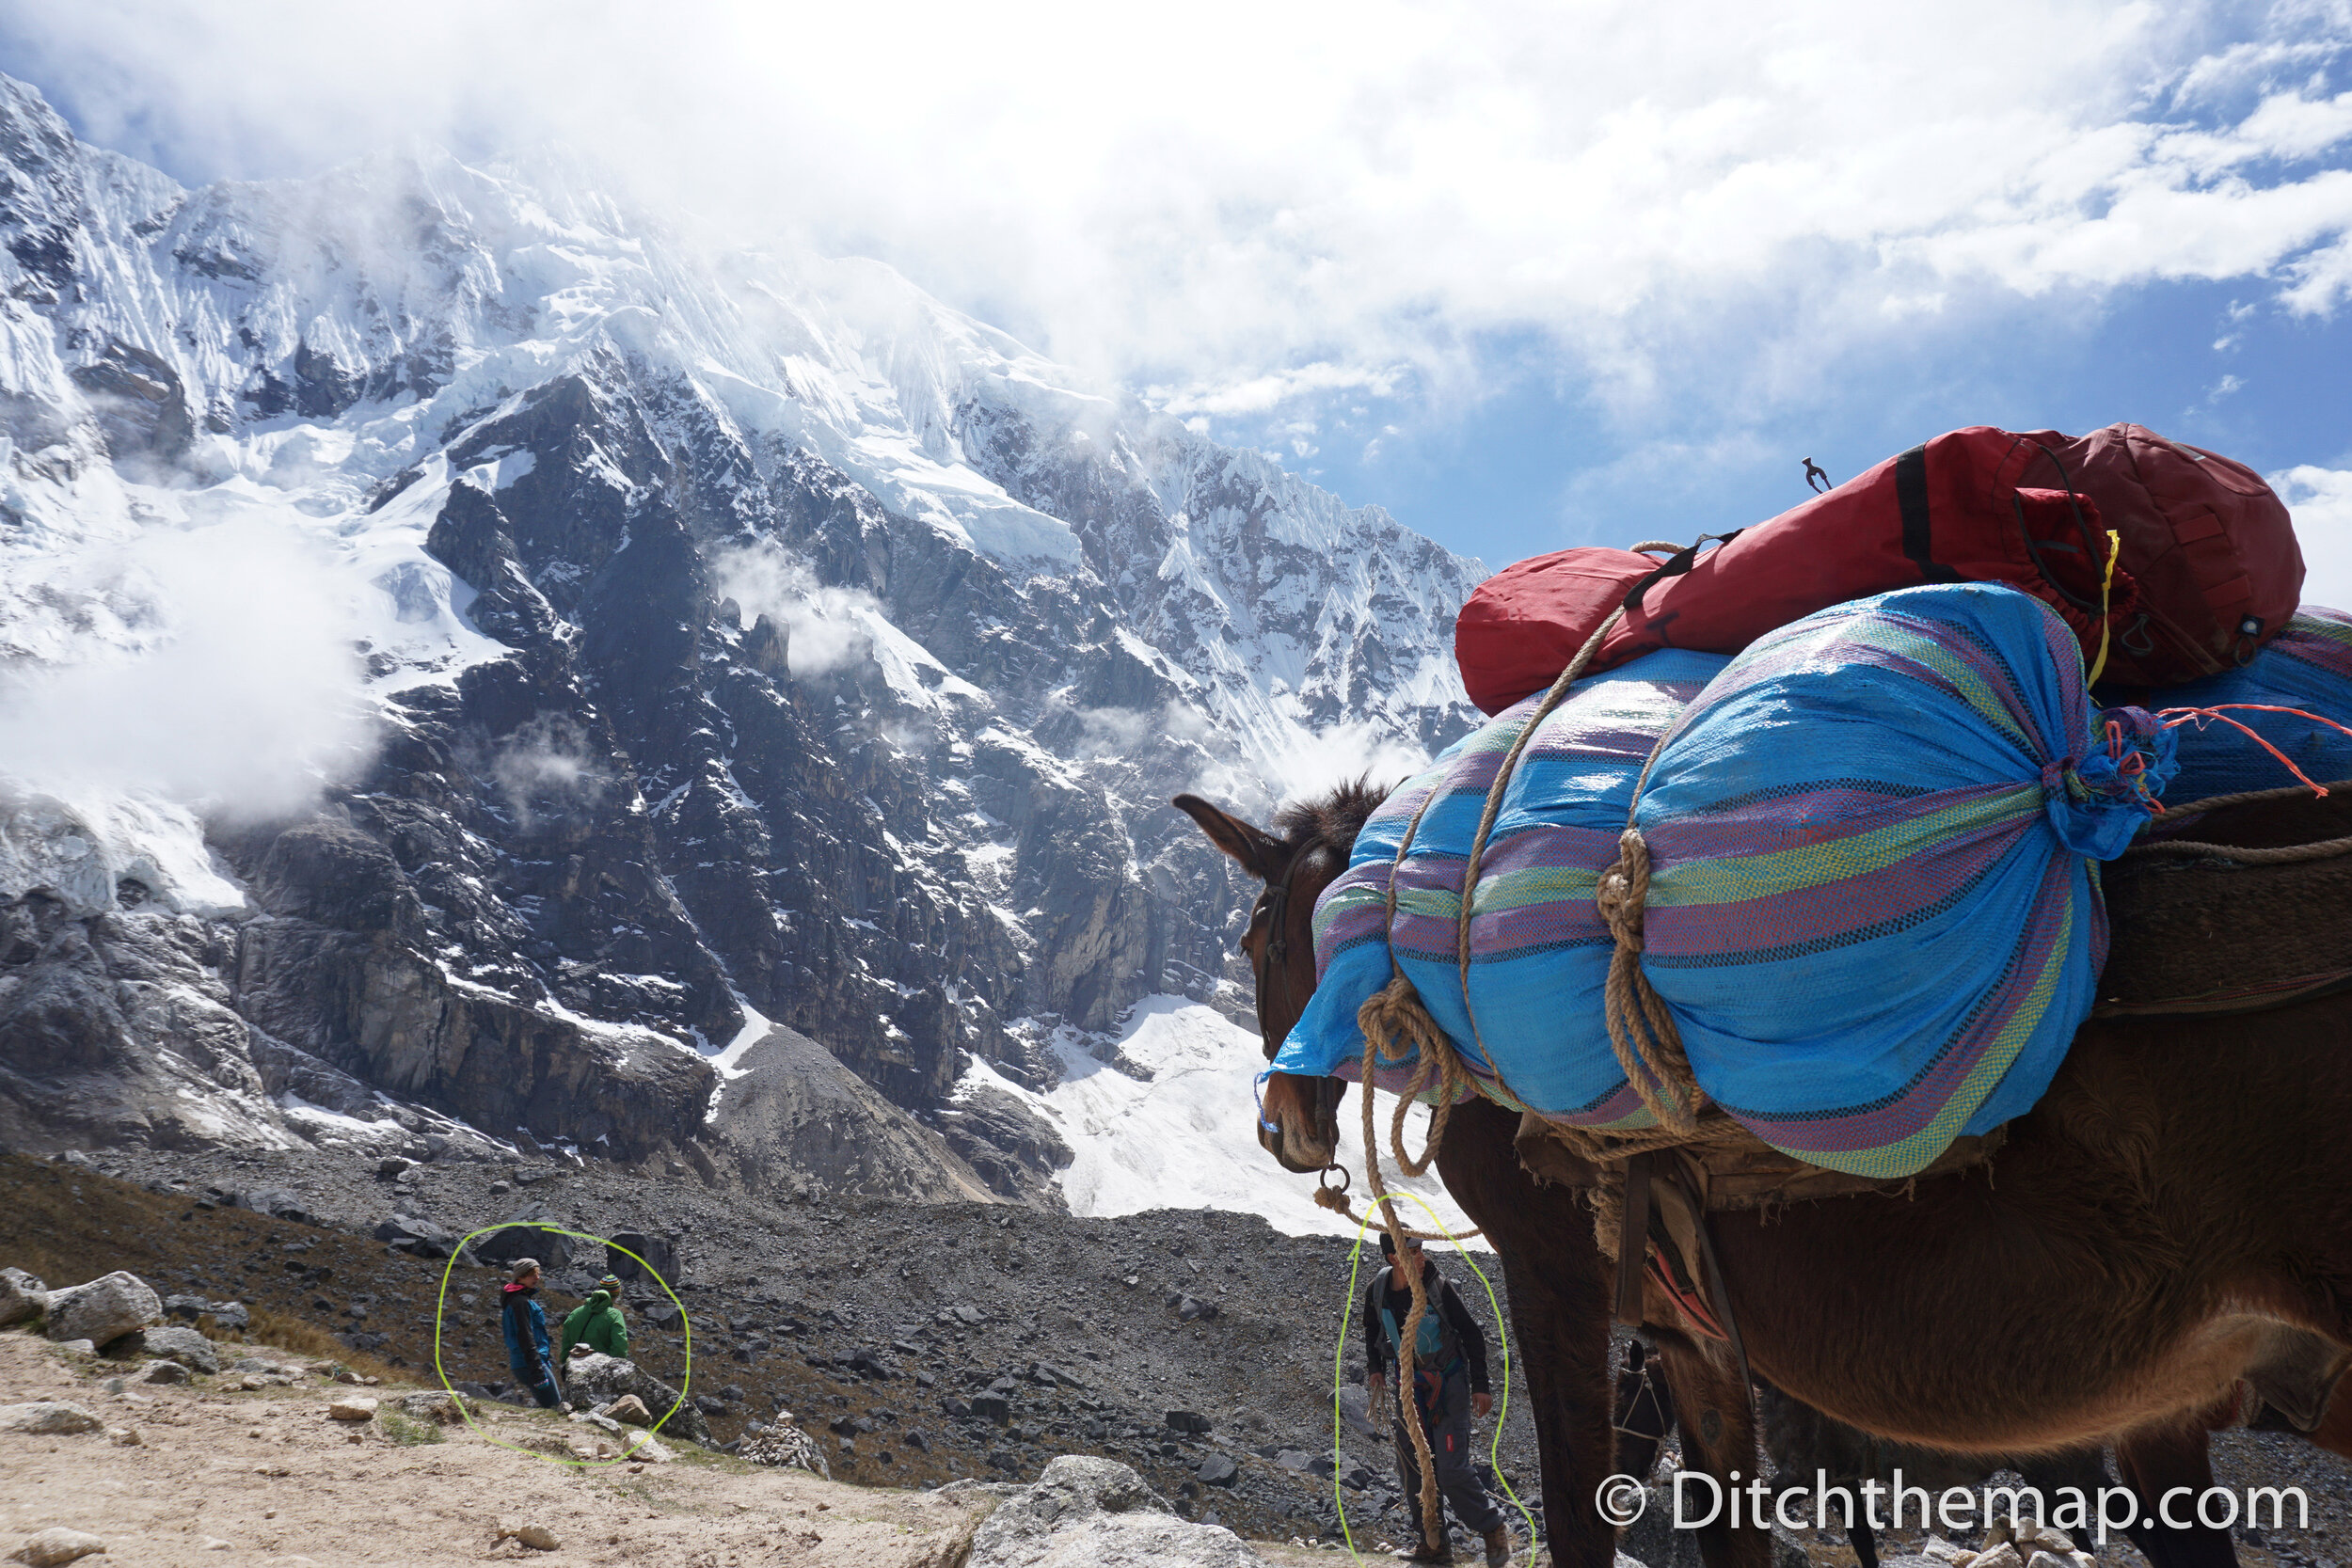
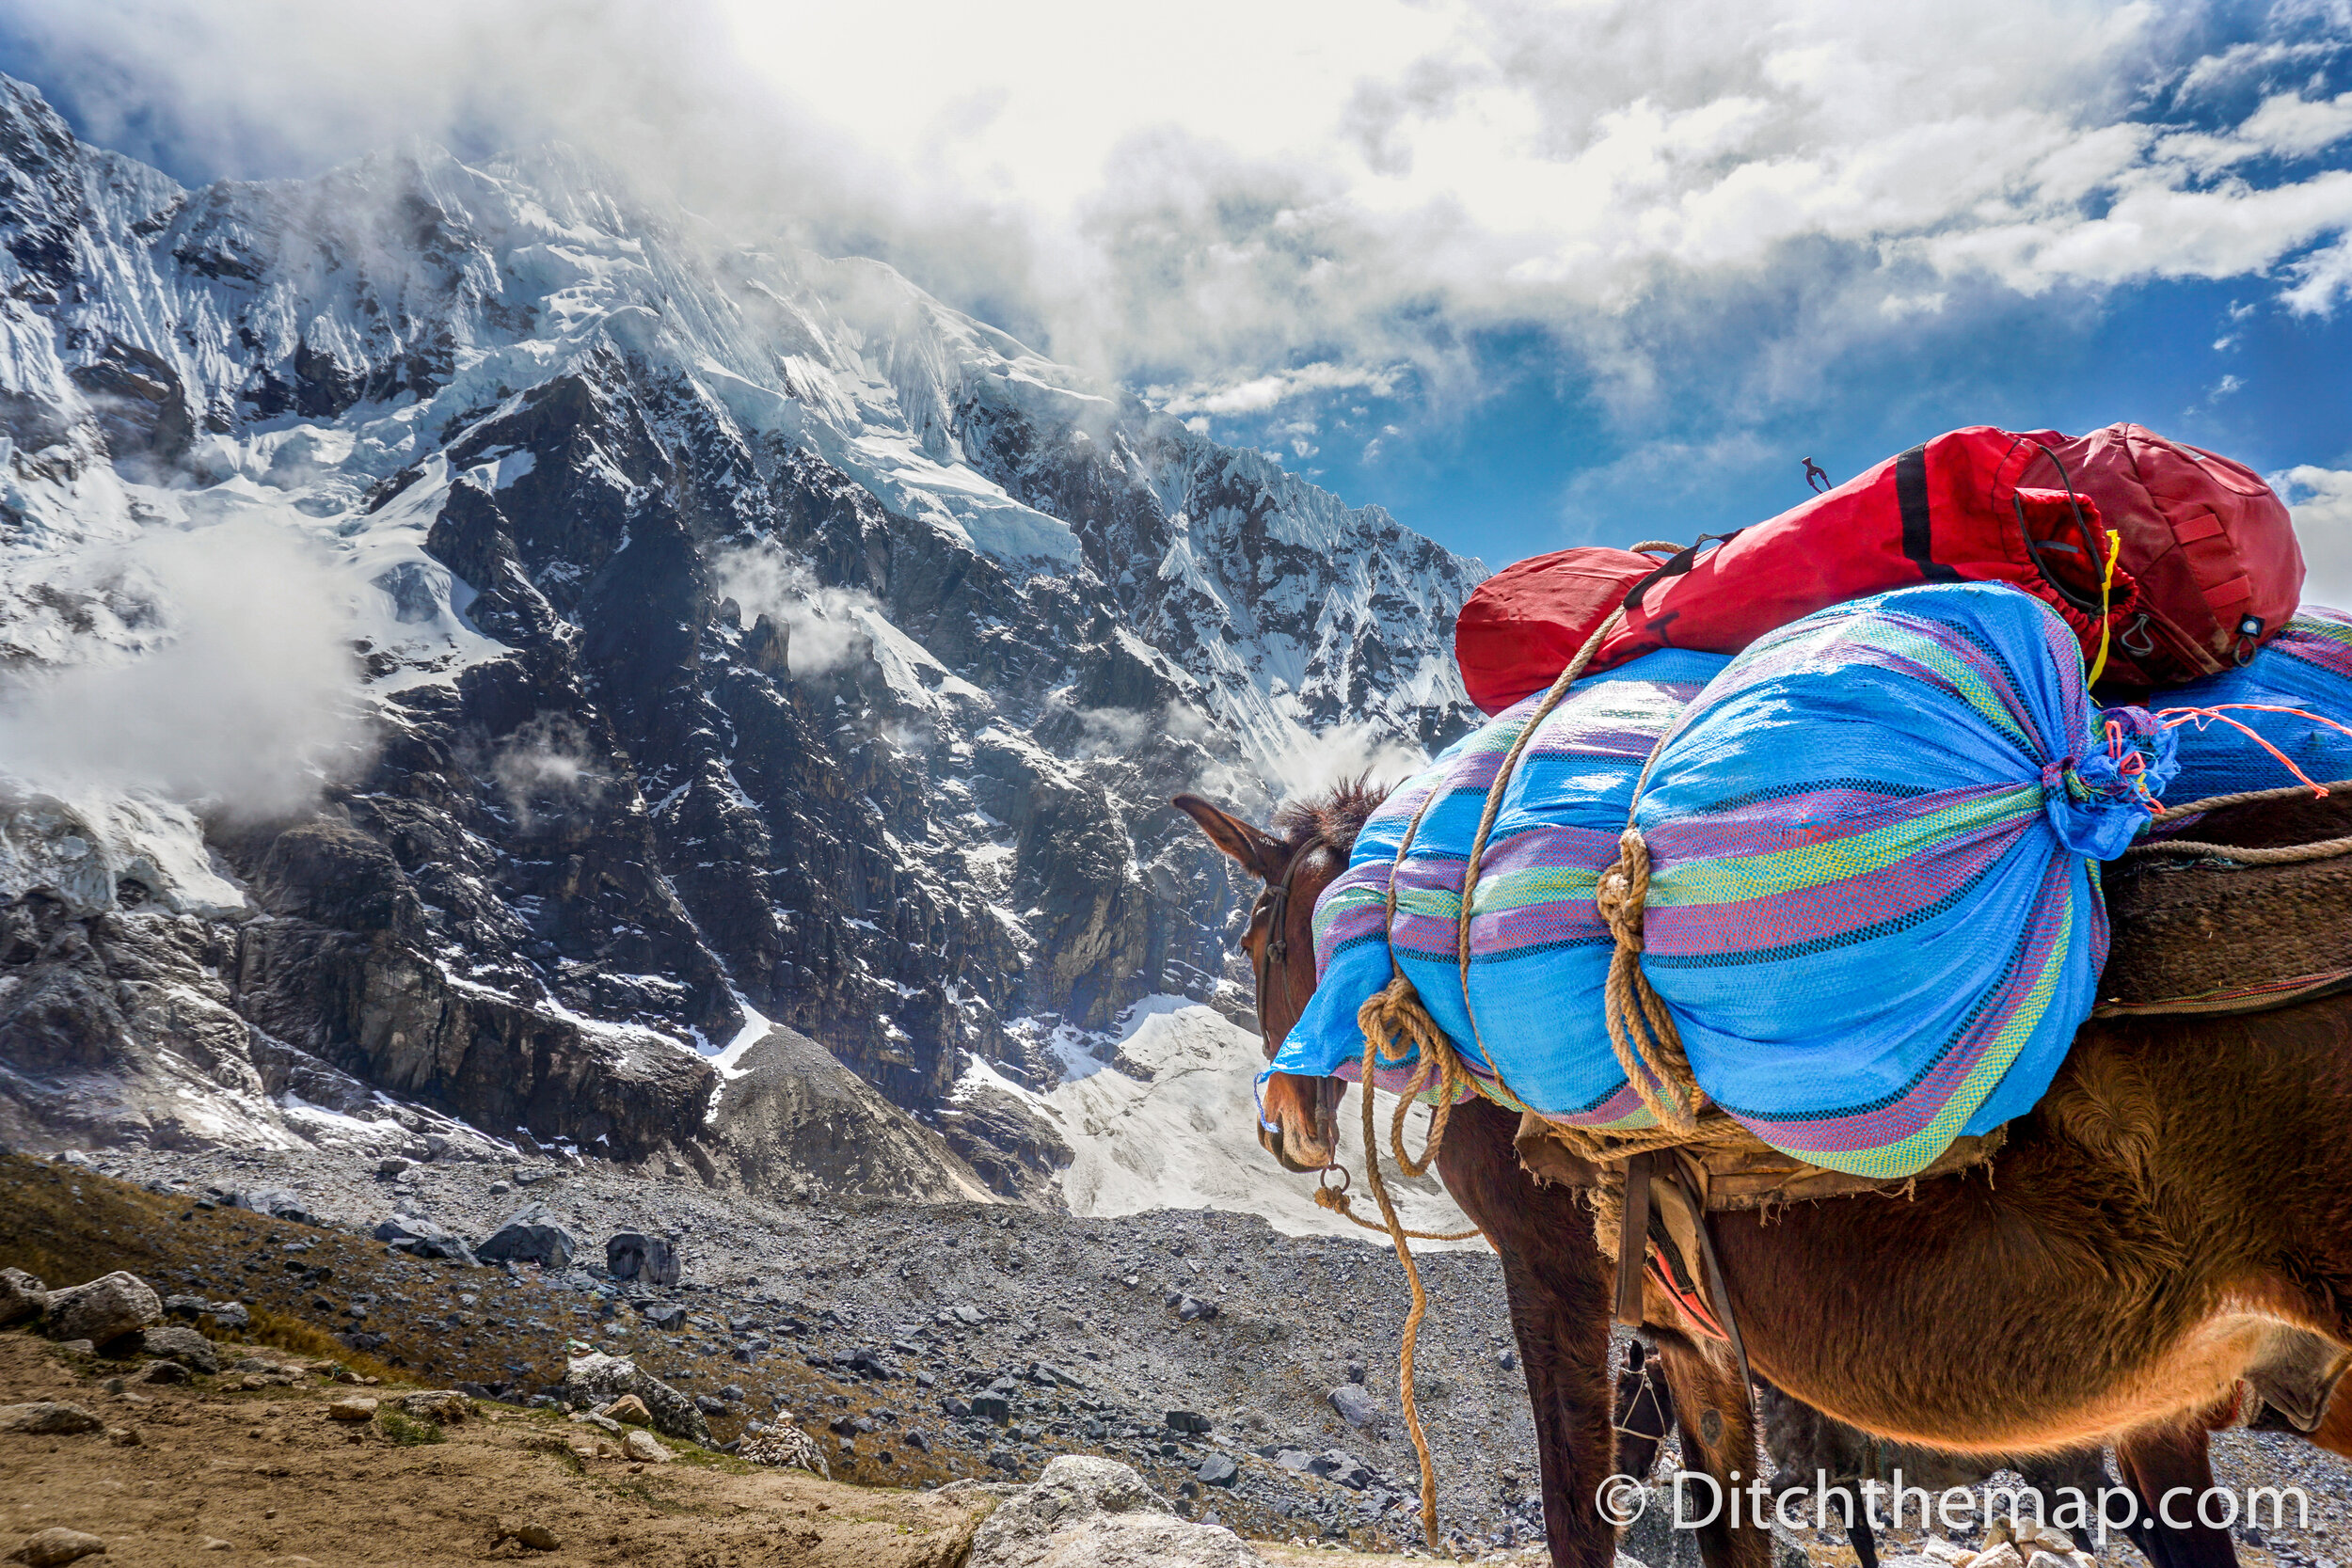
Effort - The photo of Machu Picchu below acts as a great example of what I mean by effort. Here is what it took to get this pristine photograph of Machu Picchu without any tourists in my shot.
To get this picture I had to first hike 5 grueling days through the mountains in below-freezing weather. I then woke up and left at 4:00am to hike 30 minutes to the bridge allowing access to the stairs to climb Machu Picchu. The bridge didn’t open until 5am but I needed to ensure a favorable spot in line. I then sprinted up the 2,000 rocky stairs to ensure my place at the entrance gates of Machu Picchu. After 1 hour of climbing I finally arrived, tired and sweaty. I was the first person to enter the historic site that day. I then sprinted all the way through the ruins, ignoring all the sights, to get to a vantage point for my photograph. After another 30 minutes or so I was all set up and was able to take a few hurried shot of the mega-ruins before people started to trickle into view. After all the physical effort I put in to get a few awesome shots of Machu Picchu I had no more than 3 minutes before people were crowding the lower levels of the site. Next time you see a photo like this on the web you better recognize the true effort that went into taking it. You can read about the adventure here:
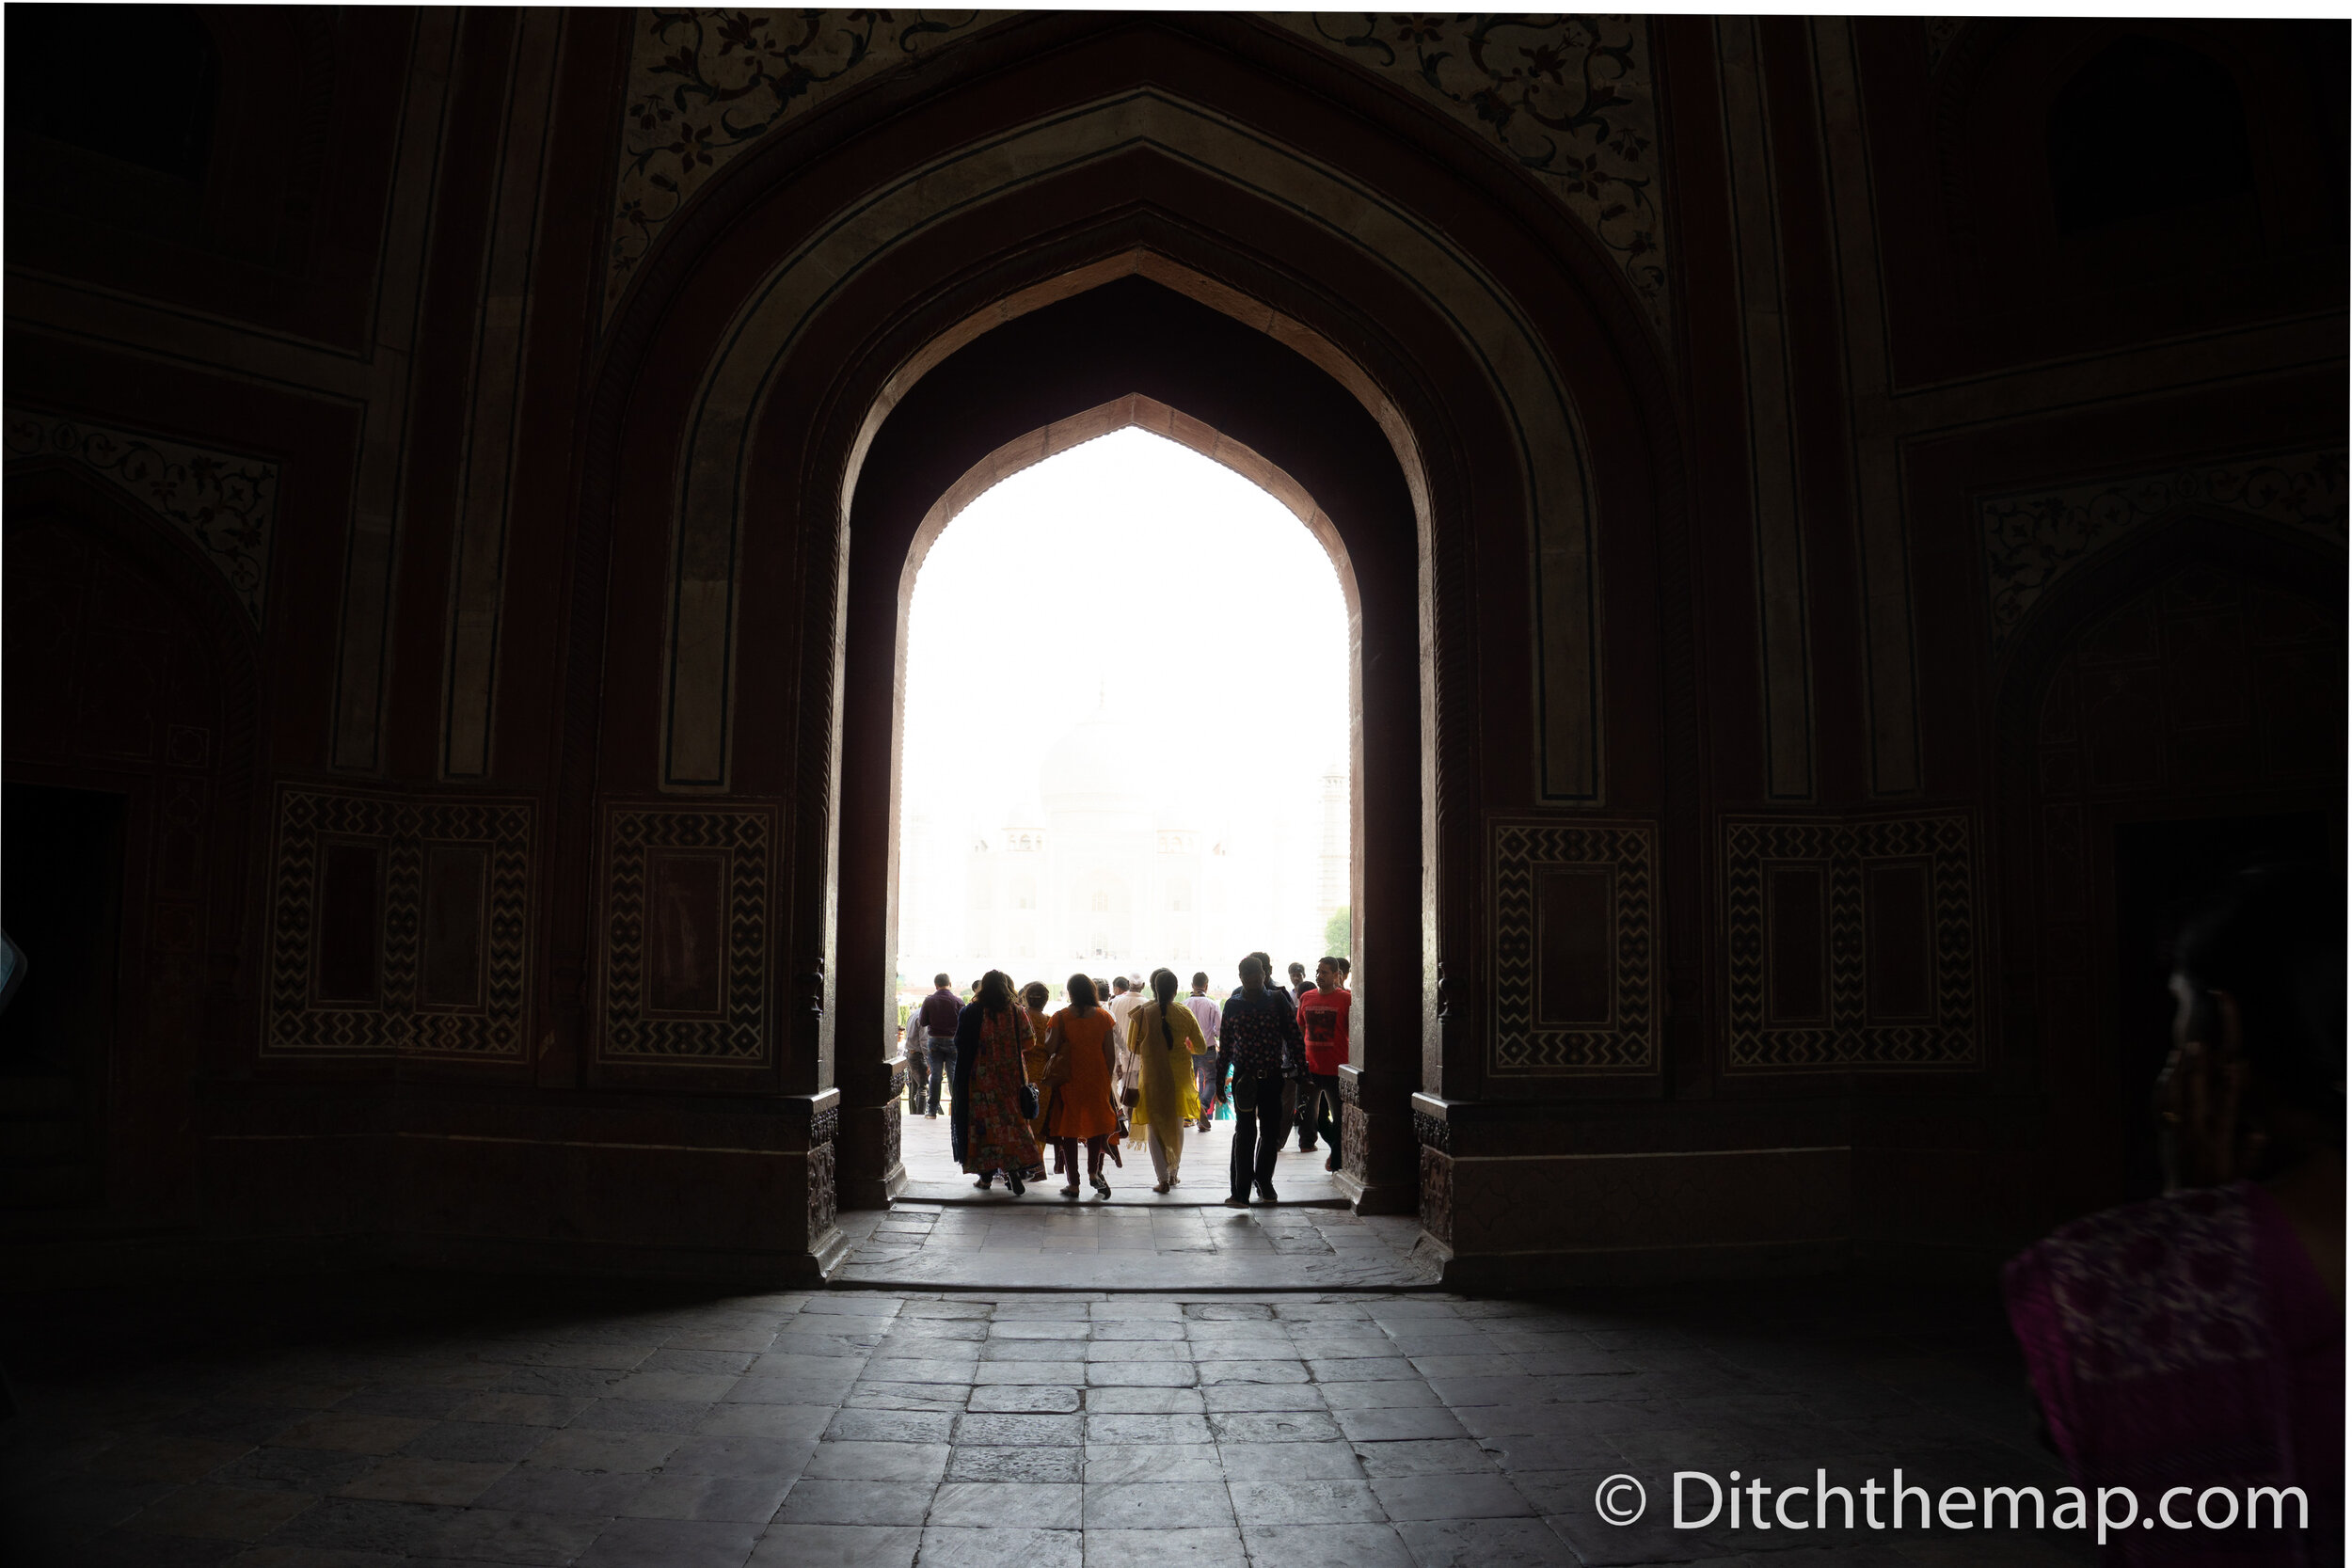
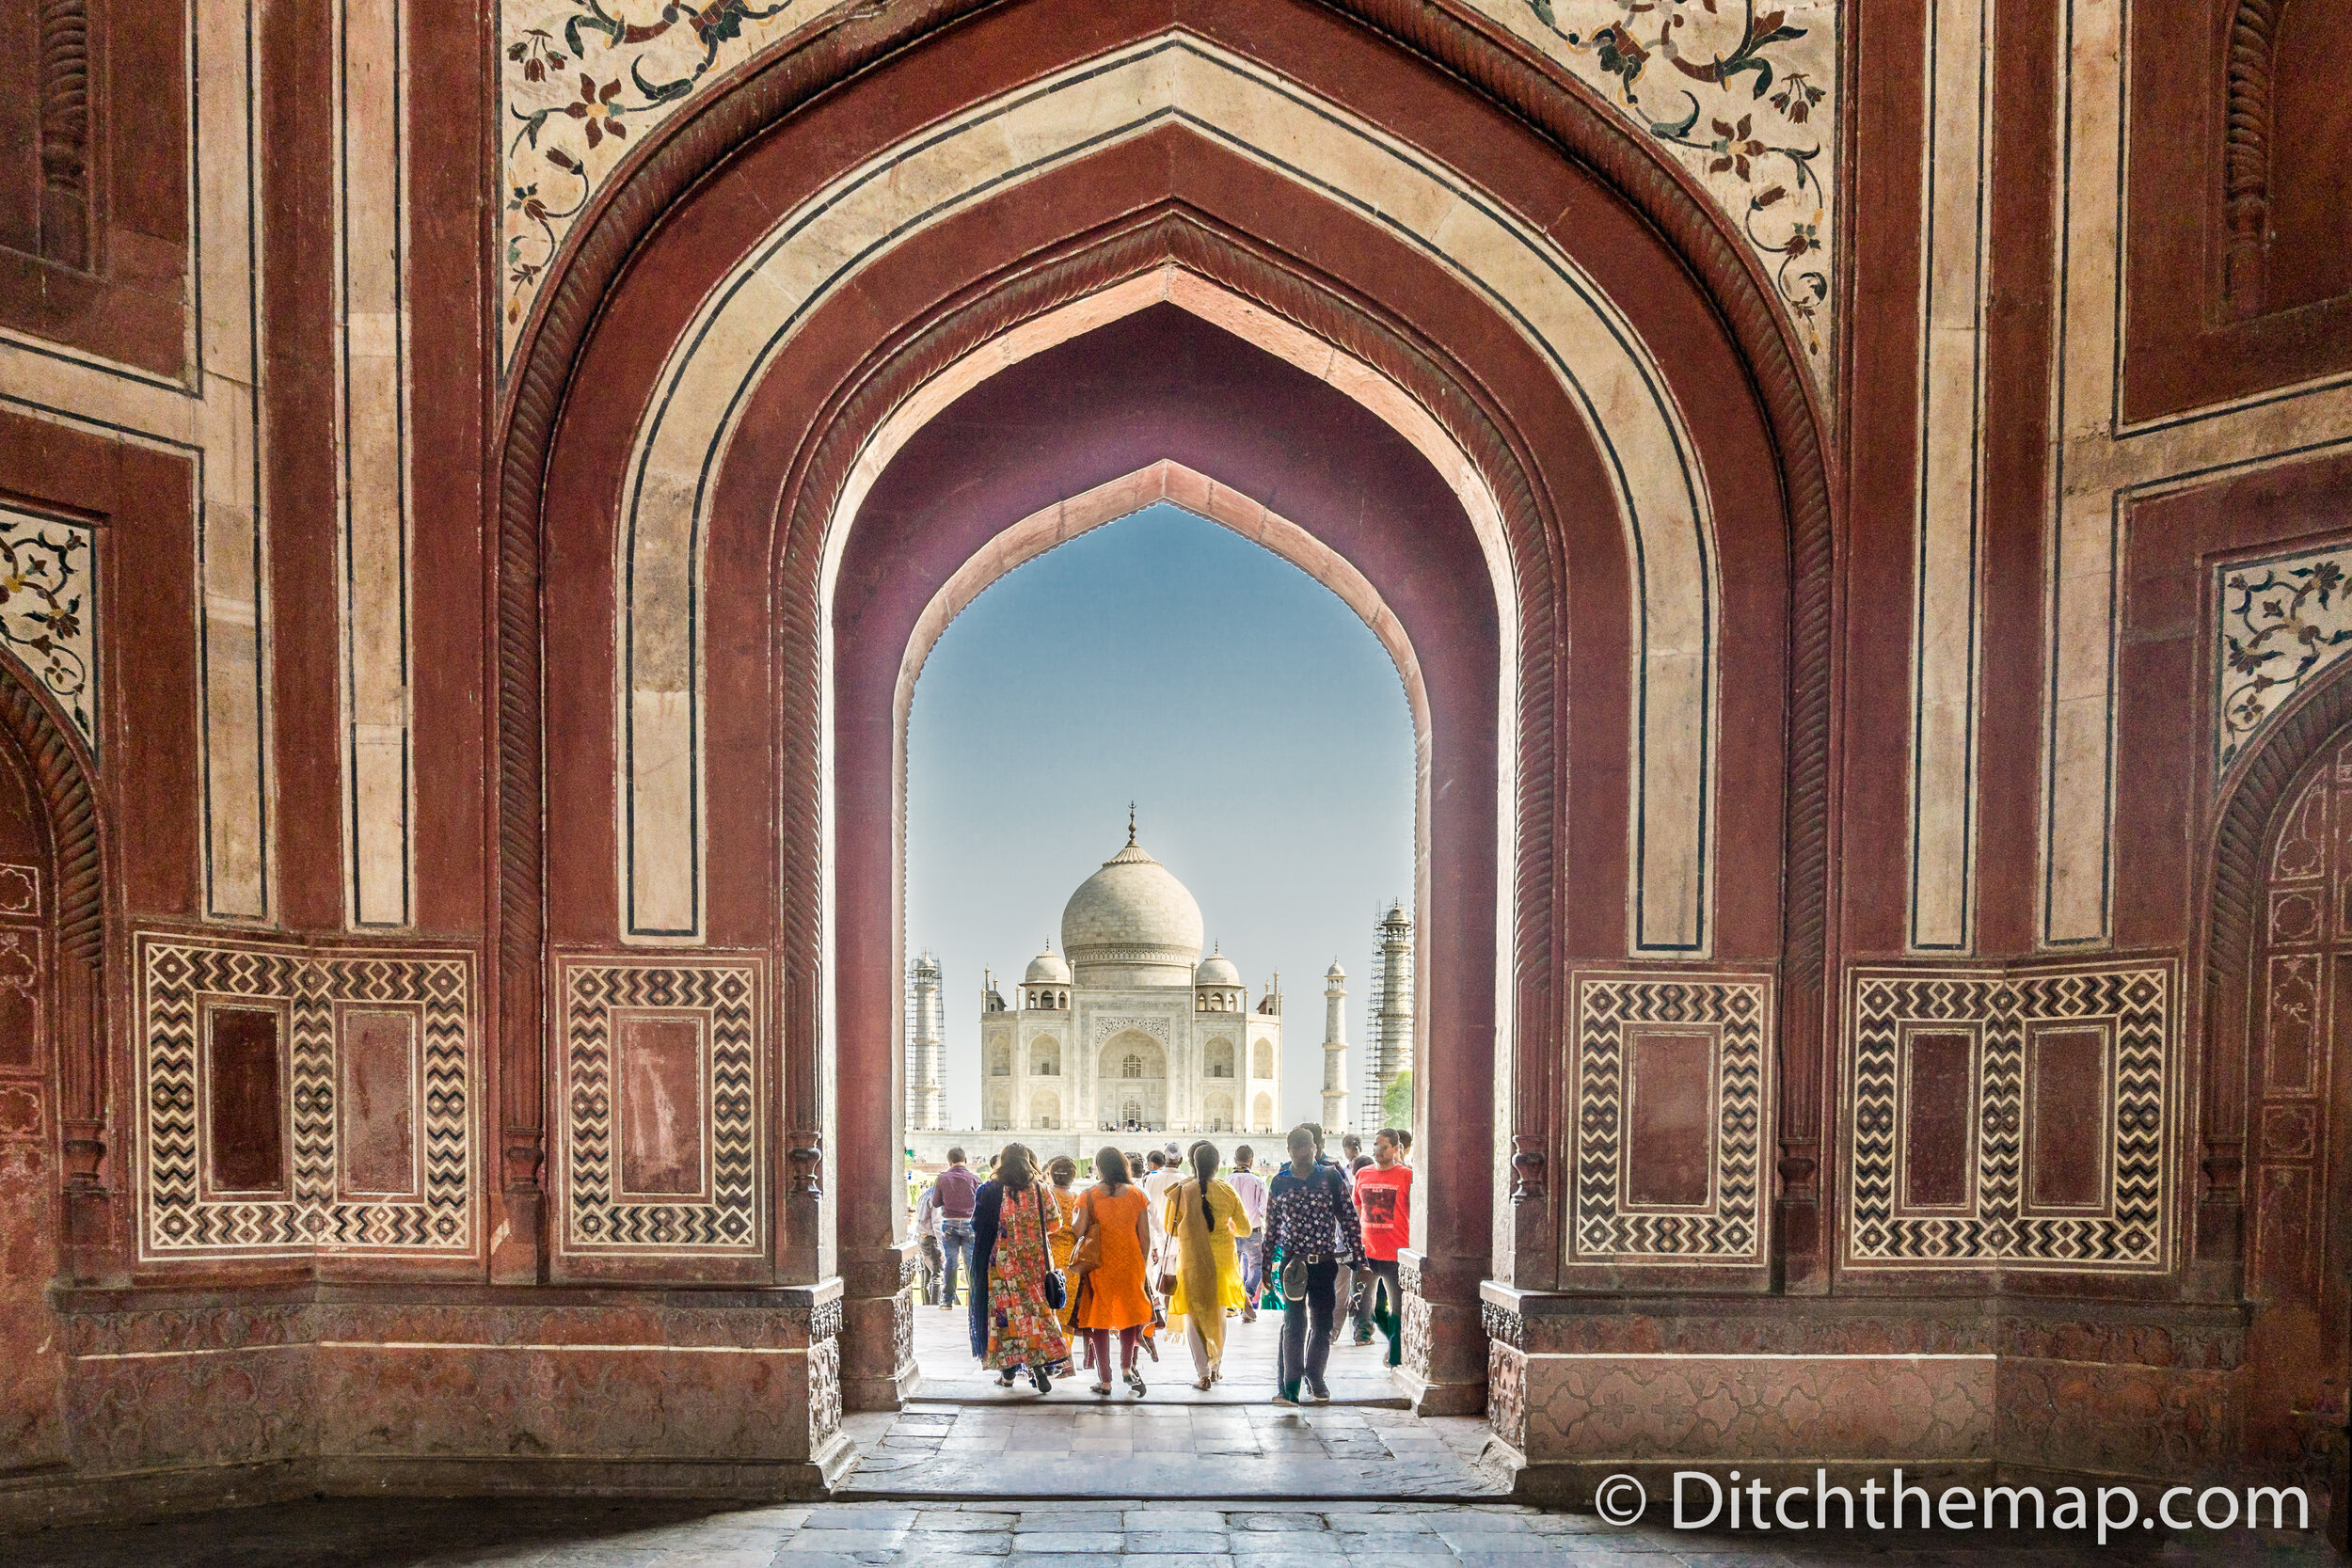
Disappointment - Prepare to be disappointed. It will rain all day during your holiday. It will be cloudy when you only came to see the northern lights, The Taj Mahal will be under construction during your once-in-a-lifetime visit. You need to roll with the punches and be creative. Look outside the box and find inspiration everywhere you are.
In the picture below, taken while visiting the Taj Mahal, I had arrived too late to get a clear shot of the main building but I was still able to take a phenomenal photo—one of my all time best sellers. I also used HDR and cropping to draw attention to the people in the archway.
Software:
I have already mentioned a few pieces of software in the section above but I will summarize them in this section.
Cataloging (+ editing) - I use Lightroom (because it integrates with Photoshop) but there are several others to choose from. Lightroom is photo cataloging software that organizes where your pictures are stored and is the main software you will use for 95% of all your edits. This software lets you apply lens corrections, global color changes, panorama and HDR composite shots, along with countless other photo editing tools. This is where you name your pictures, add tags and titles, add GPS data, etc. There is facial recognition and you can search for various photos by word, lens, focal length, etc. The edits made using this software are non-destructive, which means you can simply restore the photos to its original state at any time. Lightroom can handle cloning, HDR, panoramas, etc. They do not do any one thing amazingly but they are pretty good. Using Lightroom is akin to using the 80/20 rule (20% of the work for 80% of the result). If you need that extra 20% then you should use specialty software (described below)
Photo Editing - This is where Photoshop comes in, however travel photography typically does not require Photoshop often. Most edits can be done in software packages like Lightroom. Photoshop is best used when making local edits to a photo (e.g. removing complex objects).
HDR - There are specialty HDR software packages but I find Photoshop to be pretty darn good. Lightroom works well and is fast but not as good at Photoshop.
Starscapes - There are numerous software packages available (only 1 on Mac) that lets stack photos to make starscapes. The stacking will align the stars even when other objects in the photo have shifted.
Stock Websites:
I sell my photos online using half a dozen (or so) stock image sites. You need to upload your pictures separately to the websites, each having their own requirements. This is extremely time-consuming and you should not expect to make huge money. You need to have filled in categories, titles, tags, and relevant signed releases to have your photos accepted. All stock photo sites have their own application process, some being more competitive than others. Although I have tried nearly 20 stock image sites these are the ones that are probably the best.
Shutterstock - lowest income per sale but highest volume
Getty Images (ESP) / iStock
Adobe Stock / Fotolia
123rf
Dreamstime
Depositphotos
Hustle:
You have to be an entrepreneur with hustle if you want to make it as a travel photographer. You are NOT going to come across an ad that reads, “Travel photographer wanted to travel the world for free and take pictures”. Your path of as a travel photographer will differ depending on why you want to be a travel photographer. You will fall into 1 of the following 2 groups as to why you want to become e a travel photographer.
Group 1 - A way to legitimize your current hobby. You like traveling and taking photographs so why not make some money mixing the two?
Group 2 - Making a profession out of it. You want to transition into making a full-time living out of travel photography.
If you fall into group 2 you need to make professional connections with magazines/corporations/etc. where you can win long-term or regular contracts, galleries that will take your work and sell on consignment, etc. You will spend the vast majority of your time networking and trying to sell your work and less time out in the field.
If you fall into group 1, like me, you can spend your time as you want. You will need to hustle to sell your work but the amount of business development you will undertake is magnitudes less than if you find yourself in group 1.
You need to hustle and make your own opportunities. Here are some of the ways I hustled:
I wrote personalized letters to hundreds of companies asking them for sponsorships. I probably heard back from 15% and only got sponsorships from half of those—only a few were ‘large’ sponsorships. The sponsorships were mostly free products. Six Moon Designs has been our best sponsor to-date.
I submitted sample photos (and sometimes written content) to countless travel publications. I ended up getting a few 10+ page stories with full-spread photos published. I earned $400 USD or so each time.
I took photos of various establishments and then sent a watermarked copy of the photo asking the business if they wanted to buy a signed print. I had them professionally printed from an online store. I was able to do this a few times, each time selling the print for $150-$500.
I reached out to hotels, restaurants, tour companies, etc. bartering free services in exchange for my professional photography. I exchanged over $12,000 worth of services during 2019 alone.
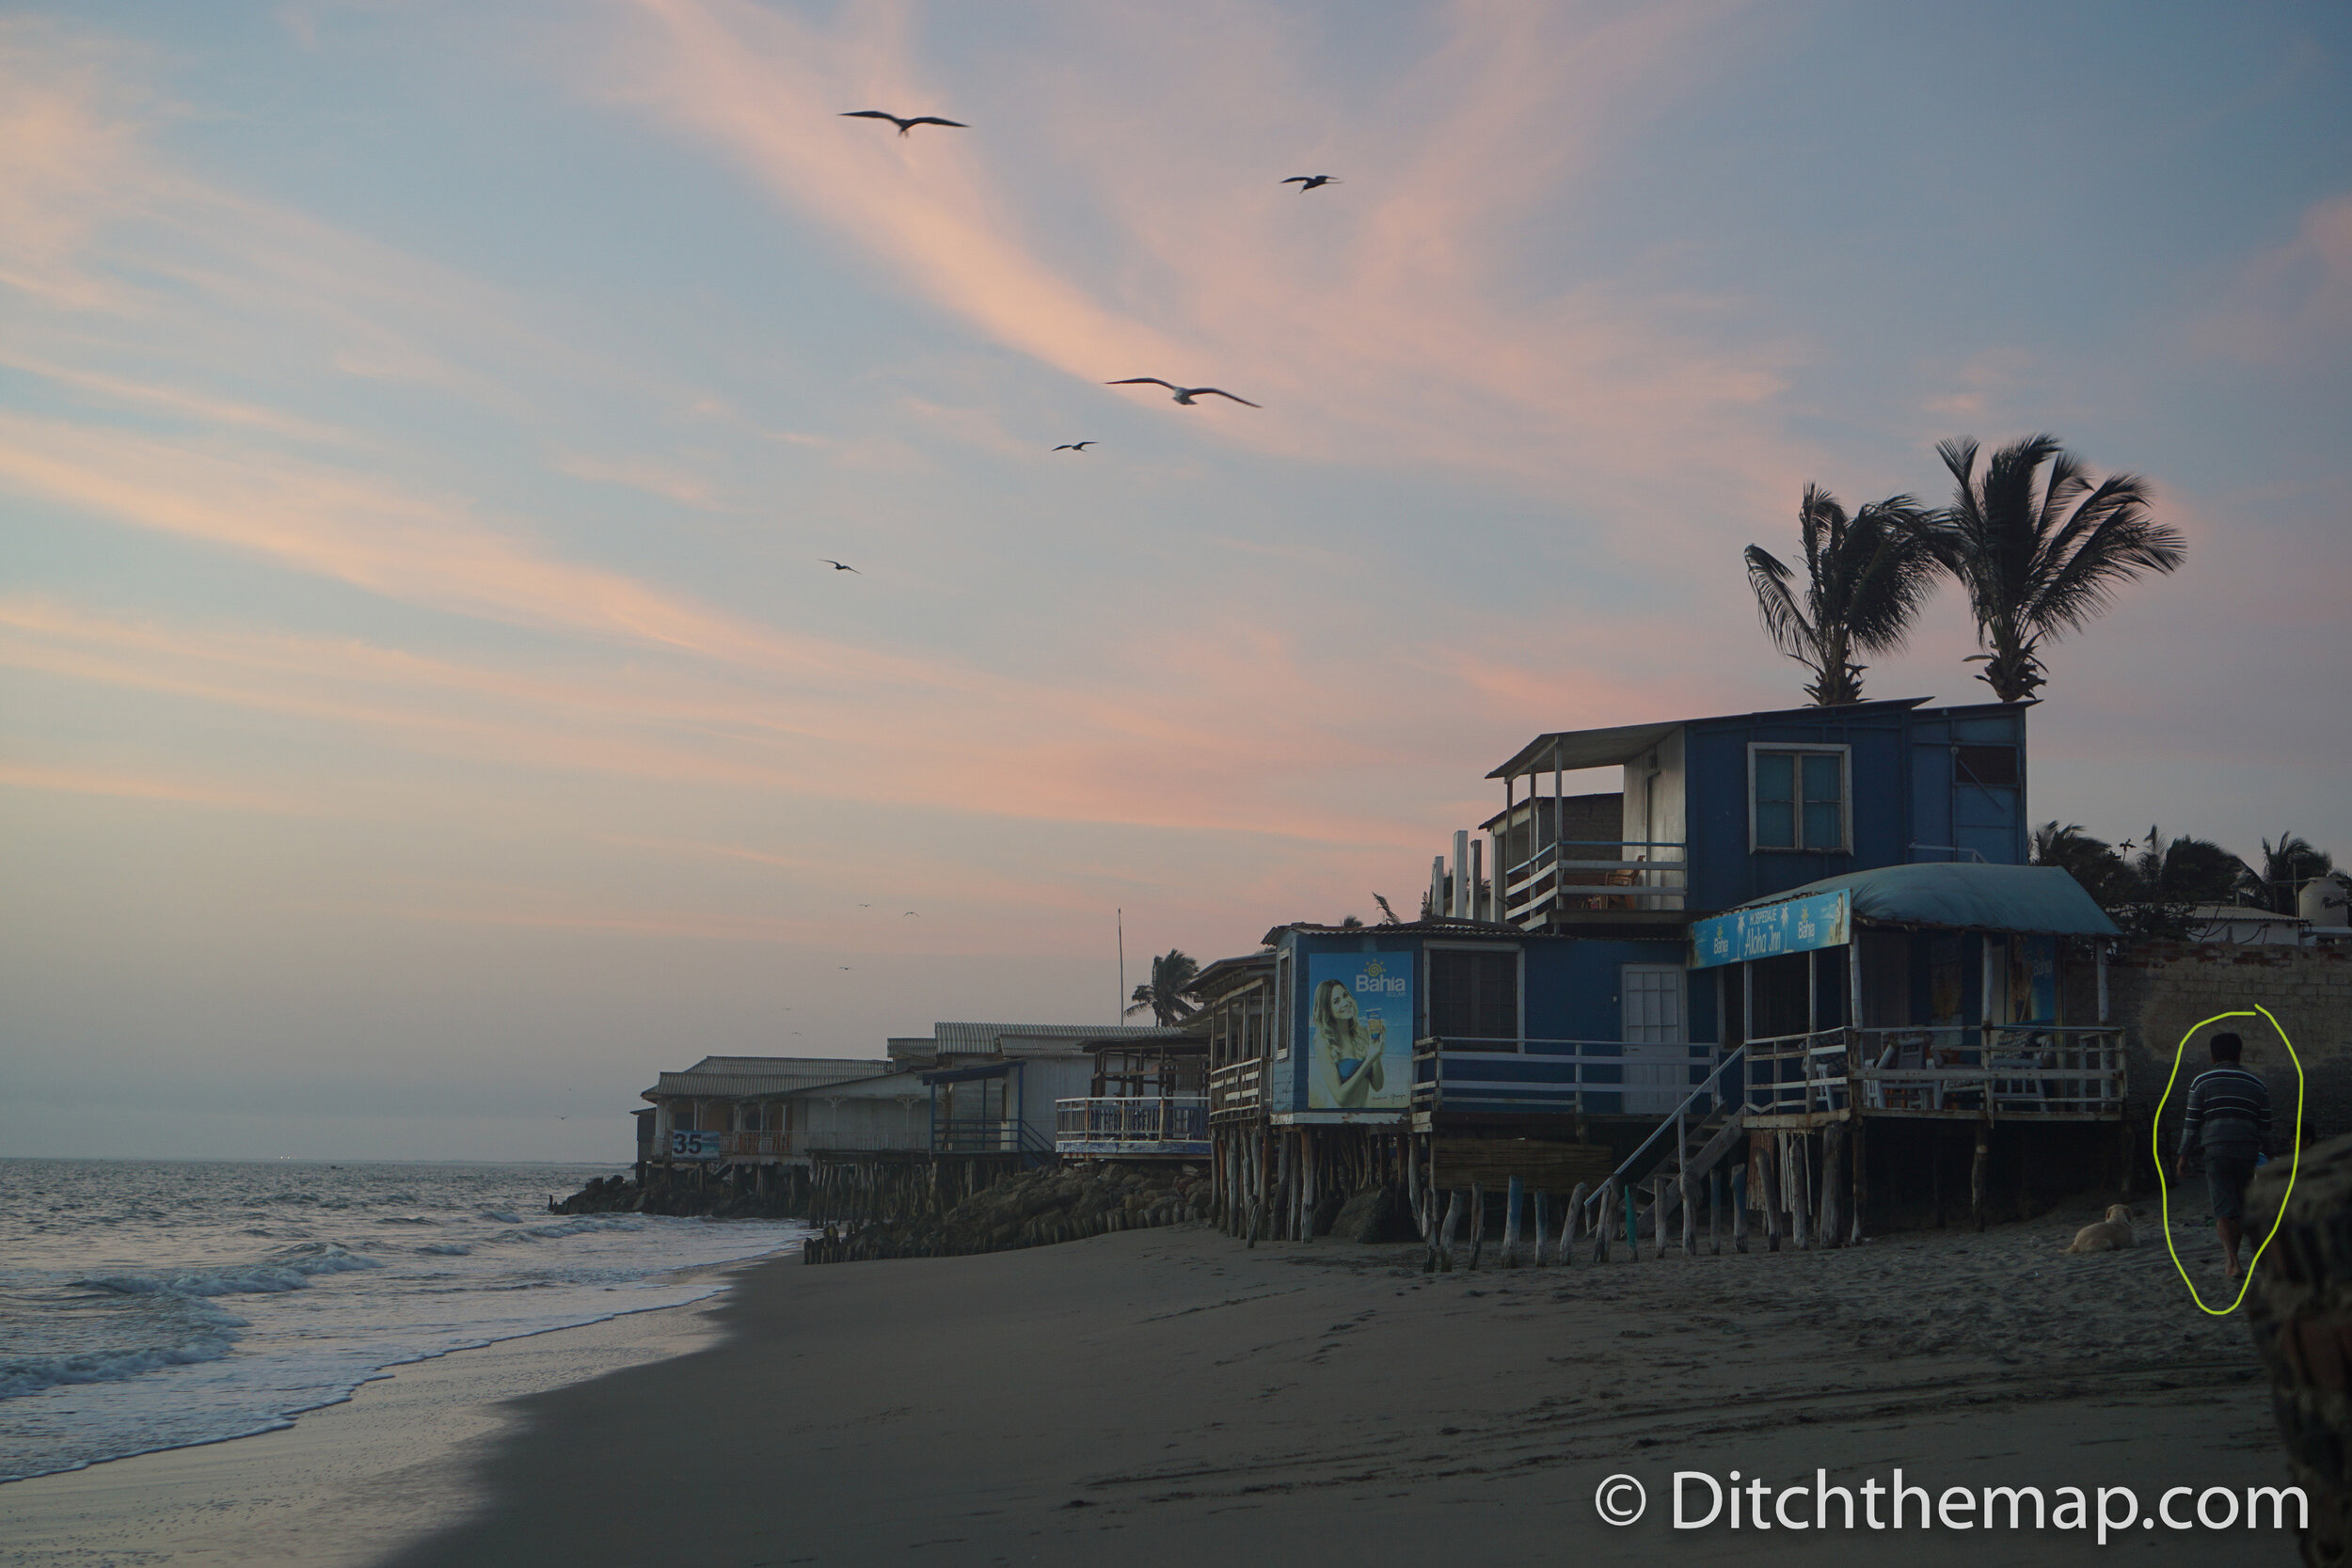
Below are some additional “before and after” examples of travel photos.
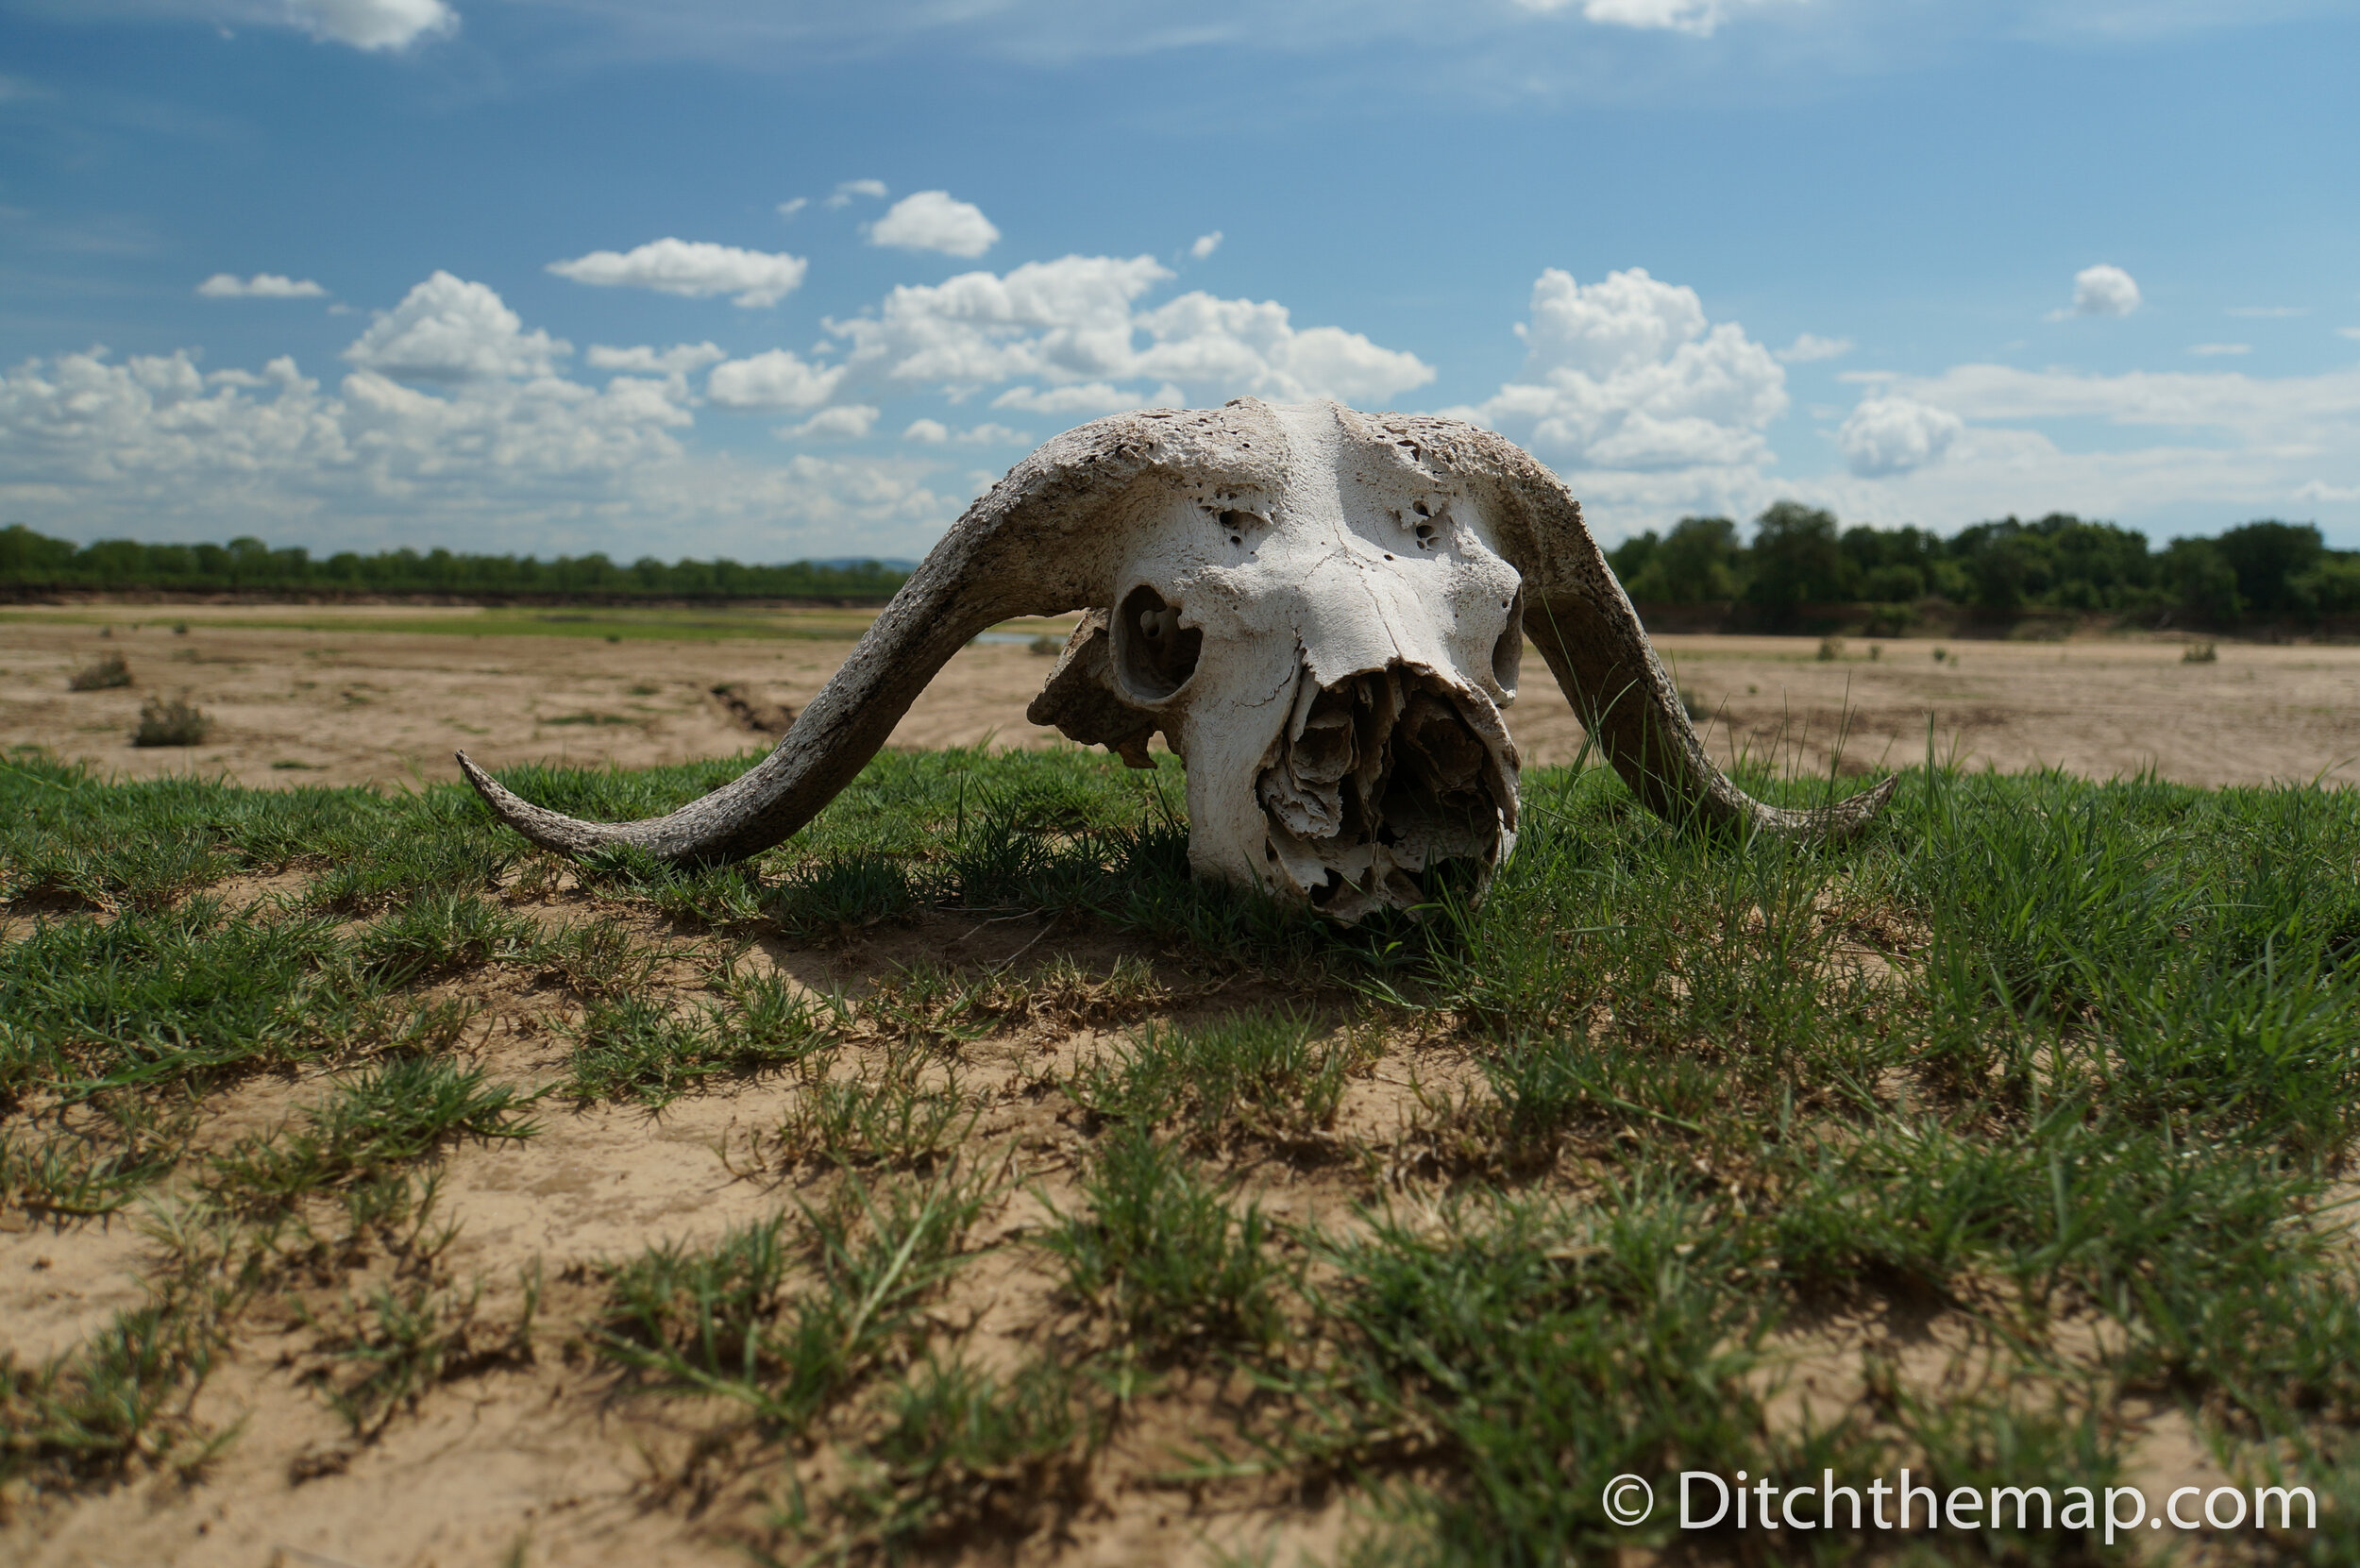
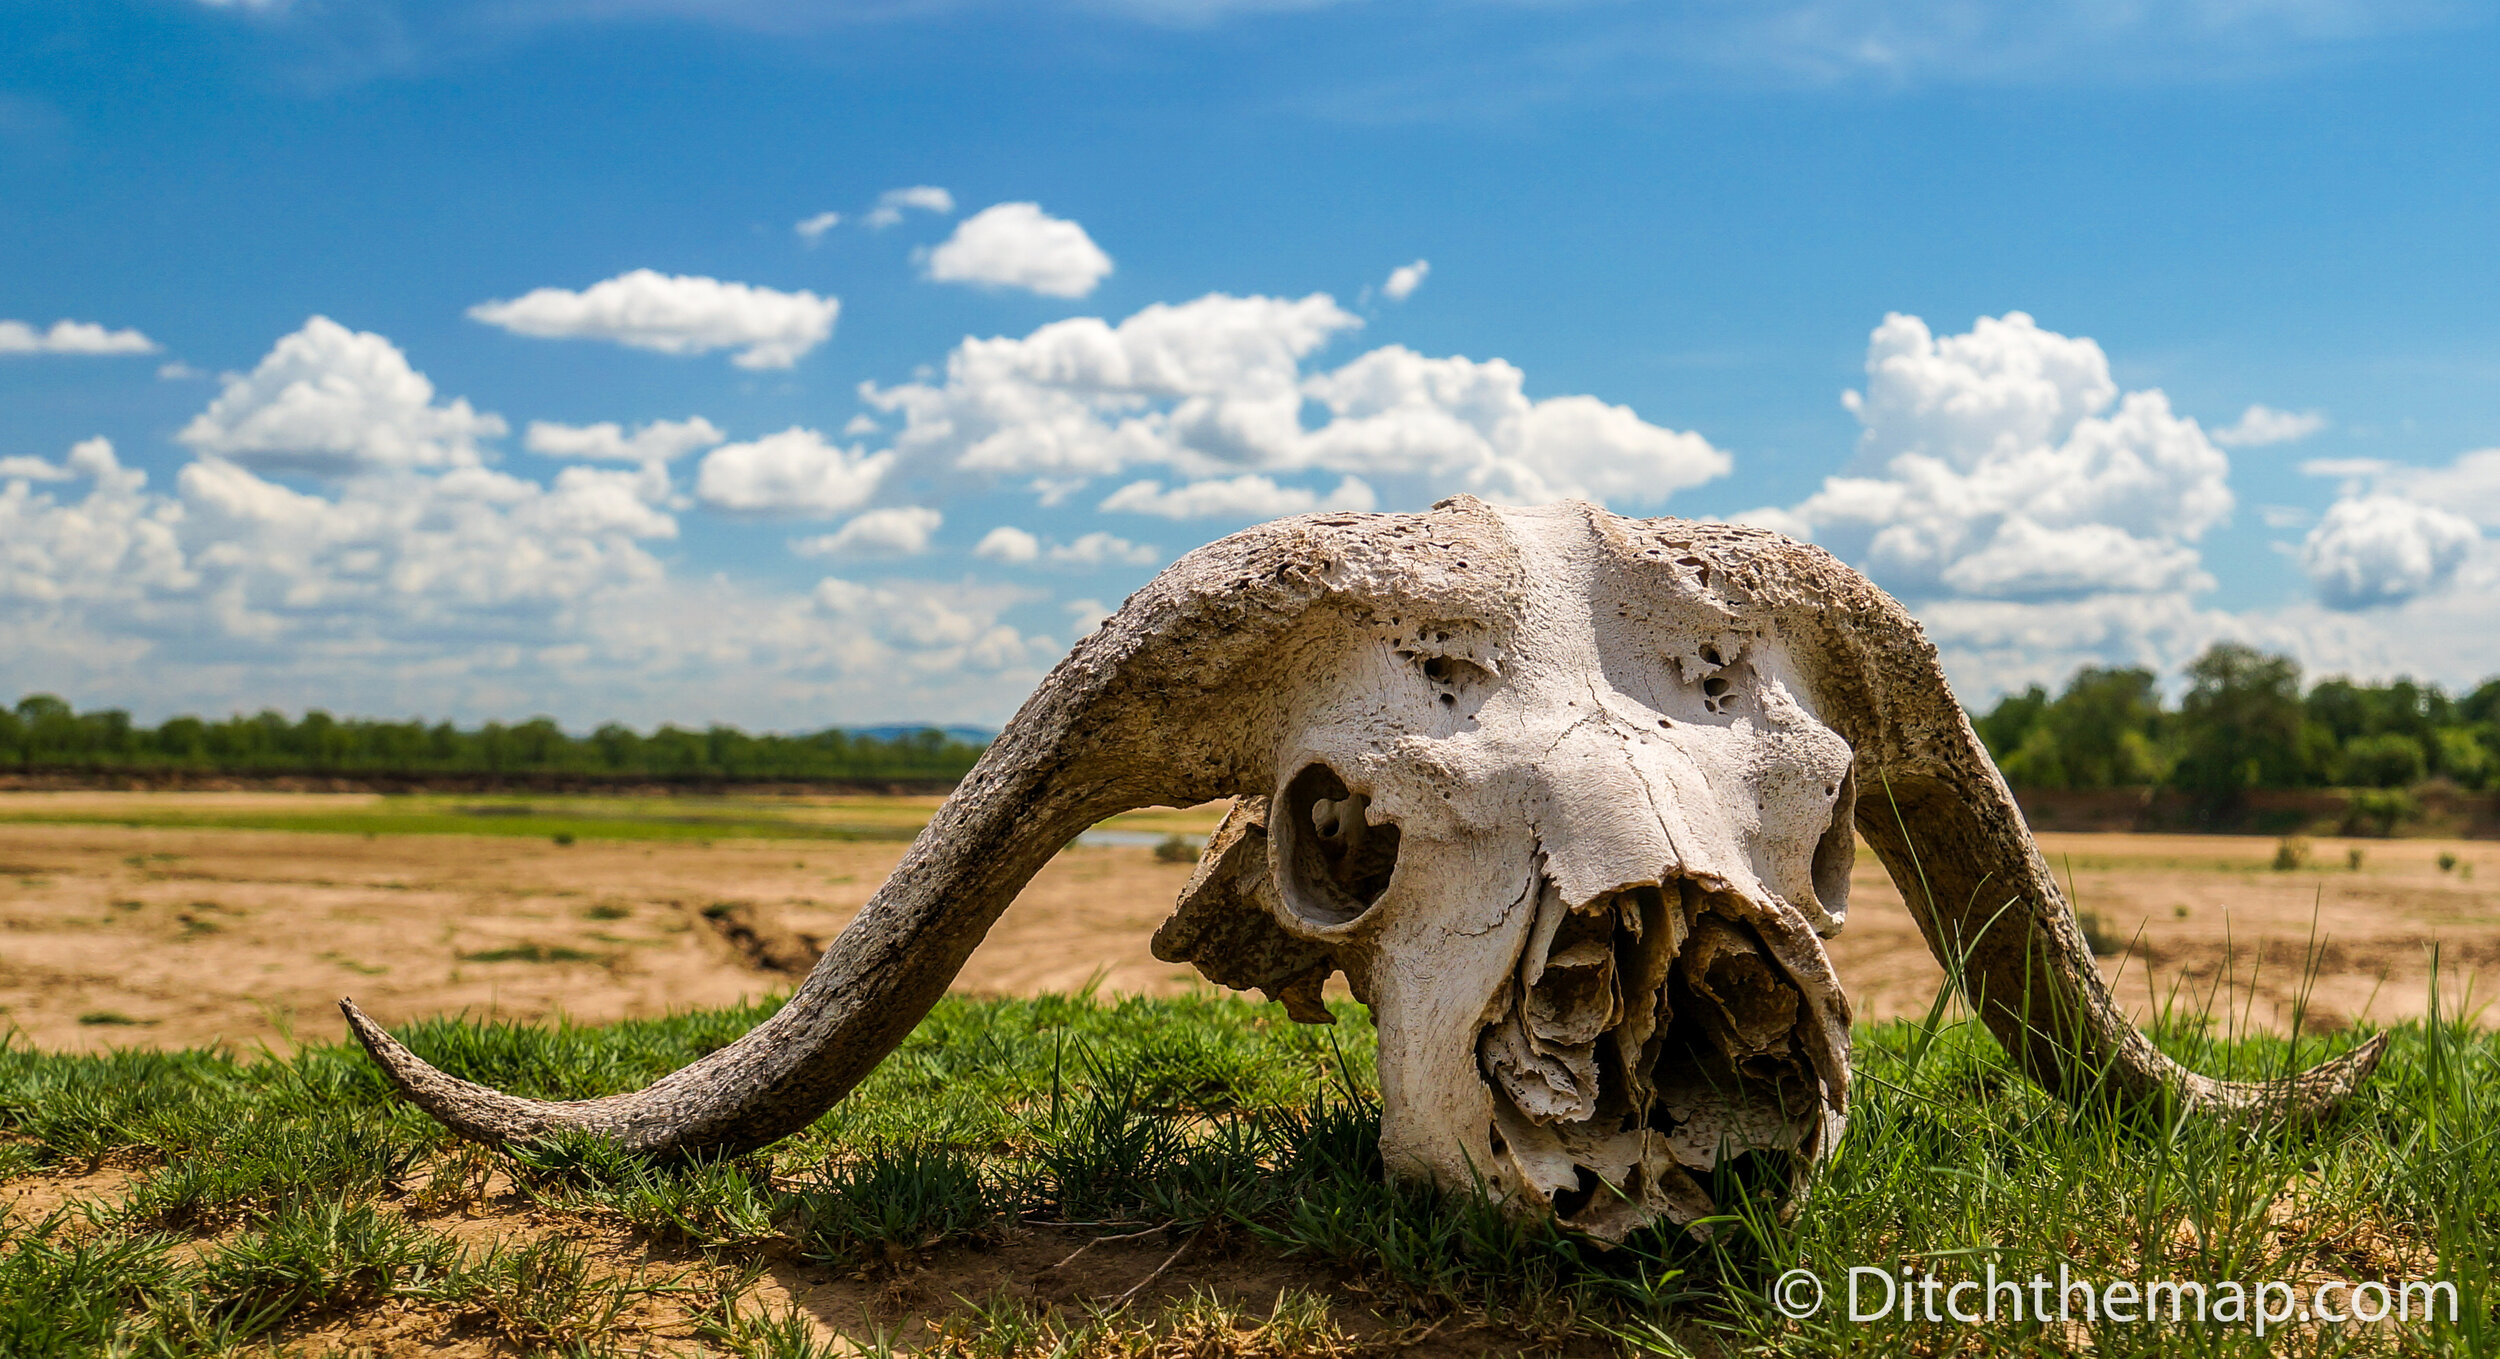
The foreground was removed emphasize the skull in the photo (below)
The photo (below) was taken using a graduate ND filter at multiple exposures to create an HDR composite image. Lightroom was used to remove the people and enhance the colors.
The photos (below) had their shadows brightened, highlights brought down, and various objects removed from the frame.
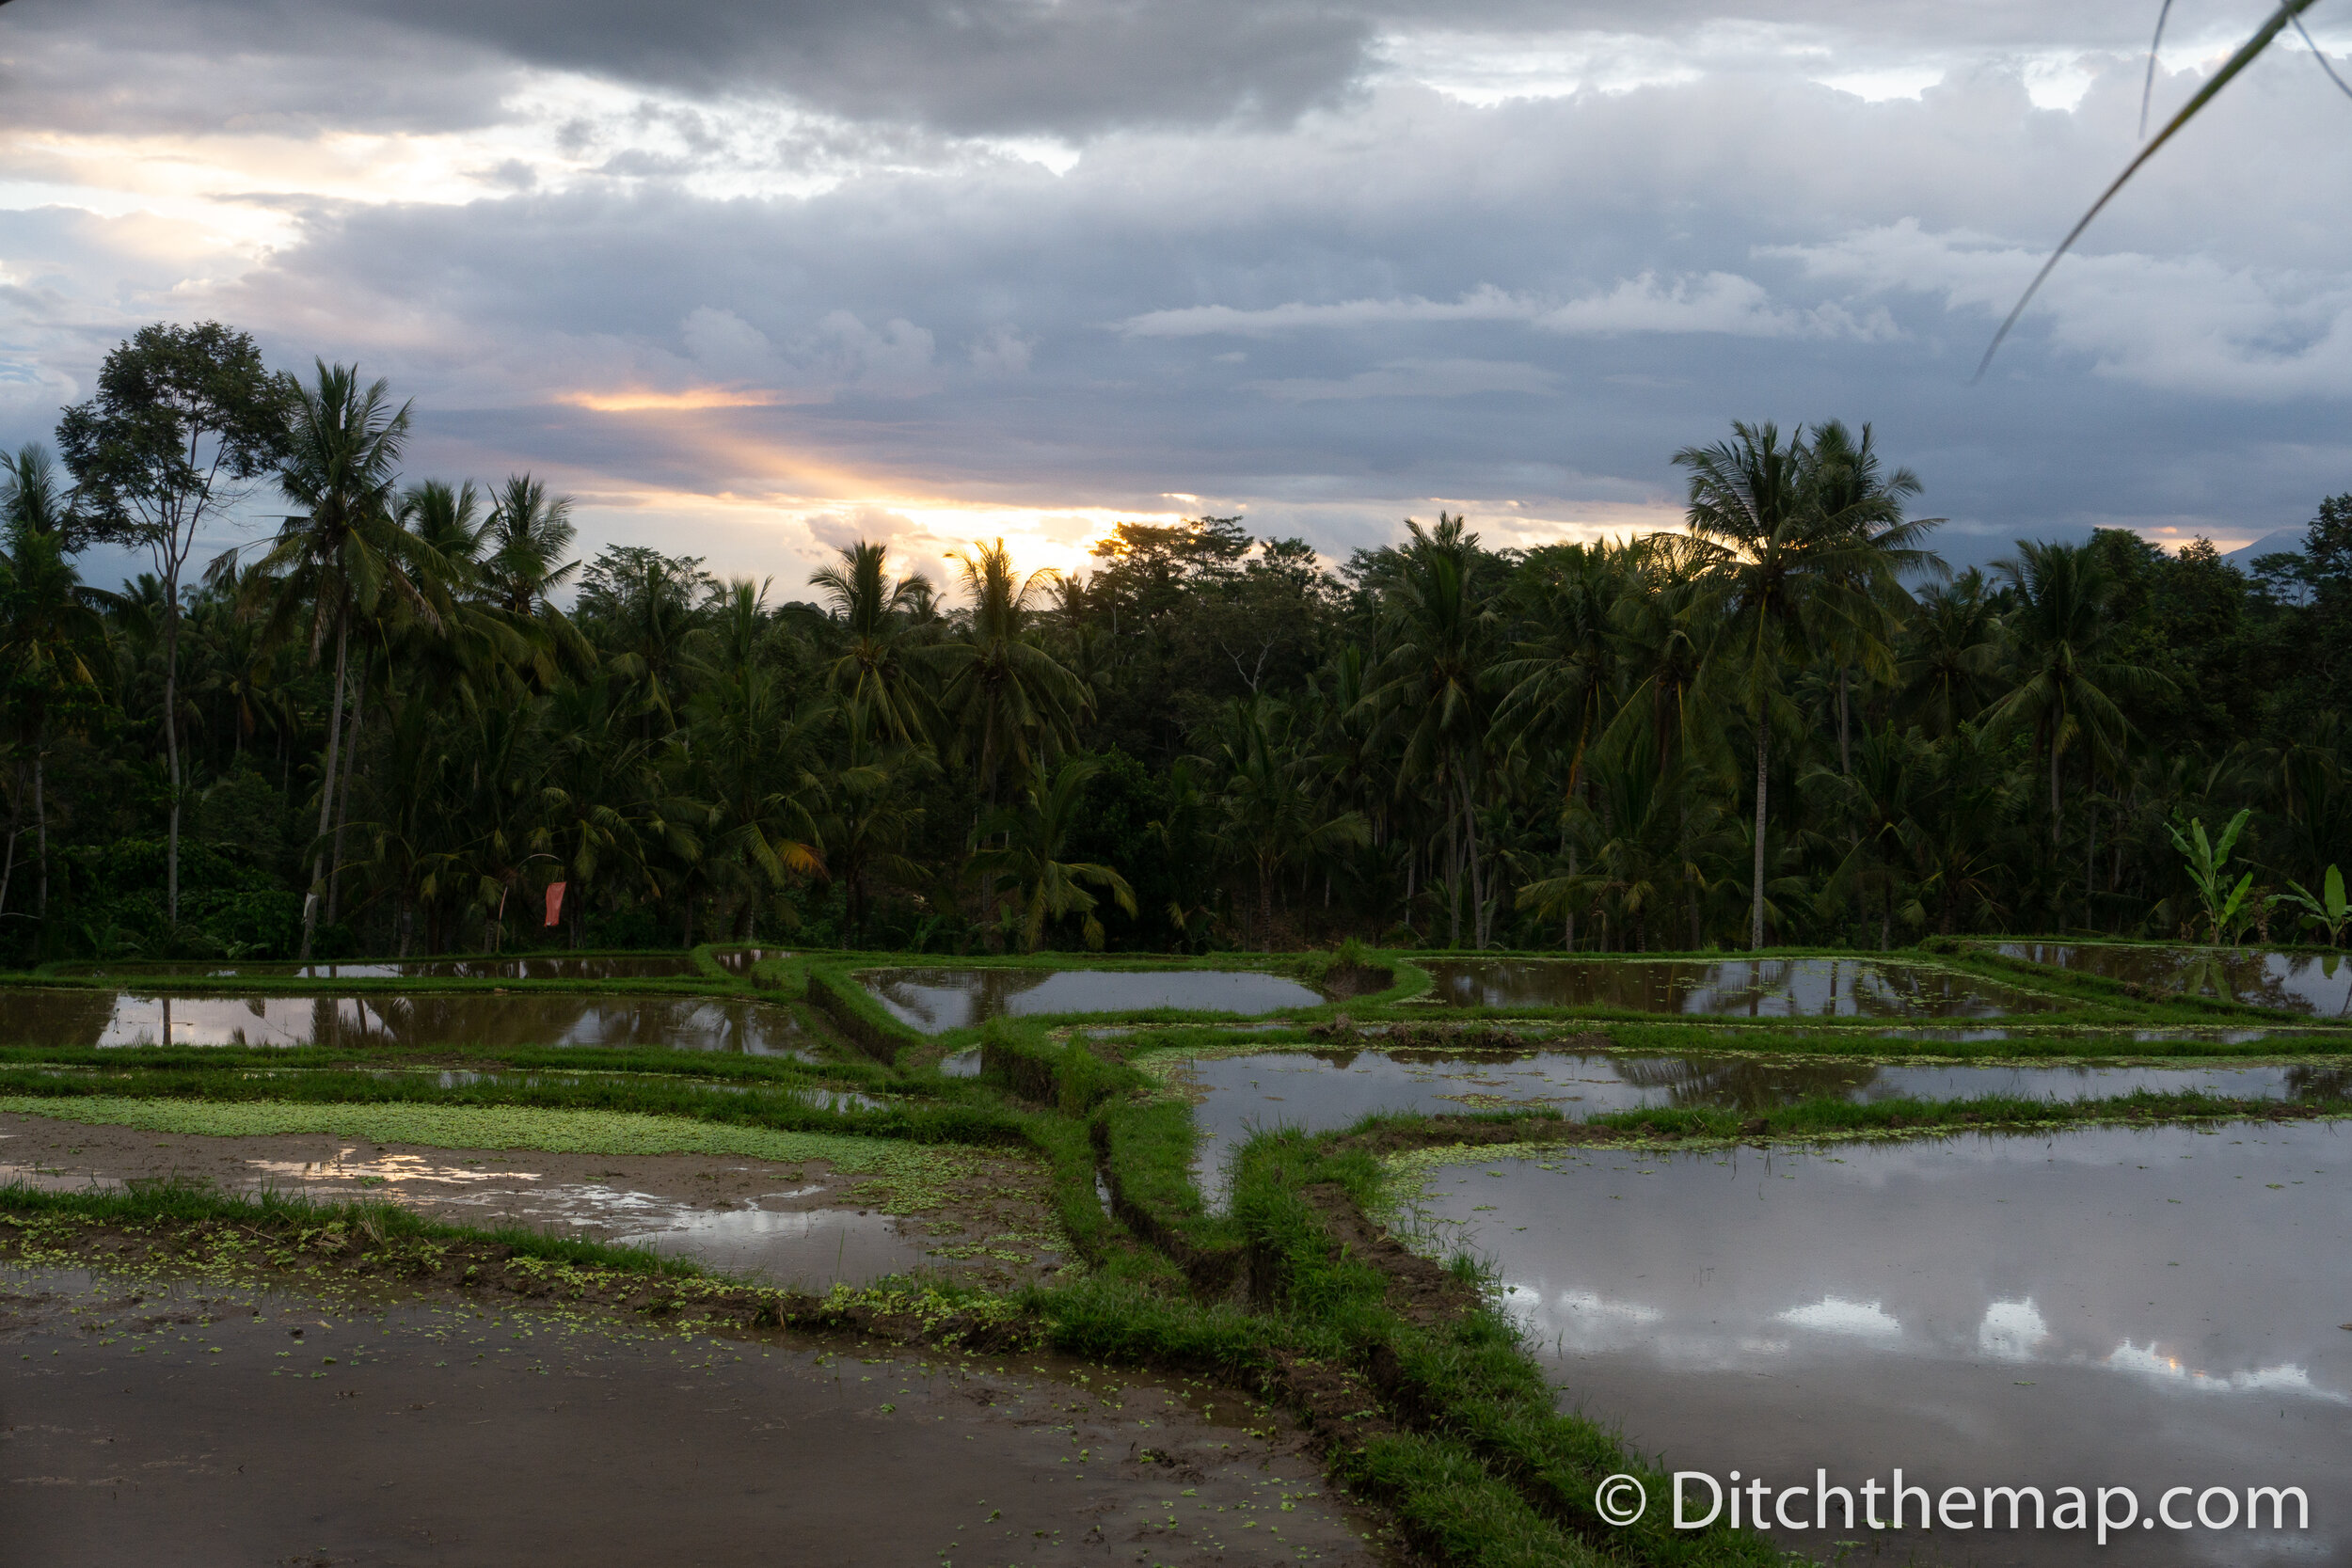
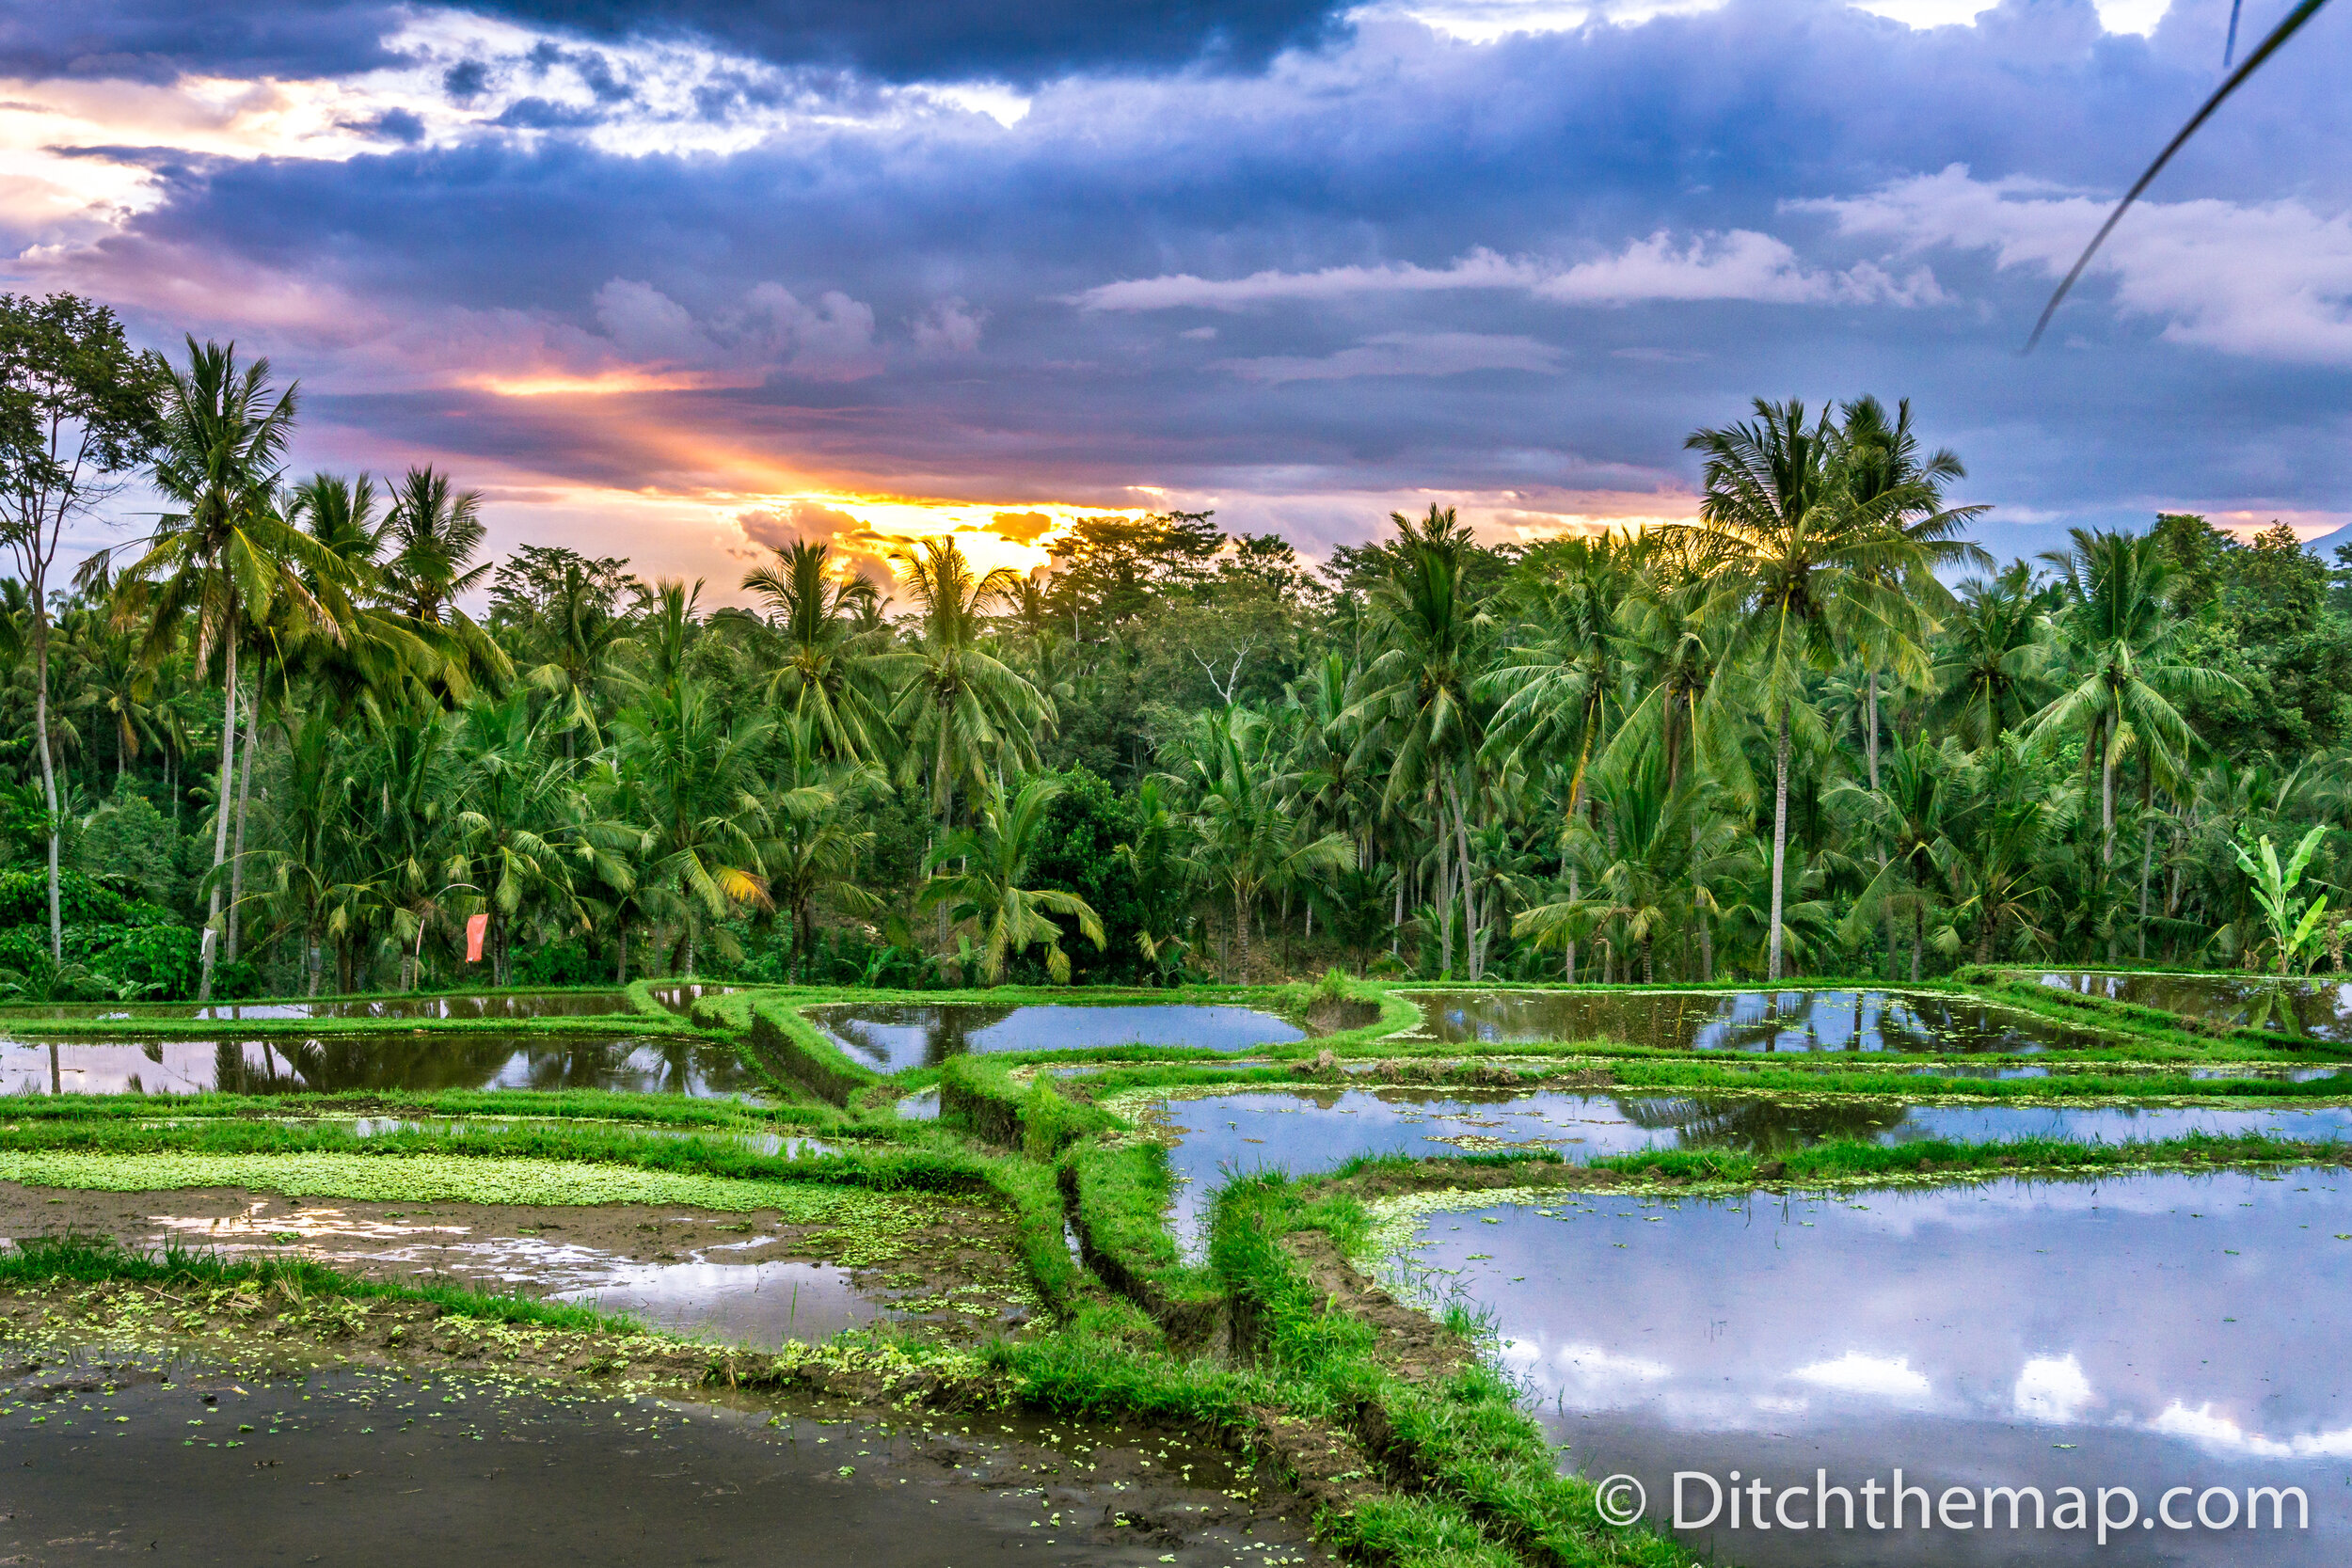
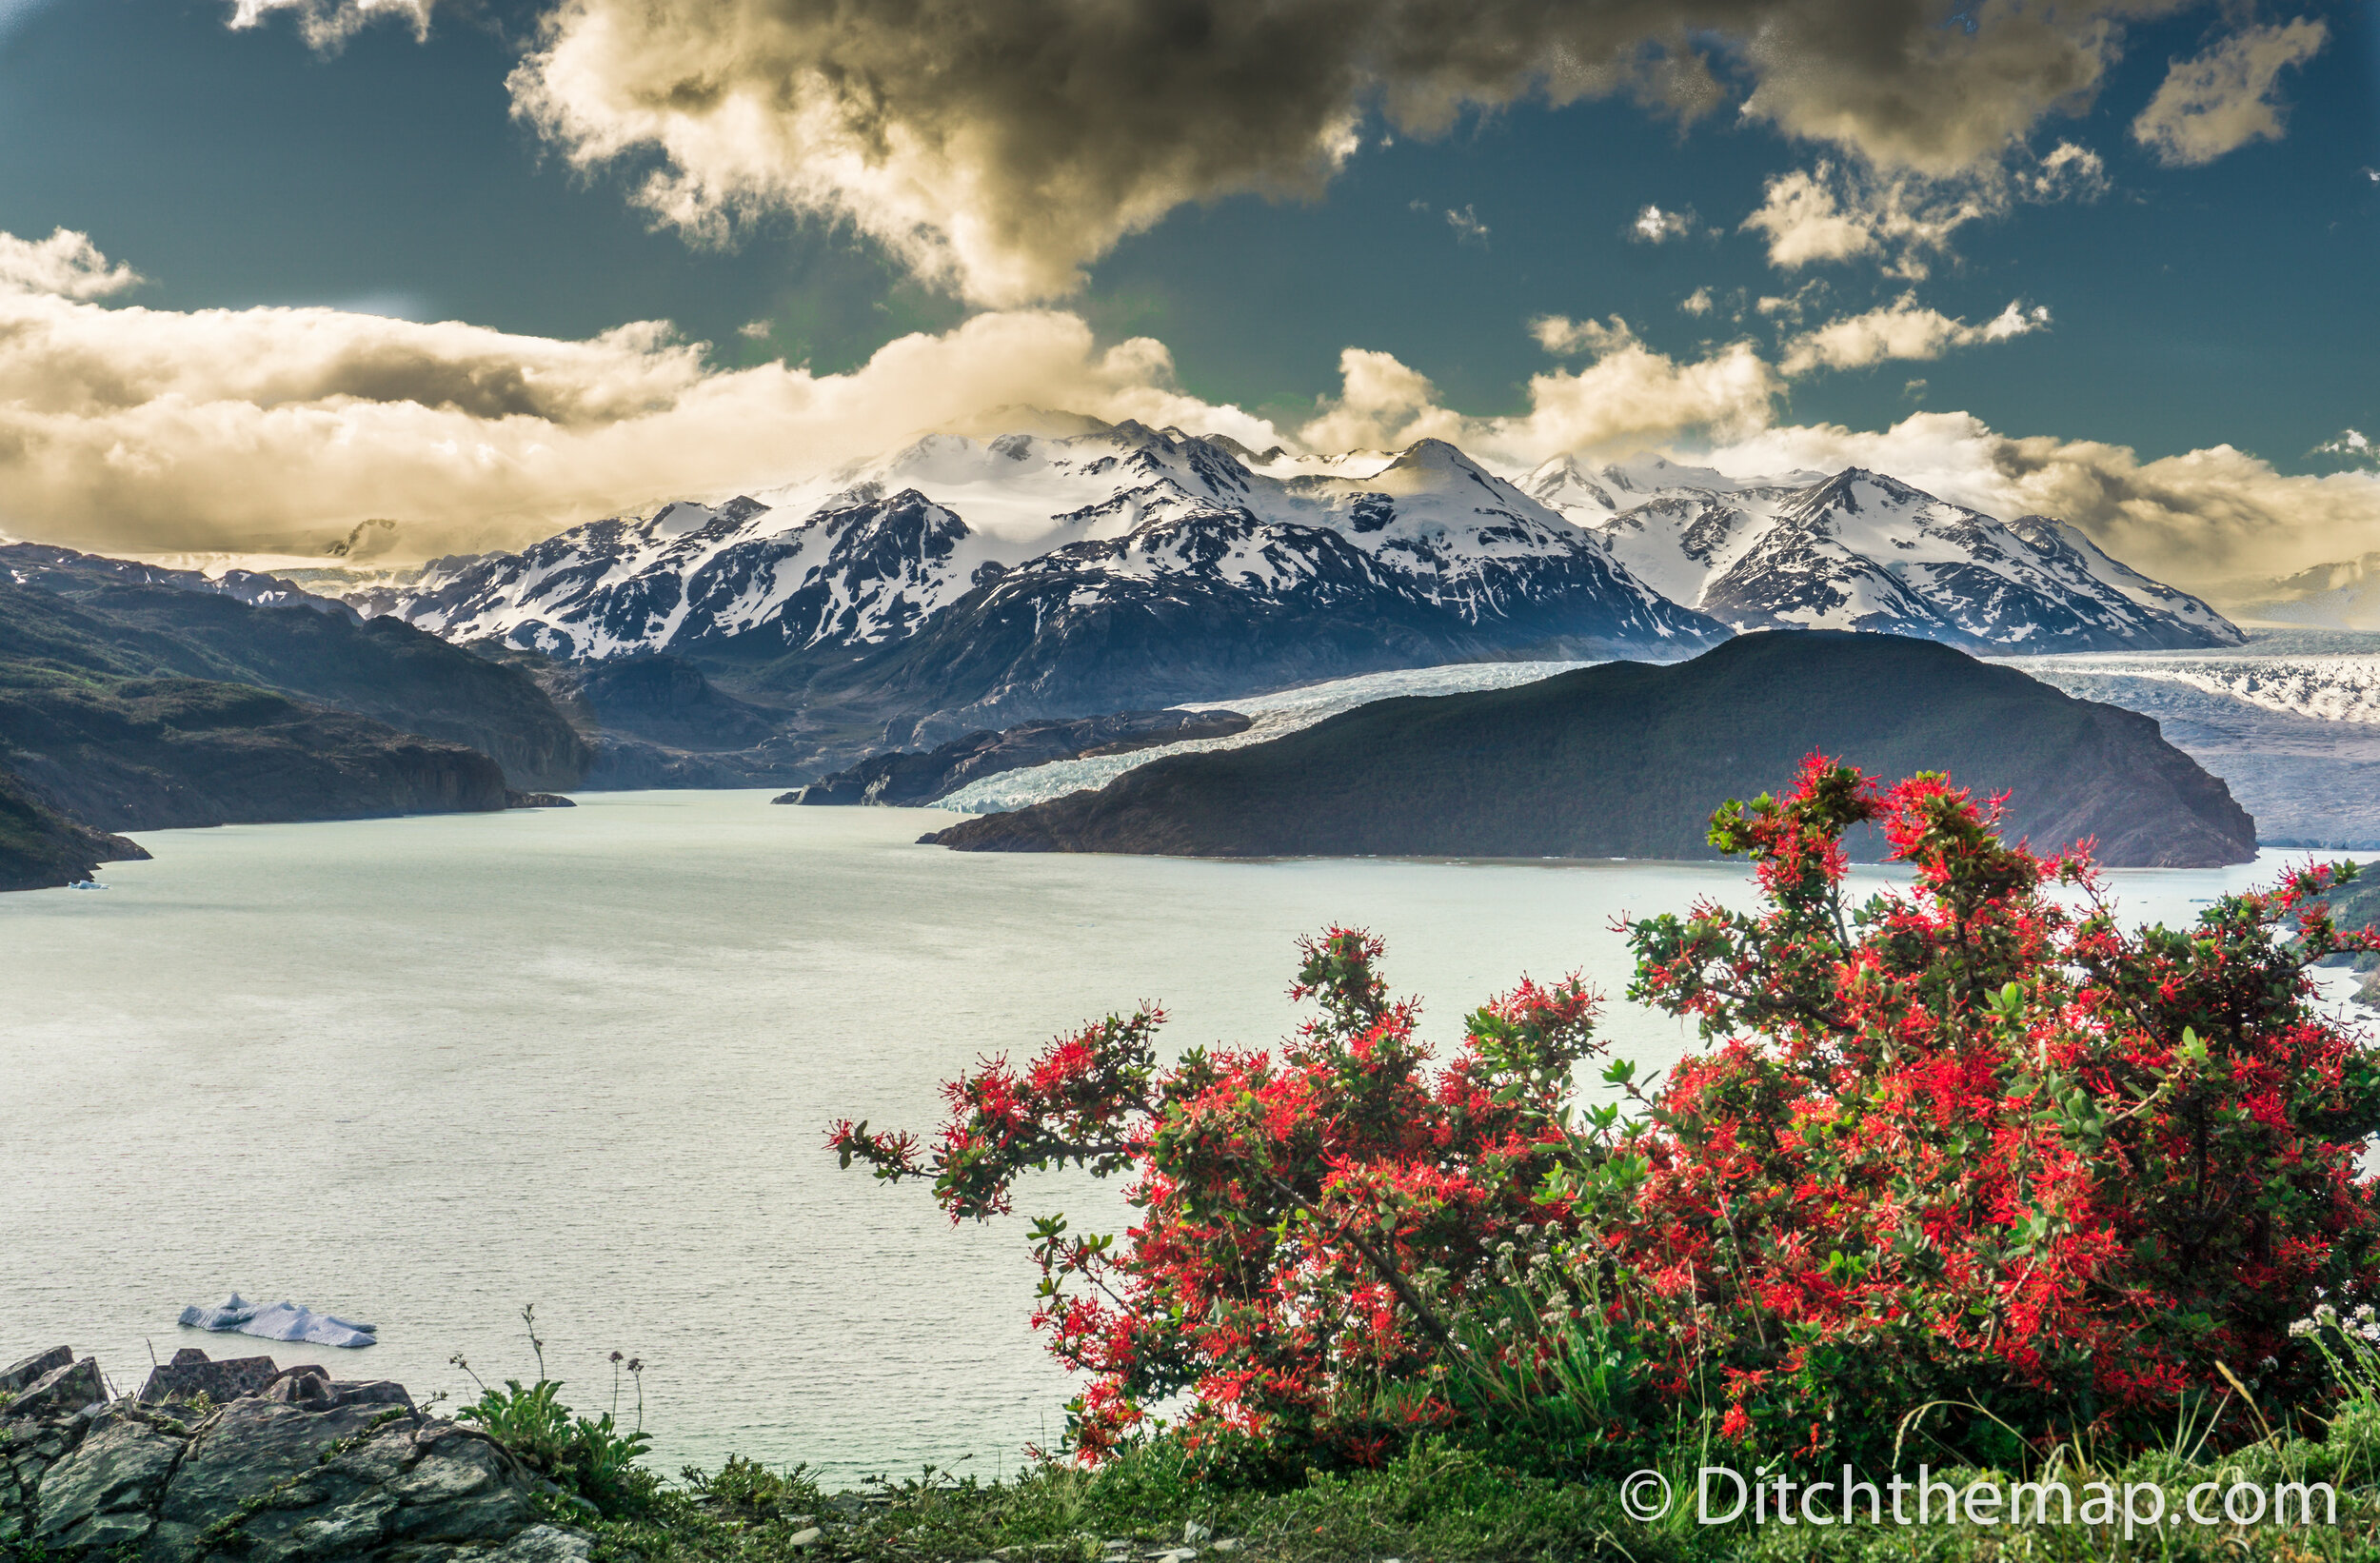
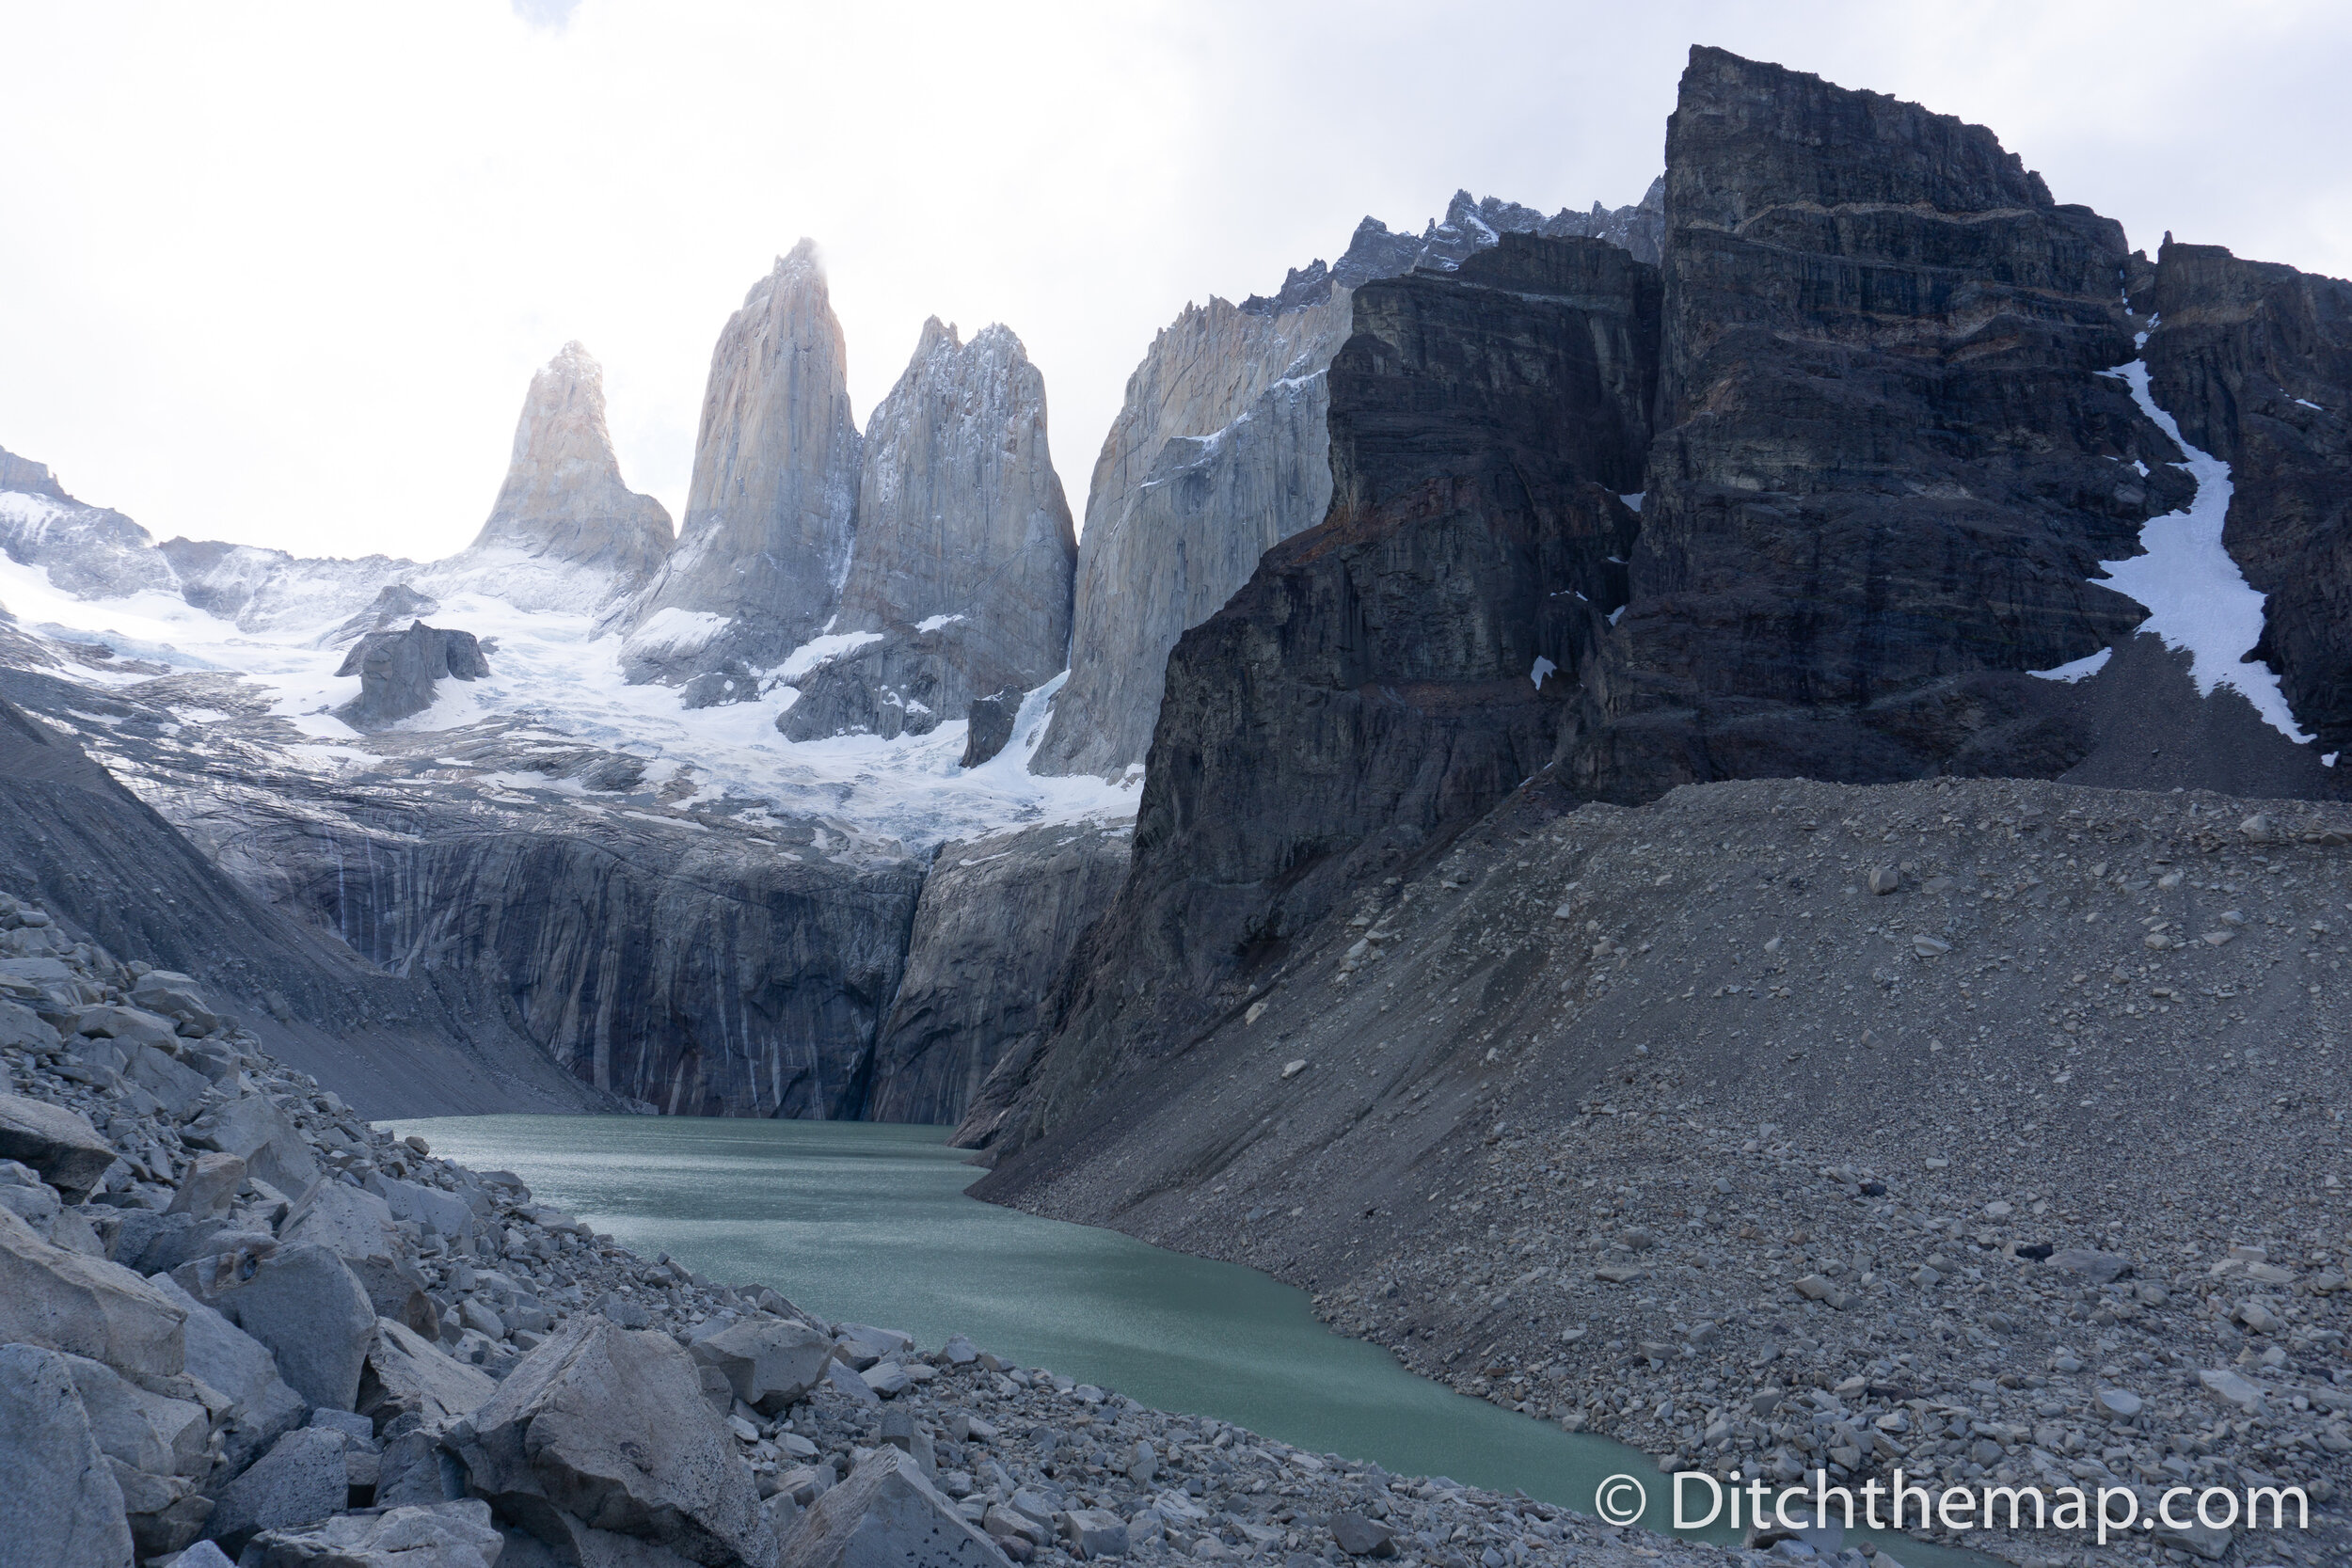
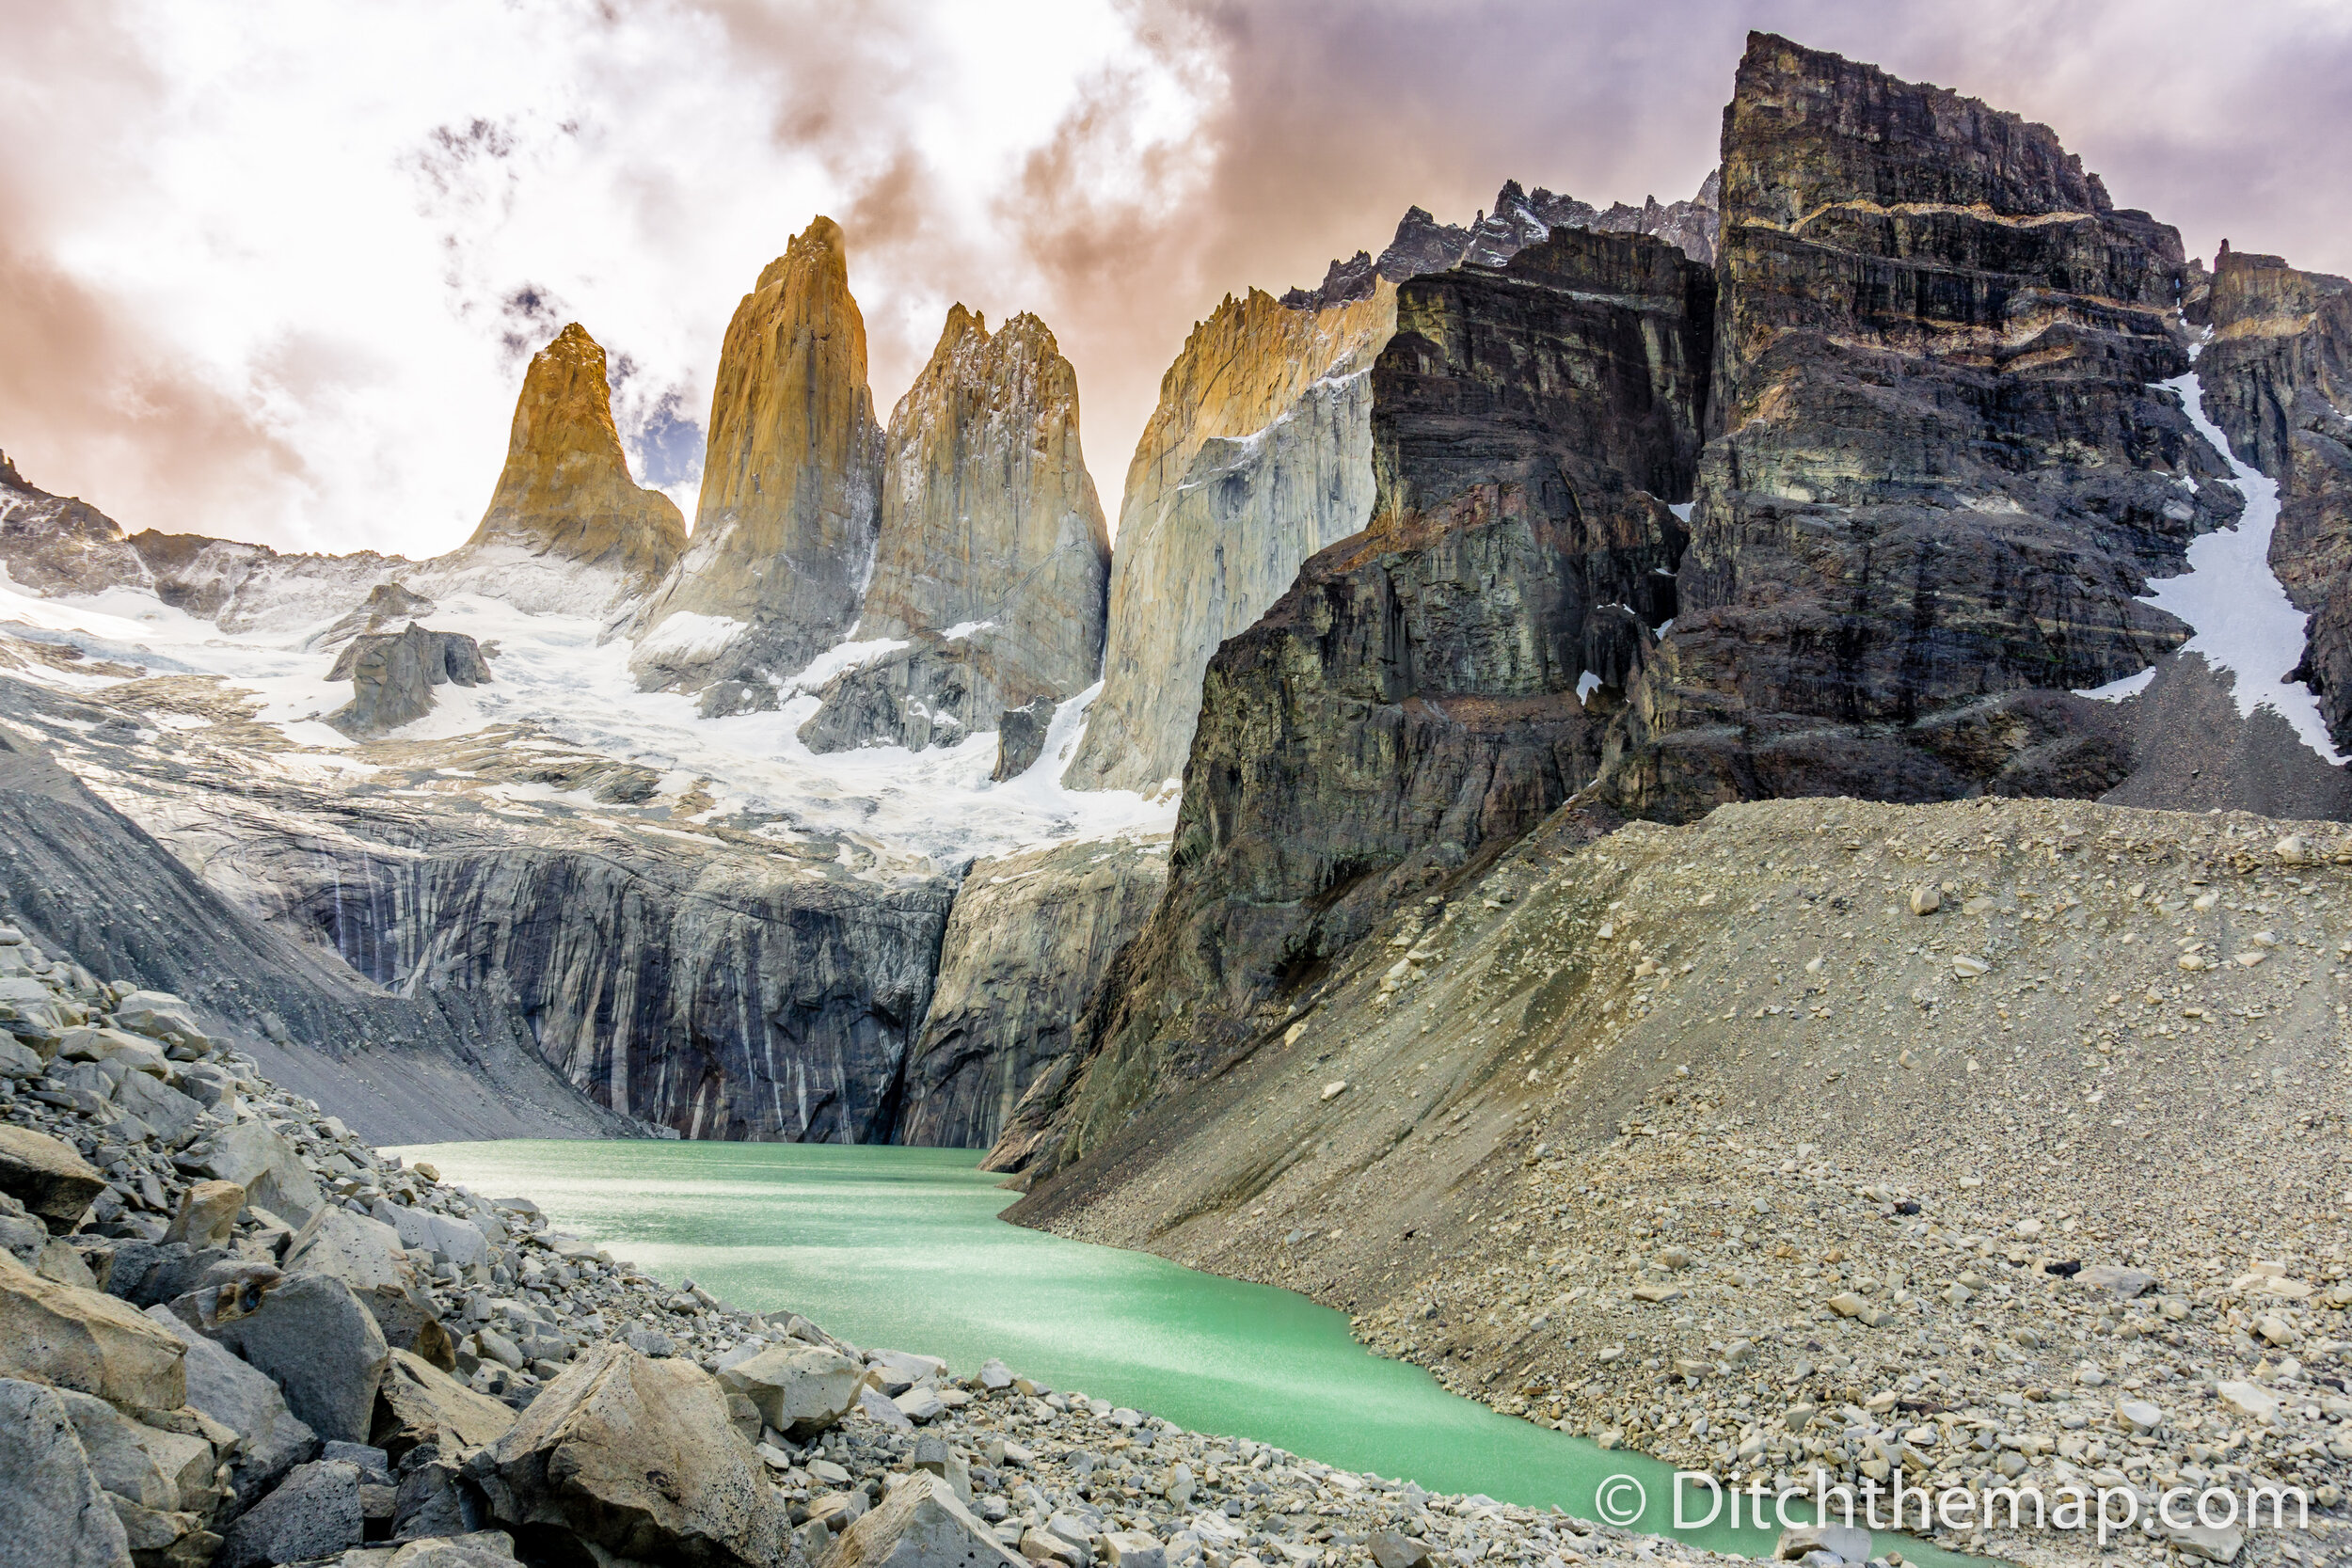
Not all photos can be gorgeous—sometimes I paint some additional colors into frame to add some interest. In the photos below I added contrast and some color in the skies. I added red to the bush in the middle photo and painted the tips of the mountains orange and the lake green in the bottom photo.
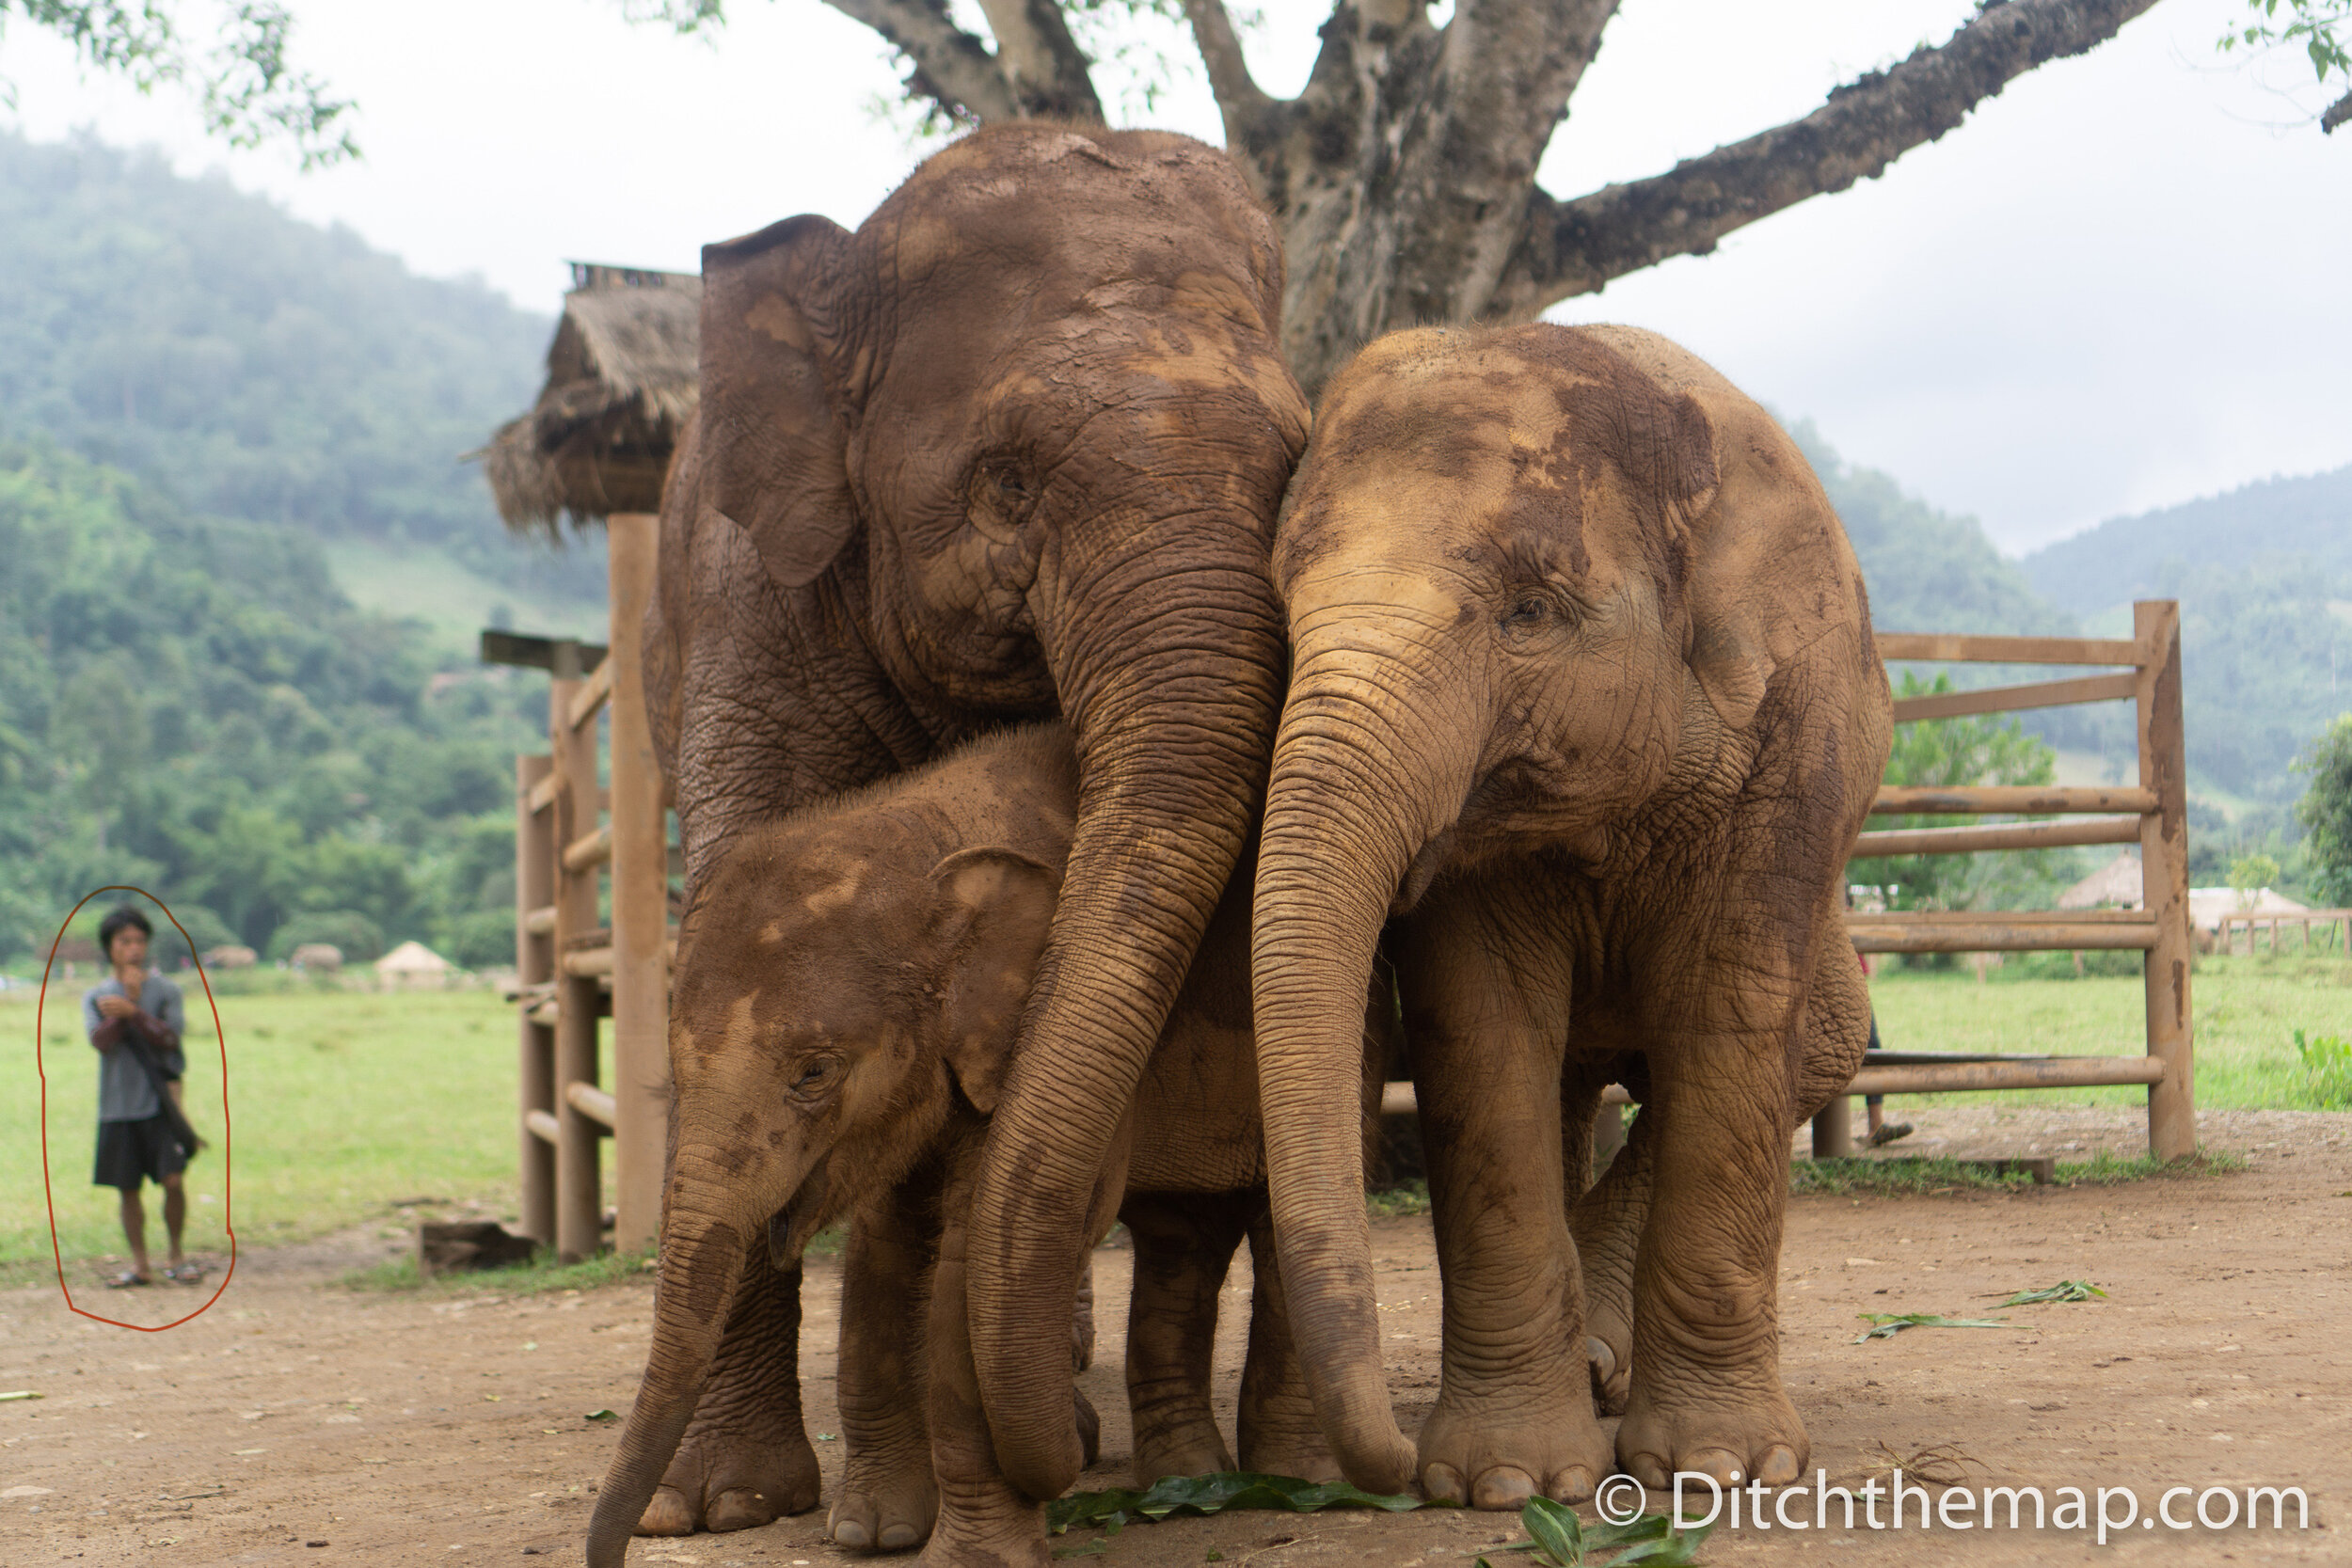
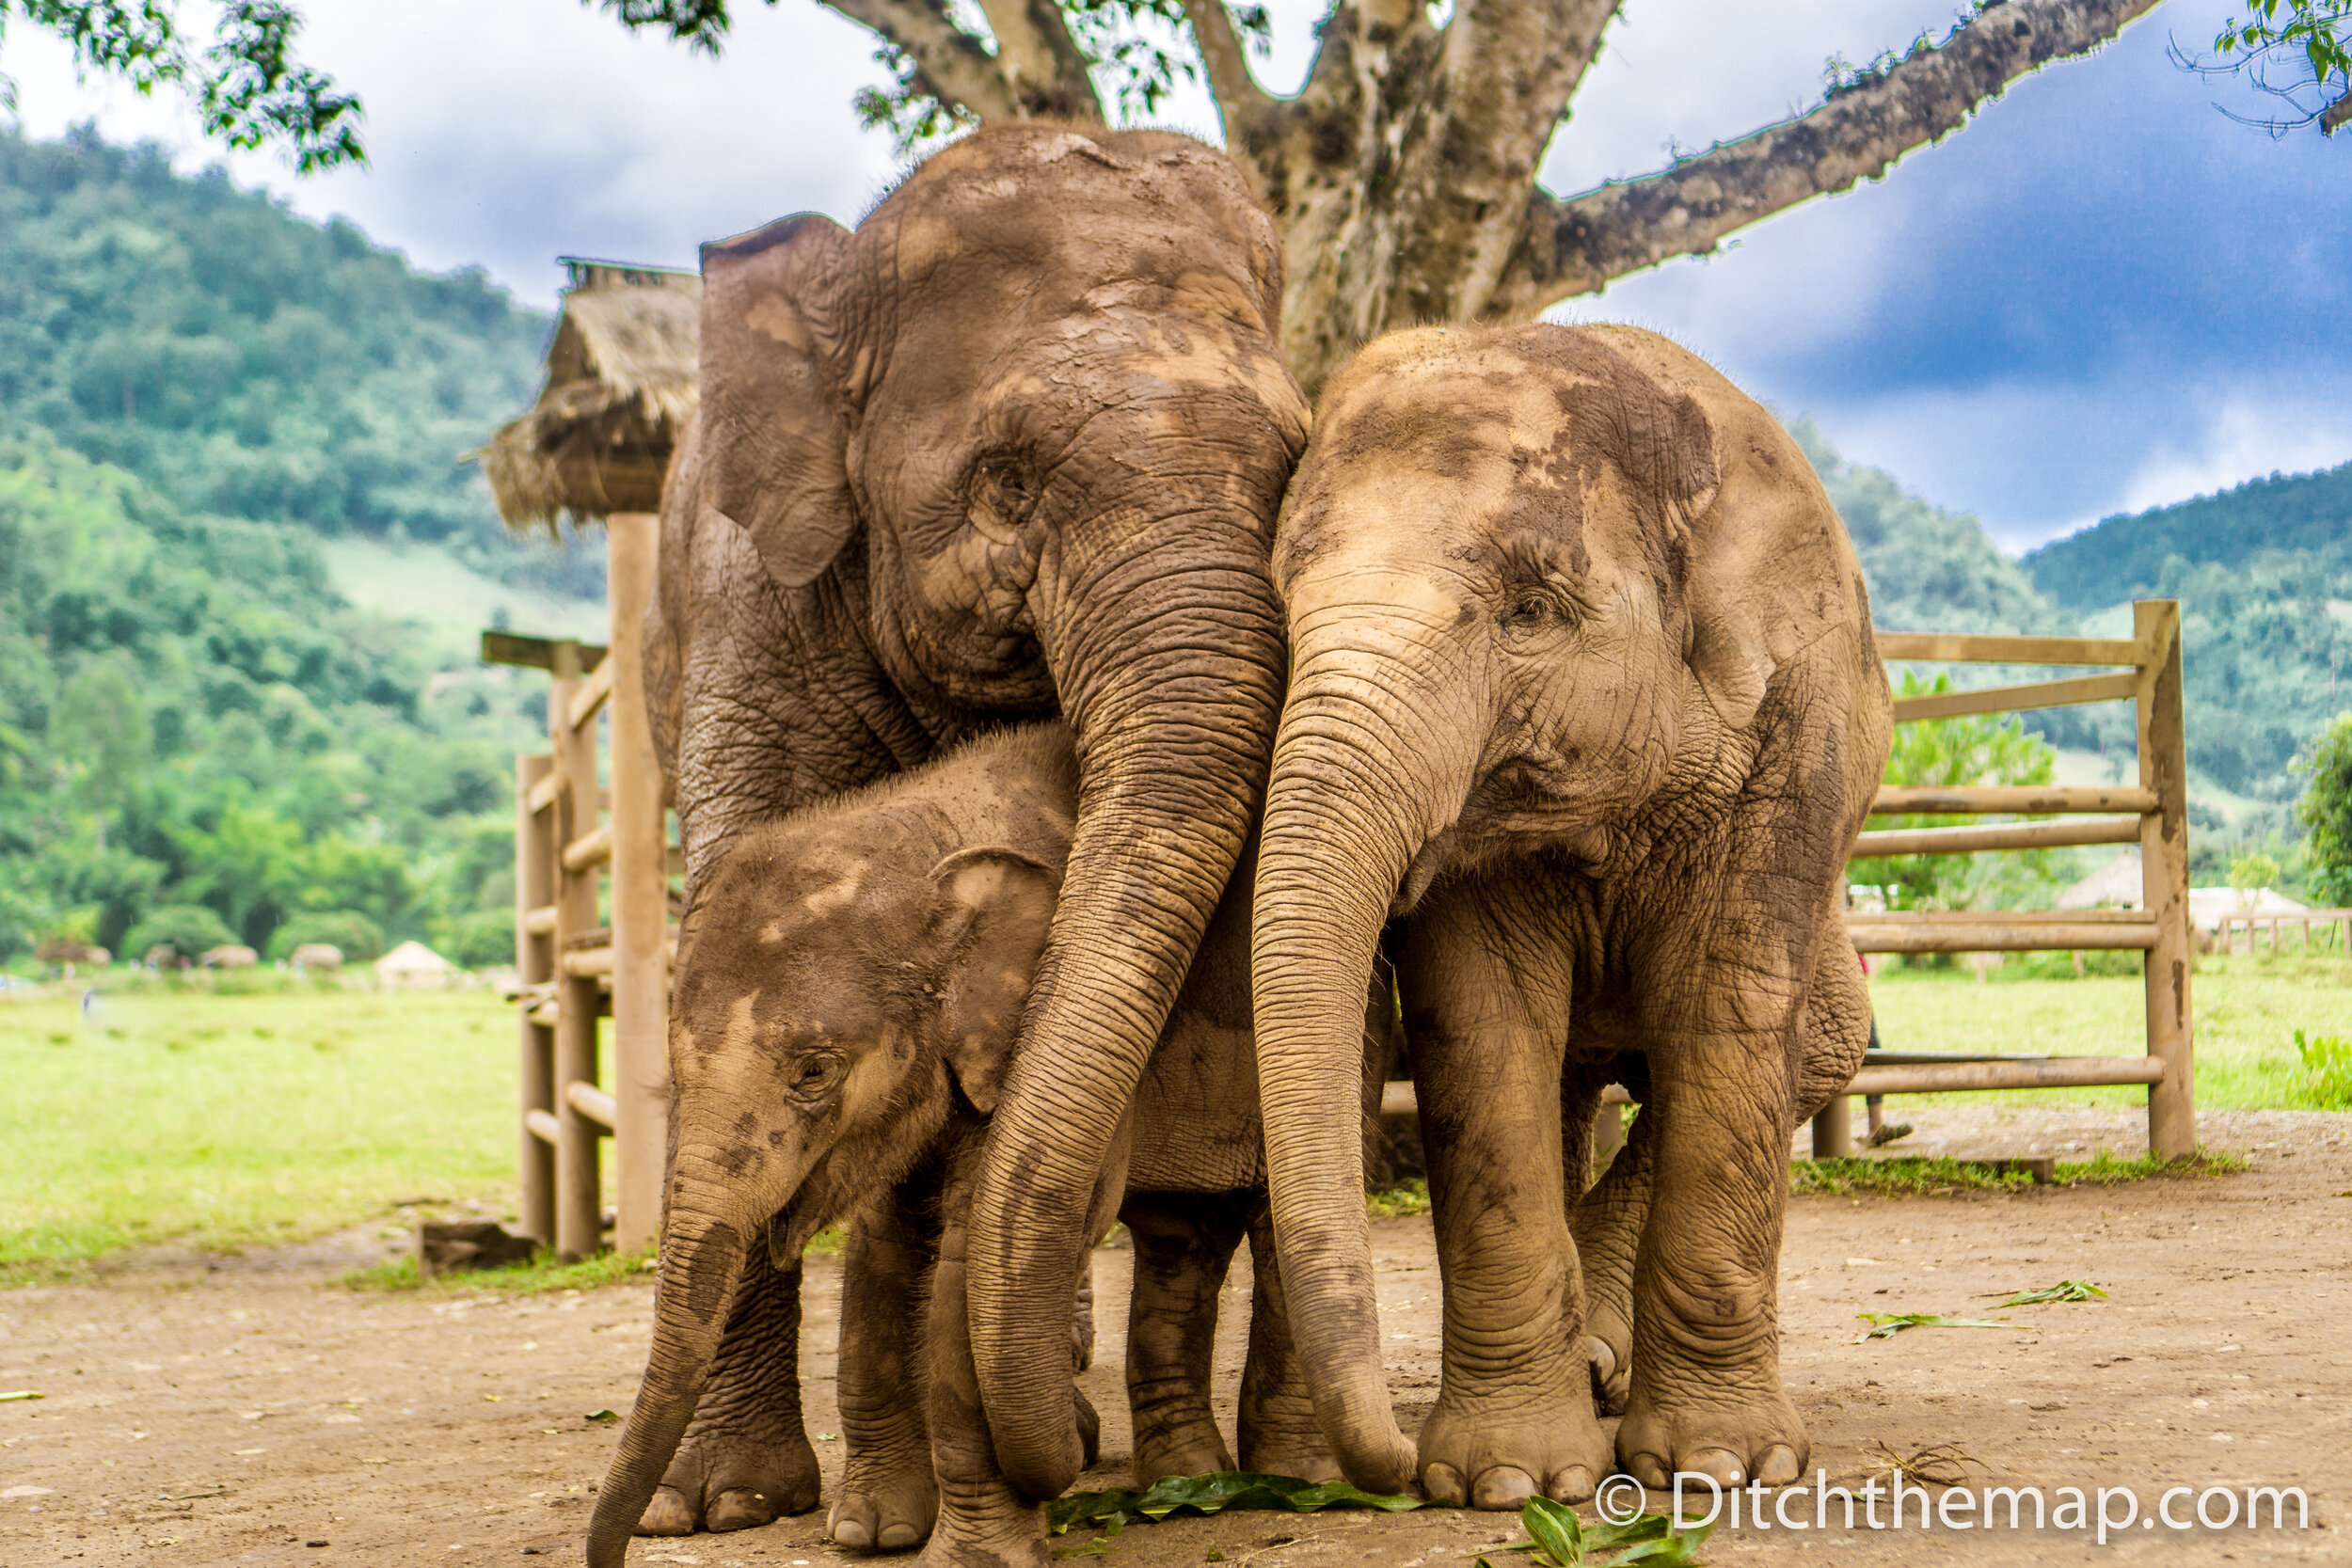
The sky looked boring in the photo with the elephants (below) so I pushed the colors—even though the sky looked fake I preferred it. I also removed the boy on side and brightened the elephants to being attention to them.
The photo below was cropped, a person removed, and the color in the sky was reproduced using HDR.
More important that what a photographer chooses to share is what they omit from their work. By curating their photos a story can be told—albeit a completely false story. Below are photos taken in Rishikesh, India during our 200-hr yoga retreat. The photo on the left shows a romantic and lovely scenic landscape taken from a tall building while the photos on the right depict the overwhelming reality—overcrowded and filthy streets with animals eating trash.


Although the landscape photo is great for a yoga school’s website since it inspires spiritual scenery I feel it is the job of a travel photographer to depict the true environment of a location and have the viewer ‘learn’ their own insights. Take for example the photo below. The photo shows Indian men sitting in a row during the early morning and accepting offerings from a local temple. It takes you on location and you feel like you are there.
It is difficult to know how much of a scene to include. Do you show all the trash in the streets, do you show the dirty sewer water overflowing into the store, etc.? As travel photographer you should know your subject before taking your photos. Are you trying to capture the trash, the poverty, the spirituality, the chaos? Only after you have selected your subject you can then frame your shot and capture that. Photos do not have to ‘do it all’. A photo that is riddled with trash, animals, and temples may make a great photo but do not expect a viewer to understand the message other than there is a lot going on.
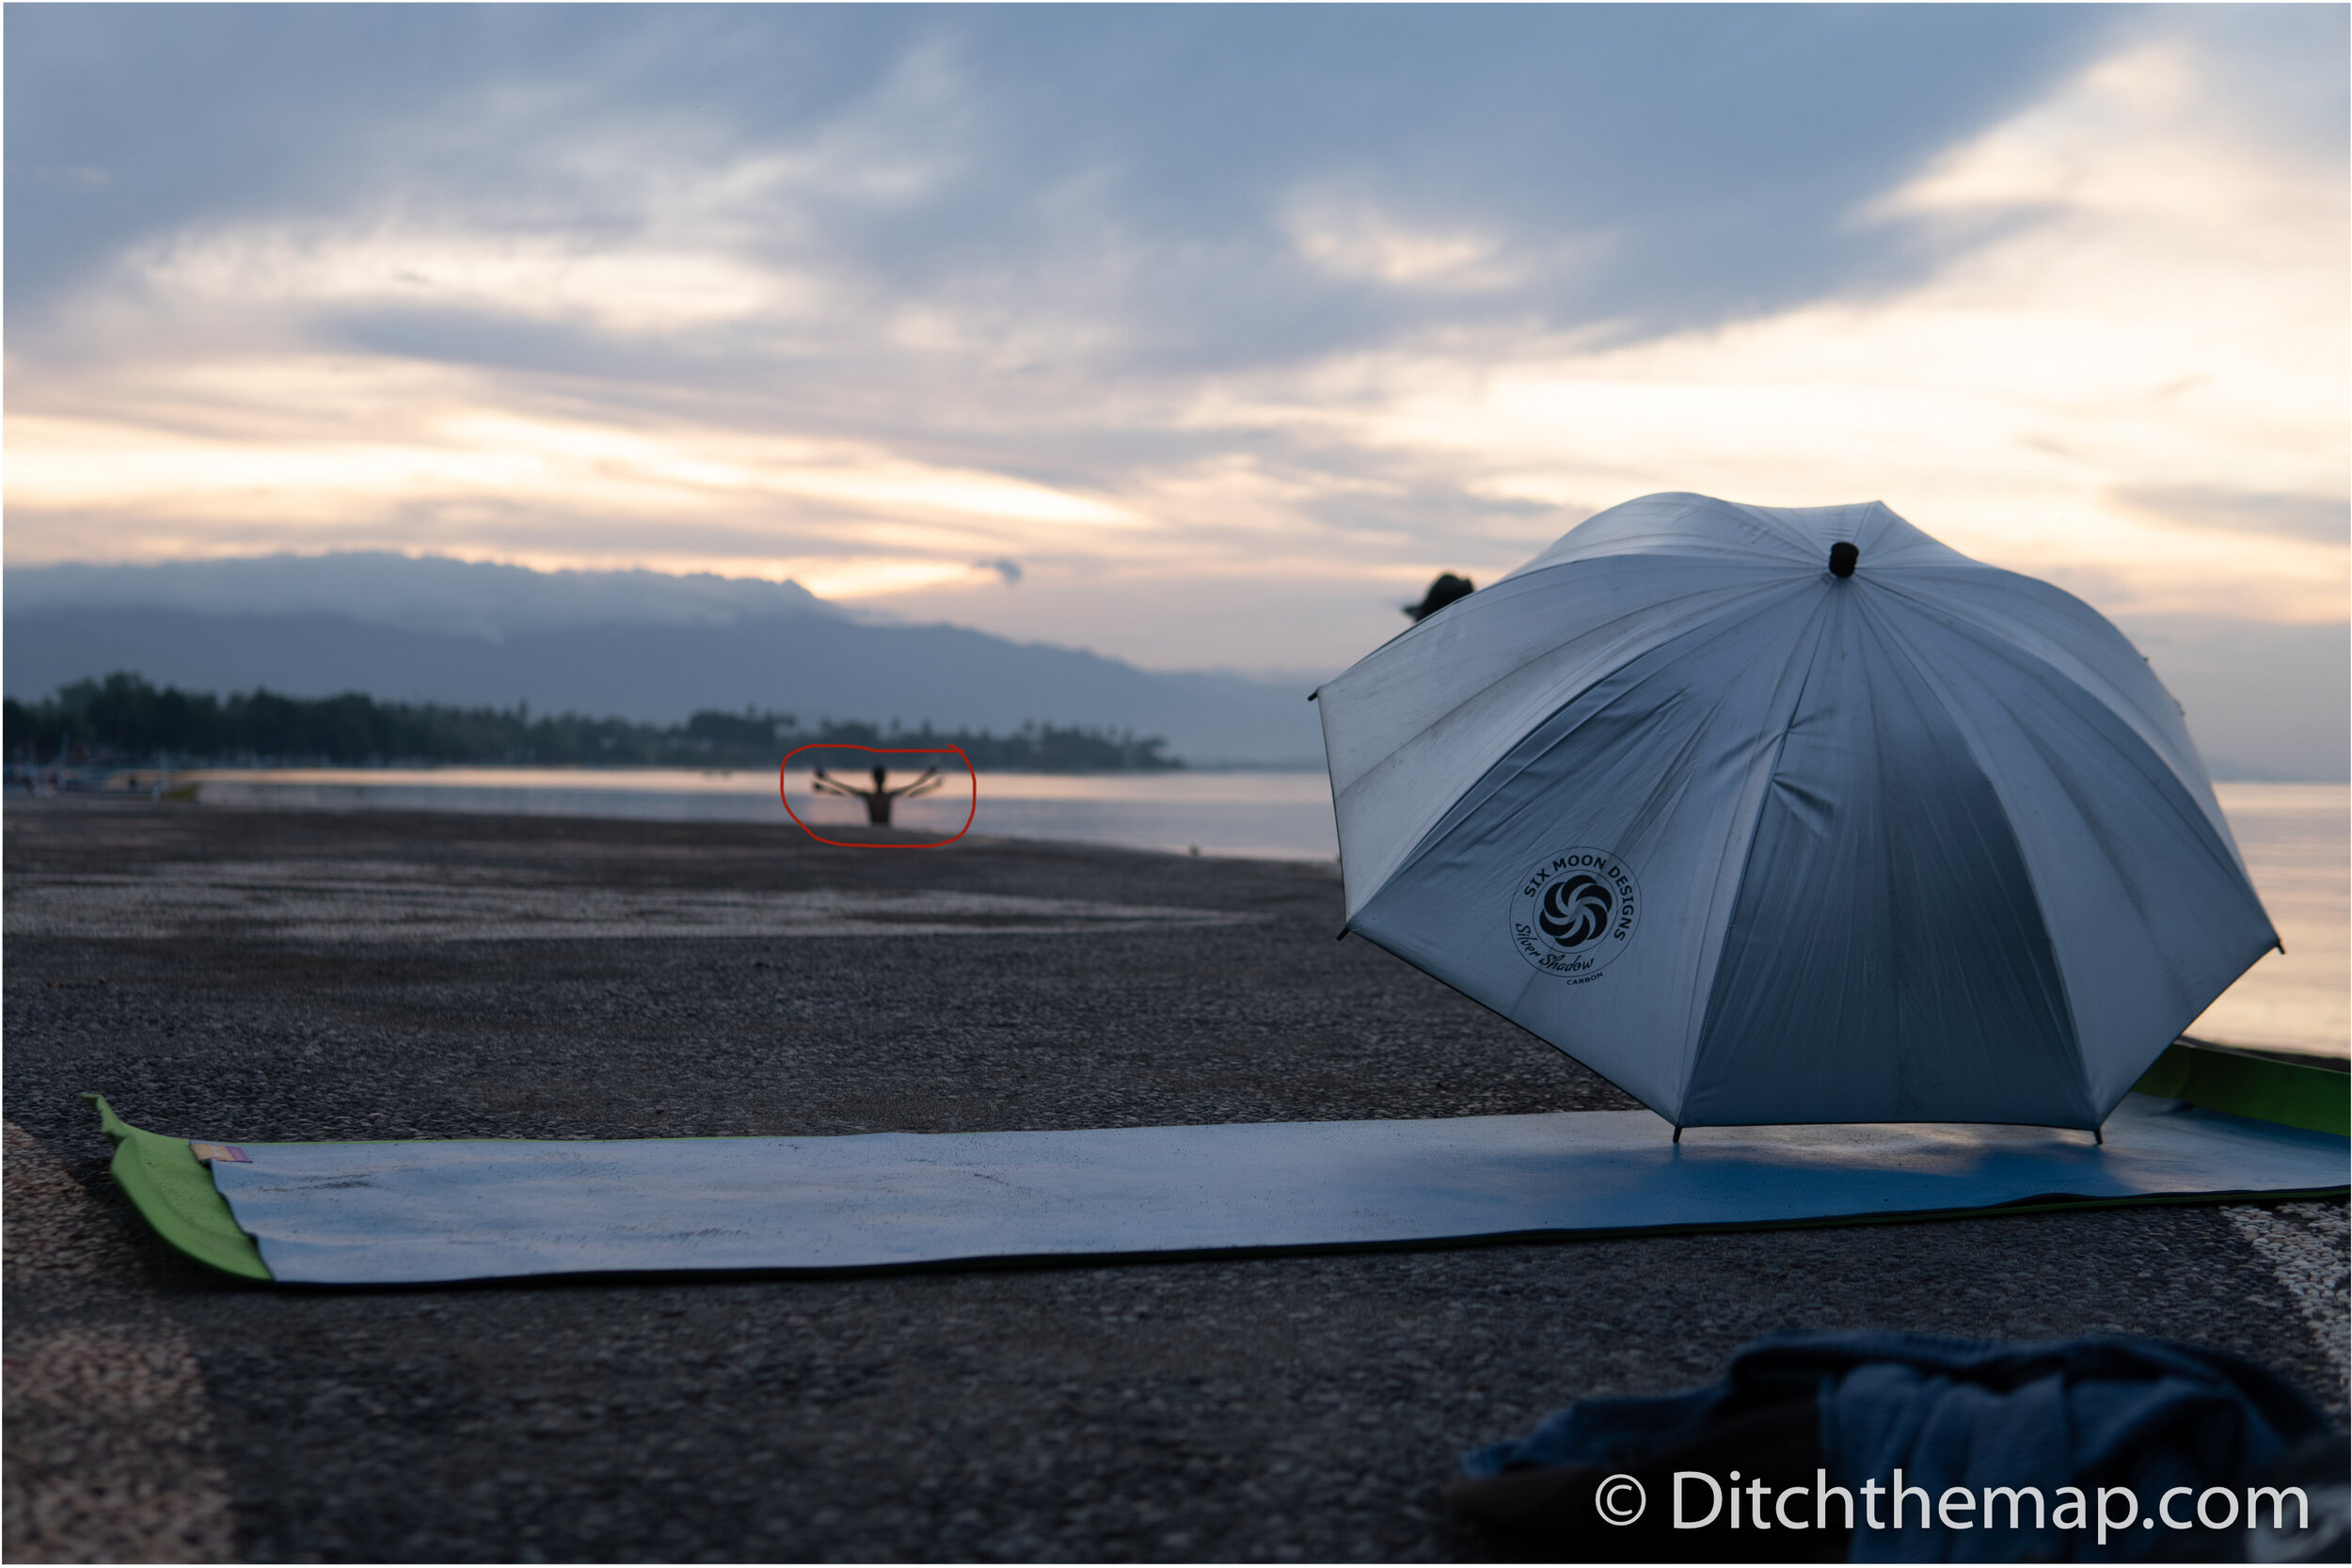
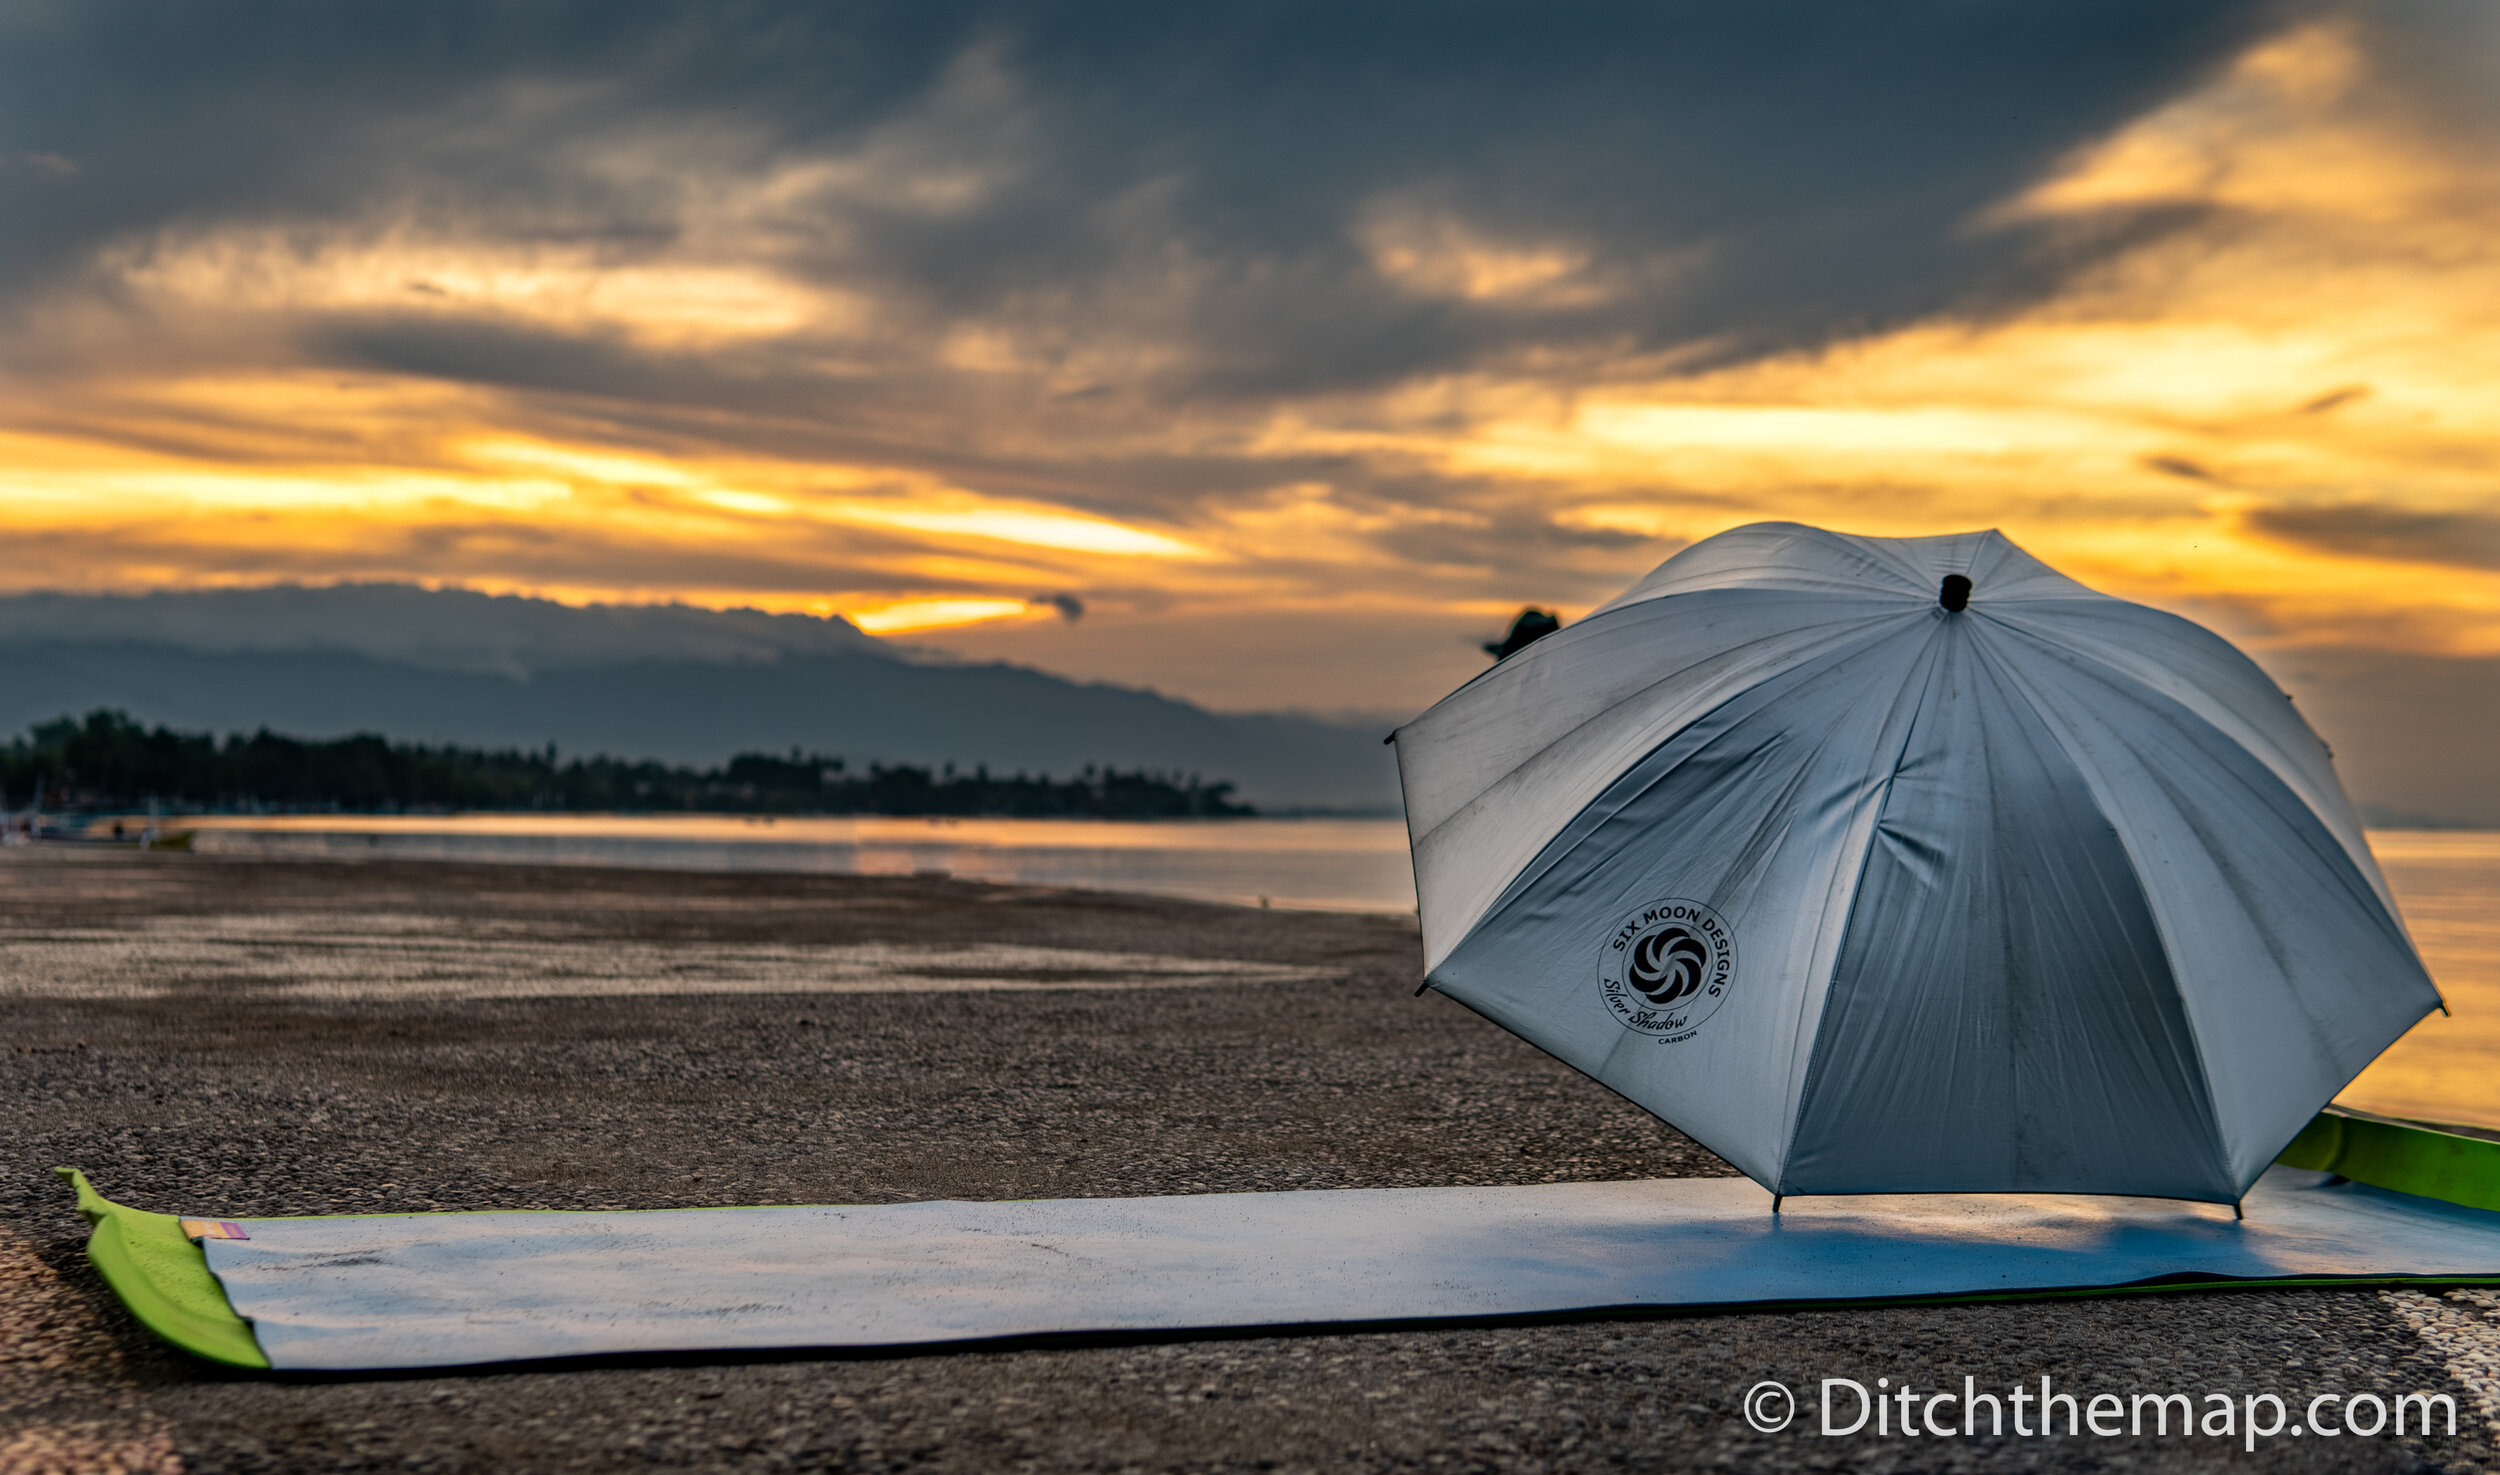
The photo below is not a great photo but illustrates my point. The middle photo is of the Old Faithful geyser. The photos on the left and right are of the people lined up to the left and right of me, respectively. By omitting the people in my show the geyser looks like it is being observed by only me, when in fact it was very crowded.


The photos below were taken within the same few minutes using the same zoom lens. The one on the left was taken with a wide focal length while the photo on the right was taken zoomed in. They are very different photos yet the subject is the same. Notice how there is more red and green in the leaves in the photo on the left. The clouds were playing a fun game with the sun up above, resulting in the leaves reflecting varying amounts of sunlight.
The photo on the bottom shows me framing and capturing the shots.


Don’t forget to PIN the photo below to save and share this article.